This article was published as a part of the Data Science Blogathon
Learn an effortless way of versioning the data, machine learning models, and monitoring model performance using the DAGsHub platform.
Introduction to DVC and DAGsHub
In this guide, we will learn about DVC and how DAGsHub makes it easy for Machine learning engineers to track various experiments. We are going to train our model on a synthesized Titanic dataset and run various experiments based on classification models. In the end, we will visualize and compare using DAGsHub interactive dashboards. Before we dive into coding, I wanted to give you guys a brief introduction to DVC, FastDS, and DAGsHub.
DVC
We have currently two options for using large files version control. The first one is git-lfs, which is a plug-in for a git-based repository. The git-lfs is quite slow and hard to handles so we have an alternative called DVC(data version control), which deals with large files such as datasets and machine learning models. DVC is built to assist mlops in handling large files, data sets, machine learning models, and metrics. It is commonly used to make machine learning experiments reproducible. Data Version Control · DVC
The DVC comes with a special ability to monitor changes in data and a faster push capability to a remote server. It shared functionality with a git-based system but it is stand-alone version control that specializes in dealing with big data.
FastDS
FastDS helps data scientists and machine learning engineers to assist them with Git and DVC so that they can version control code and data at once. FastDS was developed by DAGsHub to minimize human error and automate repetitive tasks. fastds · PyPI
This tool will make your life easy while dealing with Git and DVC
DAGsHub
DAGsHub is similar to GitHub which assists data scientists and machine learning engineers in sharing the data, models, experiments, and code. It allows you and your team to easily share, review, and reuse your work, providing a GitHub experience for machine learning. DAGsHub Docs
DAGsHub is more than that, it comes with experiments, mlflow integration, machine learning pipeline visualization, performance metrics comparison, and visualizations. The best part of using DAGsHub is how it’s easy to play around with different features and how the whole platform is focused on assisting data scientists and machine learning engineers.
Building Machine Learning Model using DAGsHub
In this machine learning project, we are going to learn how to use the DAGsHub library for tracking hyperparameters and performance metrics. We will be working on the simple Titanic dataset to predict the survival of passengers by experimenting on 3 distinct machine learning models and eventually checking our model performance on Kaggle Tabular competition. The project involves multiple tools, and we are going to learn how to use them to make tracking experiments easy.
Titanic Dataset
The dataset is used for this competition is synthetic but based on a real dataset (in this case, the actual Titanic data!) and generated using a CTGAN. The Dataset is available at Tabular Playground Series – Apr 2021 | Kaggle .
We have three files available in the Data folder, test.csv, train.csv, and submission.csv. We will be splitting the train data set into train and test dataframe for training and validation. The final submission will be made by predicting survival on the test dataset.
The information about variables clearly explains what each column contains, and we will be using this information for feature engineering.
Data Dictionary
| Variable | Definition | Key |
|---|---|---|
| survival | Survival | 0 = No, 1 = Yes |
| pclass | Ticket class | 1 = 1st, 2 = 2nd, 3 = 3rd |
| sex | Sex | |
| Age | Age in years | |
| sibsp | # of siblings / spouses aboard the Titanic | |
| parch | # of parents / children aboard the Titanic | |
| ticket | Ticket number | |
| fare | Passenger fare | |
| cabin | Cabin number | |
| embarked | Port of Embarkation | C = Cherbourg, Q = Queenstown, S = Southampton |
pclass containing the socio-economic status of passengers: Upper, Middle, and Lower. The age is rational if it’s less than 1 for example xx.5. The sibsp defines family relation in form of sibling and spouse. Finally, the parch defines family relationships in form of parent and child.
This dataset is synthesized using CTGAN to avoid cheating and getting a perfect score in Kaggle competitions. If your model performed well here, obviously you will have a superior algorithm.
Import
- dagshub library for tracking performance metrics and hyperparameters.
- pandas for dataframe, NumPy for data augmentation.
- sklearn for feature engineering and machine learning models
- joblib for save our model
import dagshub
import pandas as pd
from sklearn import preprocessing
from sklearn.linear_model import SGDClassifier
from sklearn.tree import DecisionTreeClassifier
from sklearn.ensemble import RandomForestClassifier
from sklearn.metrics import (
    roc_auc_score,
    average_precision_score,
    accuracy_score,
    precision_score,
    recall_score,
    f1_score,
)
from sklearn.model_selection import train_test_split
import joblib
import numpy as np
Constant Variable
We are going to drop Name, SibSp, Parch, and Ticket to simplify our dataset. Our main focus is to learn DVC and dagshub experiments. We will keep our dataset and model architect simple.
- Setting target column as Survived.
- adding train, test, and submission file path.
drop_cols = ["Name", "SibSp", "Parch", "Ticket"]
obj_col = "Survived"
train_df_path = "Data/train.csv"
test_df_path = "Data/test.csv"
sub_df_path = "Data/sample_submission.csv"
Feature Engineering
In these functions we are :
- cleaning Cabin column
- creating a new column by combining SibSp and Parch.
def feature_engineering(raw_df):
    df = raw_df.copy()
    df["Cabin"] = df["Cabin"].apply(lambda x: x[:1] if x is not np.nan else np.nan)
    df["Family"] = df["SibSp"] + df["Parch"]
    return df
Model Building
All three experiments are related to this function as we are going to change SGDClassifier to another sklearn classifier. Our main focus will be to monitor our accuracy score on both test and train performance metrics. For a baseline, we are using a simple SGDClassifier with loss=”modified_huber”.
def fit_model(train_X, train_y, random_state=42):
    clf = SGDClassifier(loss="modified_huber", random_state=random_state)
    clf.fit(train_X, train_y)
    return clf
Categorical Features
Before we can train our model, we need to convert categorical data to numerical data by using Label Encoder. In our case, we have Sex, Cabin, and Embarked as categorical columns.
def to_category(train_df, test_df):
    cat = ["Sex", "Cabin", "Embarked"]
    for col in cat:
        le = preprocessing.LabelEncoder()
        train_df[col] = le.fit_transform(train_df[col])
        test_df[col] = le.transform(test_df[col])
    return train_df, test_df
Evaluation
This function takes a model, X, and y to return a dictionary containing all possible metrics for binary classification. For AUC and average precision score we will be using predict probabilities, but for the rest of the metrics, we will be using simple prediction that will return either 1 or 0.
def eval_model(clf, X, y):
    y_proba = clf.predict_proba(X)[:, 1]
    y_pred = clf.predict(X)
    return {
        "roc_auc": roc_auc_score(y, y_proba),
        "average_precision": average_precision_score(y, y_proba),
        "accuracy": accuracy_score(y, y_pred),
        "precision": precision_score(y, y_pred),
        "recall": recall_score(y, y_pred),
        "f1": f1_score(y, y_pred),
    }
Submission
The submission function will predict survivors on the test dataset and save the dataframe in CSV for us to check model performance on both public and private datasets.
def submission(clf, X):
    sub = pd.read_csv(sub_df_path)
    sub[obj_col] = clf.predict(X)
    sub.to_csv("Submission/submission.csv", index=False)
Train Function
This function is the main function, which will run all of the above functions in sequence.
- load both train and test datasets.
- apply feature engineering function on both train and test_df
- drops unwanted columns
- convert categorical columns into numerical using label encoder
- fill missing values with zero
- run dagshub_logger to create metric.csv and params.yml
- split train dataset into train and test
- train our classifier model
- saving model as .joblib
- logging hyperparameters which store data in params.yml
- run evaluation on both train and test
- logging evaluation metrics which are saved in metric.csv
- creating submission file.
The main takeaway is that how the dagshub library makes our life easy for tracking performance and parameters. The DAGsHub platform looks at both metric.csv and params.yml to create an interactive visualization in the experimentation tab.
You can also do experiments logging by creating a python object too.
If you are interested in experimenting with various other ways to log params and metrics I will suggest you check out the docs DAGsHub Docs and tutorials.
def train():
    print("Loading data...")
    df_train = pd.read_csv(train_df_path, index_col="PassengerId")
    df_test = pd.read_csv(test_df_path, index_col="PassengerId")
    print("Engineering features...")
    y = df_train[obj_col]
    X = feature_engineering(df_train).drop(drop_cols + [obj_col], axis=1)
    test_df = feature_engineering(df_test).drop(drop_cols, axis=1)
    X, test_df = to_category(X, test_df)
    X.fillna(0, inplace=True)
    test_df.fillna(0, inplace=True)
    with dagshub.dagshub_logger() as logger:
        print("Training model...")
        X_train, X_test, y_train, y_test = train_test_split(
            X, y, test_size=0.33, random_state=42, stratify=y
        )
        model = fit_model(X_train, y_train)
        print("Saving trained model...")
        joblib.dump(model, "Model/model.joblib")
        logger.log_hyperparams(model_class=type(model).__name__)
        logger.log_hyperparams({"model": model.get_params()})
        print("Evaluating model...")
        train_metrics = eval_model(model, X_train, y_train)
        print("Train metrics:")
        print(train_metrics)
        logger.log_metrics({f"train__{k}": v for k, v in train_metrics.items()})
        test_metrics = eval_model(model, X_test, y_test)
        print("Test metrics:")
        print(test_metrics)
        logger.log_metrics({f"test__{k}": v for k, v in test_metrics.items()})
        print("Creating Submission File...")
        submission(model, test_df)
if __name__ == "__main__":
    train()
We need to experiment with all our functions in the Jupyter notebook and when we think there are now bugs in our code then we create a main.py file with all the code. To run this file, we will just type `python main.py` in the terminal.
DAGsHub Repo
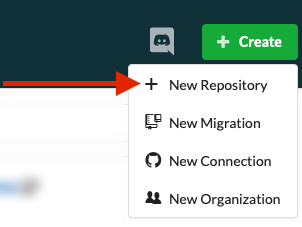
First, you need to create an account on DAGsHub and if you already have an account you can just click on create button and then New Repository as shown below.
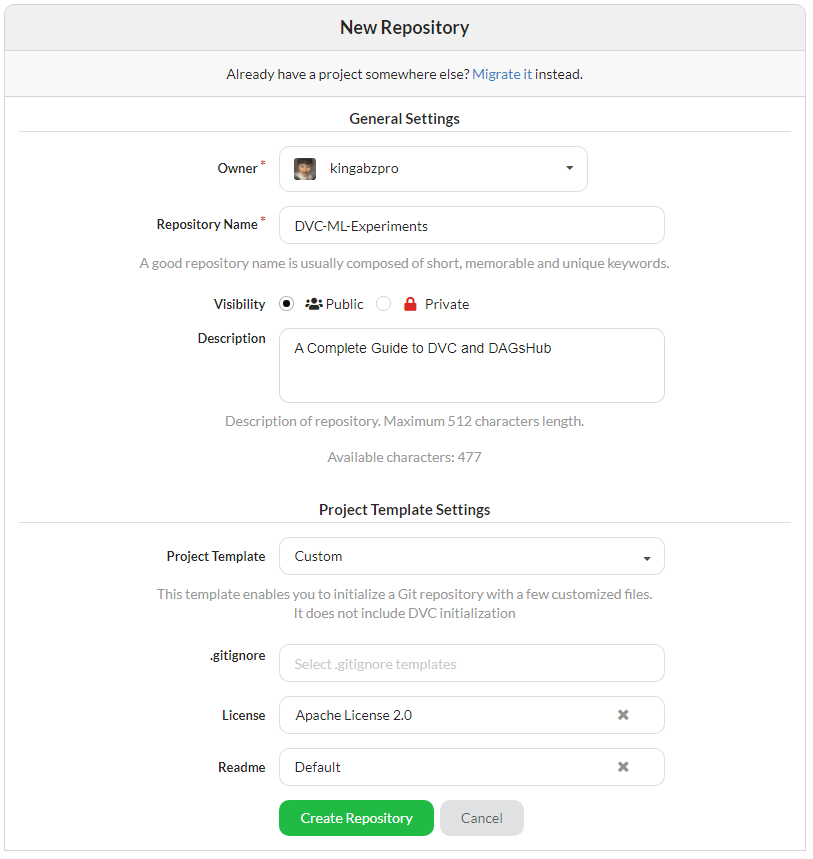
Add your repository name and description. If you want to add license or readme you can do that all from this tab and finally click on create a repository.
FastDS, Git, and DVC
Before we initialize, we need to create a project folder and install fastds / dvc. After that create the folder Data, Model, and Submission. Finally, initialize both Git and DVC with one command `fds init`
pip install fastds
pip install dvc
mkdir -p Data Model Submission
fds init

We can use fds to add all three folders into dvc but two of our folders are empty as we haven’t run the main python file. The fds CLI will ask you about the Data folder and add it to dvc but the rest of the folder will be ignored so we need to add them manually by using `dvc add`. After adding a folder to dvc we need to add these folders into gitignore so that they won’t be tracked by git version control. DVC is similar to Git but it is quite flexible in track larger files such as models and datasets greater than 100 MB.
fds add Model Data Submission
dvc add Model
git add Model.dvc . gitignore

We are going to do similar action for the Submission folder as we are also tracking submission.csv
dvc add Submission
git add Submission.dvc . gitignore
The image below contains the helping command to set up your git and dvc remote server.
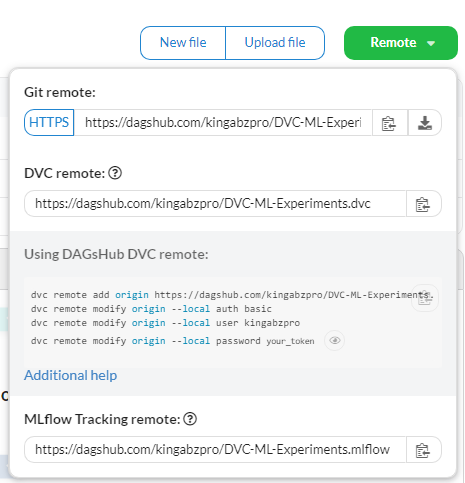
First, we are going to add git remote serve by adding our repository URL which you can copy from a remote button in your DagsHub repository. Then, we are going to add dvc remote by adding the remote server link, username, and password. You are all set after that. Good Job
git remote add origin https://dagshub.com//.git
dvc remote add origin https://dagshub.com/kingabzpro/DVC-ML-Experiments.dvc
dvc remote modify origin --local auth basic
dvc remote modify origin --local user kingabzpro
dvc remote modify origin --local password your_token
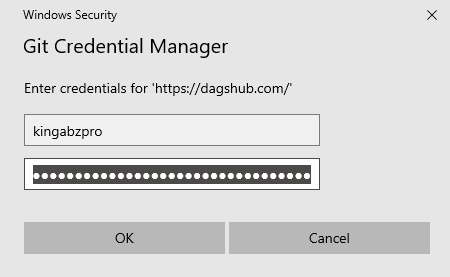
Now you need to commit and push your code to remote the server by using git add, git commit and git push.
git add .
git commit -m "Initialized project"
git push -u origin master
The security window will pop up if you are using it for the first time. You just need to add your user name and private token to get started.
Models and Experiments on DAGsHub
In this section, we will work on three experiments using three different machine learning models and we are going to learn how to commit and push both Git and DVC to DAGsHub. Finally, we will compare the results and explore amazing metric visualizations.
Experiment #1
Running our first experiment with baseline code and a simple SGD Classifier. Running python file did print some train and test metrics but I have removed it to simply final comparisons.
python main.py
Loading data...
Engineering features...
Training model...
Saving trained model...
Evaluating model...
Creating Submission File...
We will be committing changes for dvc and git after an initial run to set the baseline. The code below show how simple it is to commit changes and then push those changes to a remote server
dvc commit -f Model.dvc Submission.dvc
git add Model.dvc Submission.dvc main.py metrics.csv params.yml
git commit -m "SGDClassifier"
Using git/dvc push we can push our data, model, and code to a remote server.
git push --all
dvc push -r origin
The image below shows how your repository should look like after the first run.

We will click on the experiment tab and explore our results. I have removed some additional columns and then I will be renaming the experiment name next. You can also play around with other options to make your results look easy to understand.
Our test accuracy is 60 percent which is quite bad and the f1 score is super bad with 0.17. We need to select another model or try different techniques to get better results.

Experiment #2
In the second experiment, we will be changing our model to DecisionTreeClassifier and then run the entire process again.
- Run main.py
- commit both git and dvc
- push git and dvc
python main.py
dvc commit -f Model.dvc Submission.dvc
git add Model.dvc Submission.dvc main.py metrics.csv params.yml
git commit -m “DecisionTreeClassifier”
git push –all
dvc push -r origin

As we can see in the image above that we have another experiment with better results. The decision tree performed quite well as compared to SGD Classifier. We can also explore all the metrics and parameters in detail by clicking on the specific experiment as shown below.
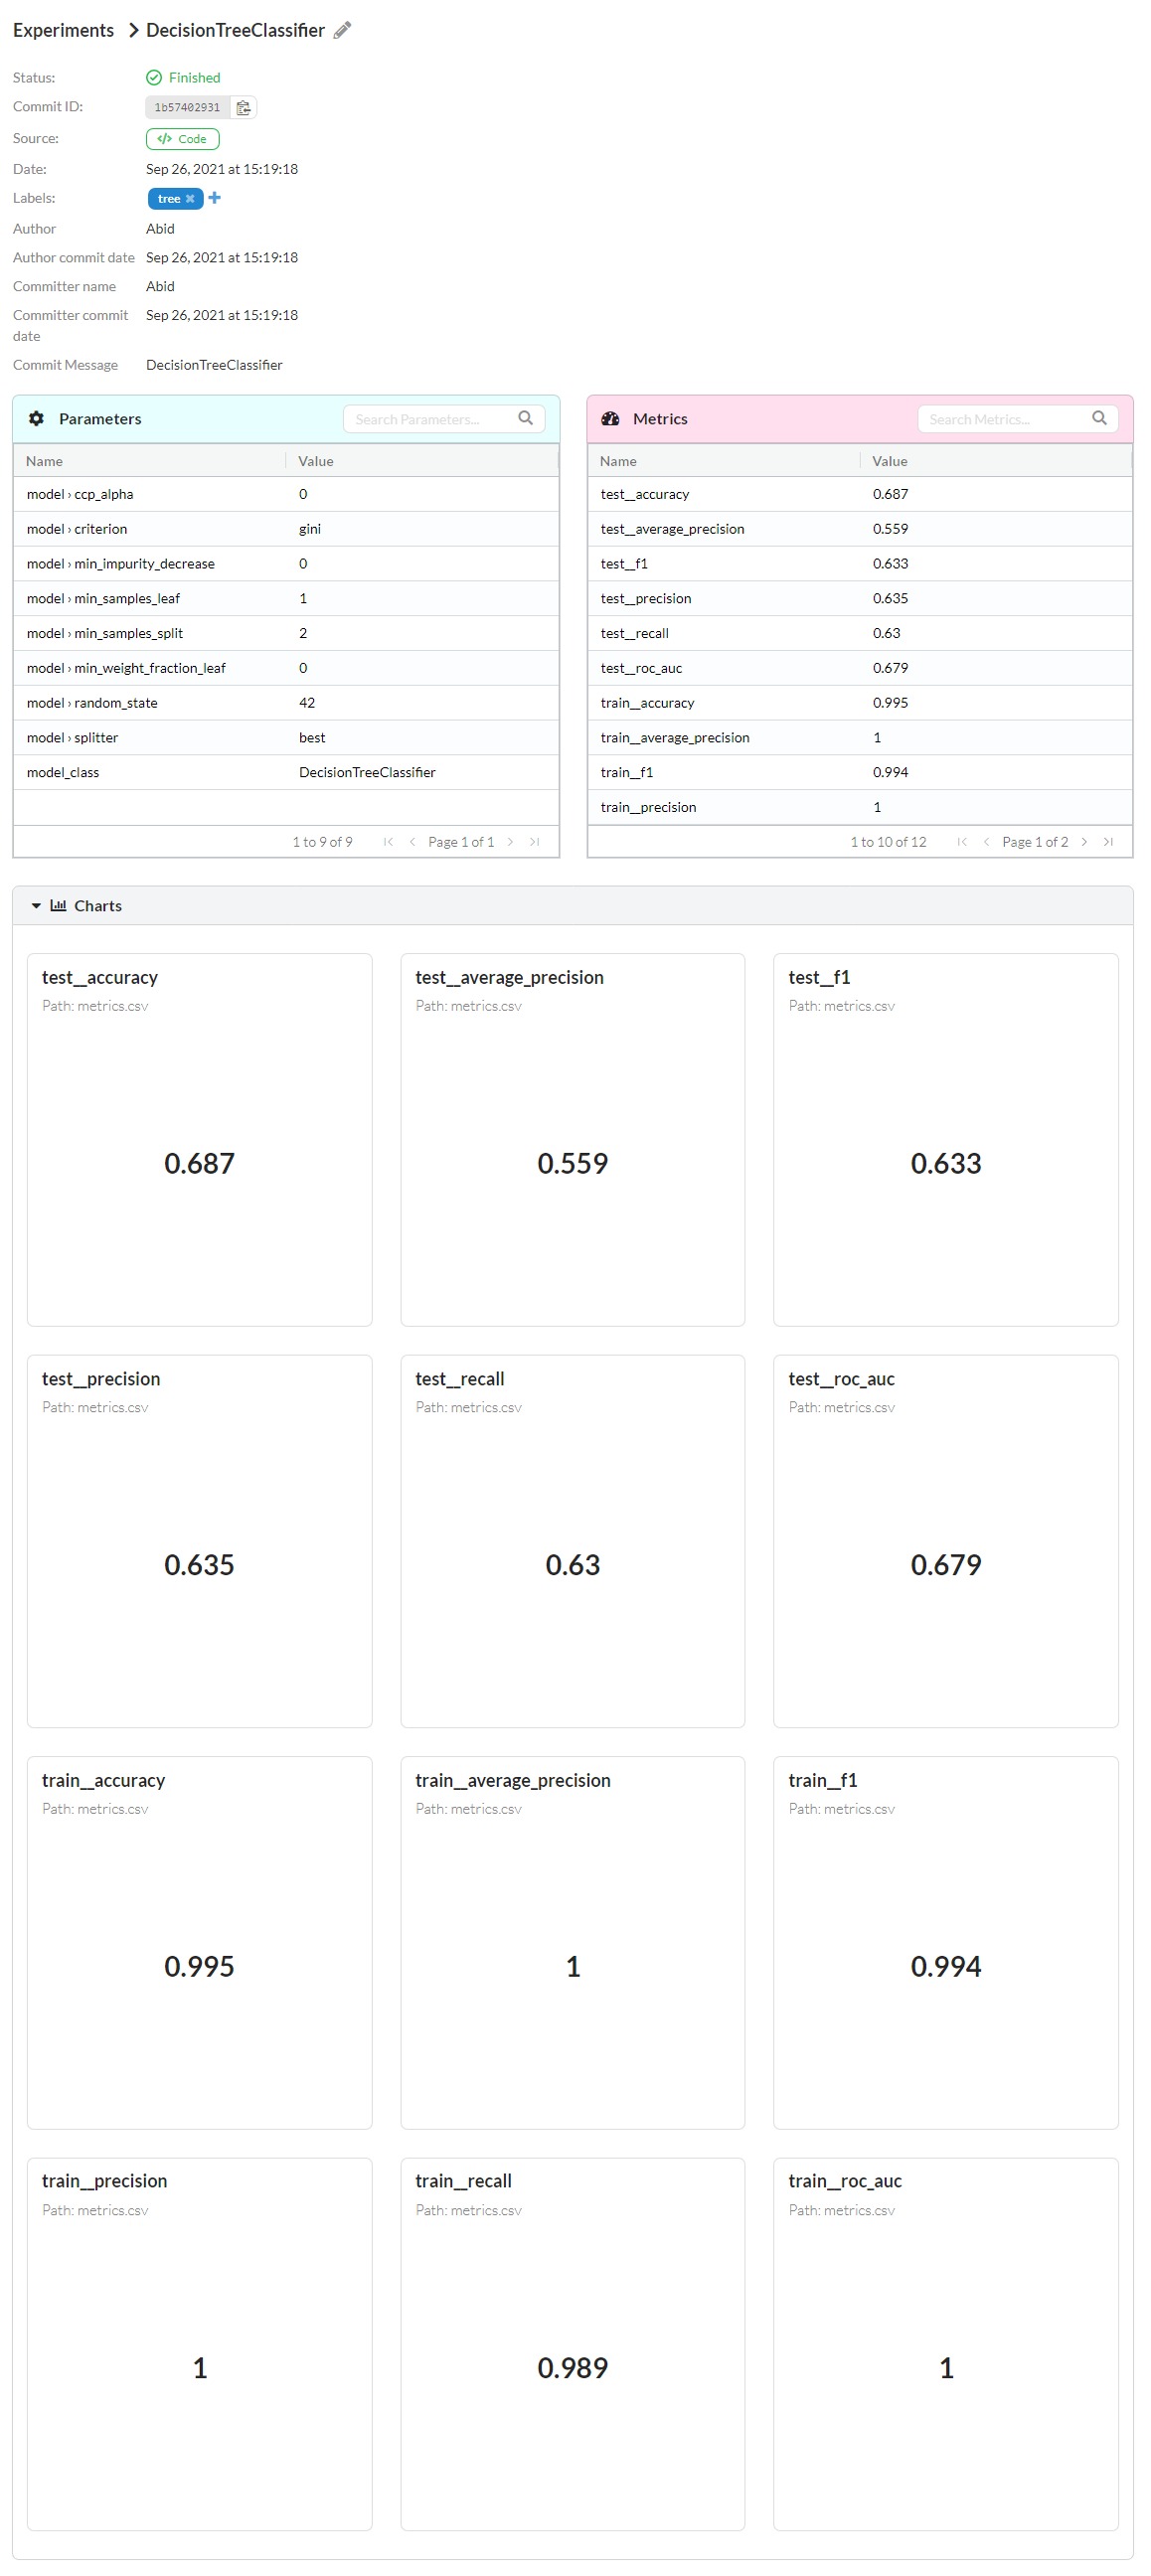
We have quite balanced results, and we will be improving them by using the ensemble model.
Experiment #3
In the third experiment, we will be changing our model to Random Forest Classifier and then run the entire process again. By now we are experts are running experiments and pushing it to DAGsHub.
python main.py
dvc commit -f Model.dvc Submission.dvc
git add Model.dvc Submission.dvc main.py metrics.csv params.yml
git commit -m "RandomForestClassifier"
git push --all
dvc push -r origin
After pushing our third experiment we will be comparing all three results by selecting all three commits and clicking on compare button as shown below.

As you can see below how it’s easy for us to compare different results. You will either receive a line chart or a bar chart depending on your metrics. It is quite clear that Random Forest performed quite well in accuracy and f1 score.
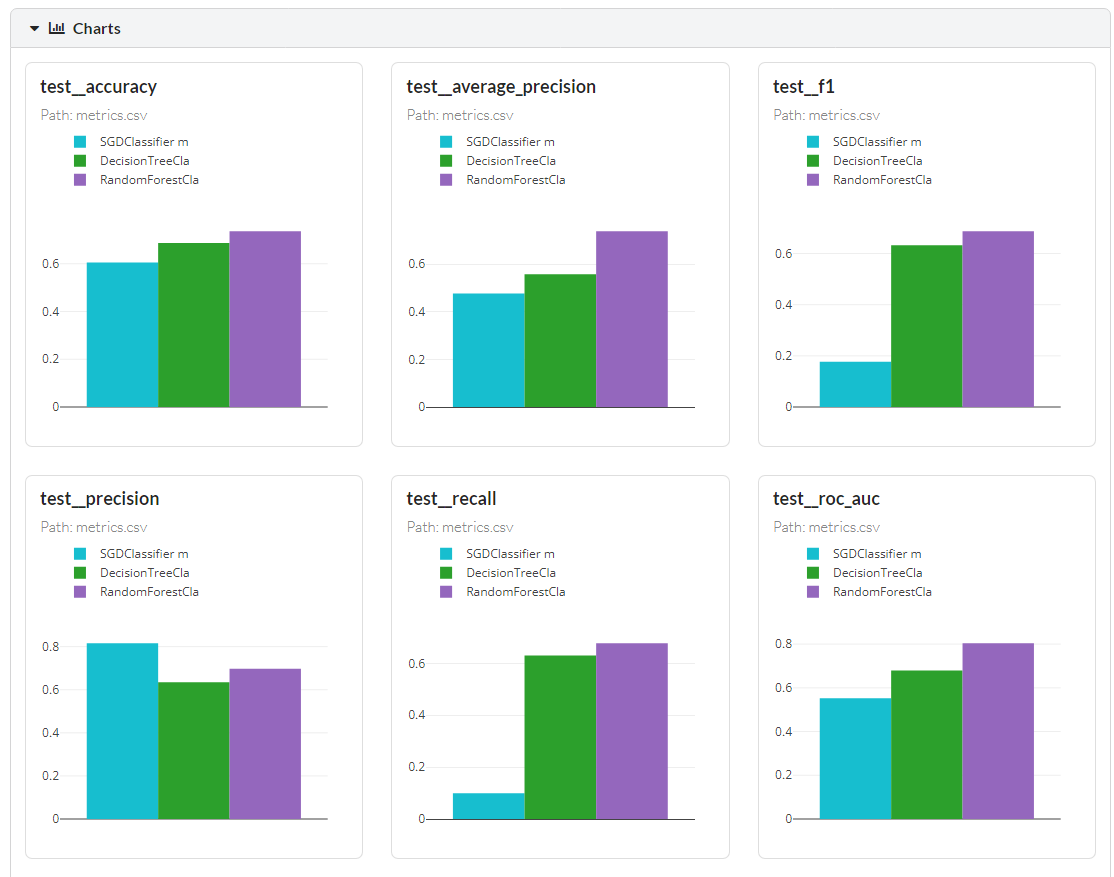
You can scroll down to even check train metrics and detail comparison of all three experiments.
Private Dataset Score
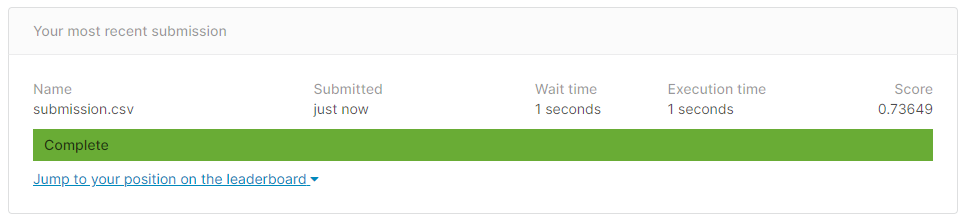
Let’s take our best-performing model `submission.csv` and check our result on the private hidden dataset. As you can see our model performs quite well with 0.7364 accuracy. You can also check your model performance by submitting it to Kaggle completion or by using Kaggle CLI.
kaggle competitions submit -c tabular-playground-series-apr-2021 -f submission.csv -m "Message"
Conclusion
In this guide, we have learned how to use various tools to get started with machine learning experiments and how powerful the DAGsHub platform is. Normally we use git-lfs for large files but it is quite slow, and you might not get a better versioning system. This is why DVC is a better choice for data science version systems as we have to deal with quite a large number of files and models. We have also learned how to use fastds and how to create experiments metrics using the dagshub python library. MLflow is another method supported by DAGsHub platform for tracking metrics and model performance. The platform also offered the ability to visualize the data or machine learning pipelines, which can be quite helpful if you are dealing with complex infrastructure. Overall, we have learned how to use a simple machine learning model to predict survivors of titanic and use tools to track parameters and performance metrics.
DAGsHub Experiments comes with flexible options to add tags, rename experiments and simplify columns. It also provides a detailed summary of each experiment and allows us to compare various experiments by using visualization.
I had fun playing around with the experiments and pushing them to the DAGsHub server. For future reference, we can train a deep learning model using TensorFlow and use MLflow to track the model performance. We can also create a machine learning pipeline so that it will run in a specific sequence and help us visualize the entire machine learning architecture with the help of DAGshub.
Source Code
You can find the repository with code and experiments on DAGsHub kingabzpro/DVC-ML-Experiments: A Complete Guide to DVC and DAGsHub. I suggest you fork my repository and experiment yourself. DAGsHub is quite interactive, and you will fall in love immediately.
Exciting DAGsHub Projects with Experiments
- When Does Self-supervision Improve Few-shot Learning? – A Reproducibility Report: arjun2000ashok/FSL-SSL
- This repository is a reimplementation of deep-explanation-penalization in Python 3.8 and TensorFlow 2.4: ShaileshSridhar2403/Re-CDEP
- This project uses all the features available in DAGsHub to predict survival on the Kaggle Titanic dataset: jnirschl/titanic_dvc
Learning Resources
- To take complete tutorial of DAGsHub Experiments: Overview – DAGsHub Docs
- Watch video tutorial about DVC and Data Versioning: Versioning Data with DVC (Hands-On Tutorial!) – YouTube
- Learn how to deal with Titanic dataset and produce best possible results: Kaggle Titanic: Machine Learning model (top 7%) | by Sanjay.M | Towards Data Science
- Learn about MLflow: Introduction To MLflow-An Open Source Platform for the Machine Learning Lifecycle – YouTube
- Learn about FastDS: FastDS (dagshub.com)
- Top scorer solution in Kaggle competition: DAE + Stacking CV Classifier | Kaggle
Author
Abid Ali Awan
I am a certified data scientist professional, who loves building machine learning models and research on the latest AI technologies. I am currently testing AI Products at PEC-PITC, which later get approved for human trials for example Breast Cancer Classifier.
You can follow me on LinkedIn and Polywork where I post my article weekly.
I am a technology manager turned data scientist who loves building machine learning models and research on various AI technologies. My vision is to build an AI product that will help identify students who are struggling with mental illness.


