This article was published as a part of the Data Science Blogathon.
Implement Jinja in Flask, FastAPI, Django, and many more to come
Web 2.0 has introduced the concept of delivering user-centric interactive content. In the very early stage of the internet, the content delivered had static files. Fast forward to the current situation: Everything you consume is dynamically generated. The website content changes according to the user inputs and the logic for implementing such changes involves additional scripting via the server or client-side.

Introduction to Jinja Template
Web development using Python is one of the most preferred projects after Data Science and Machine Learning. Every Python learner is advised to adopt at least one web development framework using Python. Some of the most popular choices include Flask, Django, and FastAPI. One thing that is common among all these frameworks is the use of templating engines.
Templating engines allow us to pass the data from the server-side to HTML pages (also support any text file and XML, CSV, LaTeX, etc) whenever the user makes the request. This also allows us to build interactive websites with less effort plus the support for the Object-Oriented paradigm on the abstract level (inheritance) for web pages nails it.
Jinja is one such template engine that is used extensively in Flask and FastAPI. Django’s Templating engine is also very much similar to Jinja with a few differences which are thoroughly discussed here. Here, I will cover everything from basic to advanced Jinja templating. All the sections are placed in the increasing order of difficulty.
Setting up Flask Server
Jinja templating comes pre-installed with Flask and as an optional requirement in FastAPI. The usage of the templating engine in both frameworks remains the same. For this article, Flask server. will be used. To know more about setting up the Jinja templating in FastAPI, refer to this article 5 Advanced Features of FastAPI You Should Try.
Here is the code to set up a simple Flask server (server.py):
To display any text on the web pages, for now, direct values are returned from the endpoint route, but in the further sections, you will learn how to render these values in combination with HTML, CSS, or JavaScript.
Next, you need to create a new folder in the project directory named “templates”. This is where all the HTML templates will be stored. Data will flow from the Python backend to these HTML templates.
Passing Data to HTML Files
Now that the Flask server is up and running, you can start sending inputs from the Python backend, and later on, you will see how inputs from web UI flow to the backend processing and render that result on the website.
The main idea of using a templating engine in web development is to render data dynamically in HTML files. To represent such data forms in HTML files, there are 3 types of syntaxes are available:
- Expressions: These are the simple variable representation that is used for displaying any data type from the Python backend. It is similar to print statements in programming languages. The syntax is
{{ ... }} - Statements: These syntaxes are used to implement control structures such as for loop, if-else, macros, blocks, imports, and much more things. The syntax is
{% ... %} - Comments: One can also add Jinja comments to the template codes. These are represented as
{# … #}.
Let’s try passing some values from the Python server to the Jinja templates. Simply create a new HTML file under the “templates” directory. In this HTML file, expression syntax has been used to print the value from the server to the HTML webpage. Here are the contents of the new.html file:
{{first_name}}, {{last_name}} :: {{article_title}}
The above content expects 3 parameters to be passed from the backend. To render this HTML template with actual values from the Python backend, you need to use the render_template method from the flask package. This method takes in the template name, followed by the values to be passed to the HTML template. The parameter’s name should be the same as the name used in the HTML template. The following snippet shows this:
If you check the rendered webpage, you will see the variable names replaced by the values passed from the Python script:
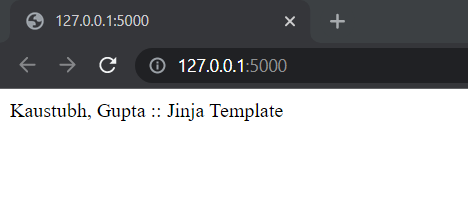
Yay! you created your first webpage that got values from your Python script!
Supported Data Types in Jinja Template
Till now you saw how to pass variables to the HTML Jinja templates. Jinja has built-in support for all native Python data types, including List, Tuple, Dictionary, Set, String, Integer, Bool, and even Classes. This feature makes Jinja super easy to use with Python as one does not need to know explicit data types other than native Python data structures.
Another interesting thing to note here is all the functions/methods that are supported for native Python data types are also supported for the Jinja expressions in templates. Let’s look at an example to have a better understanding.
In the below example, I have included all the data types with one of their accessor methods.
Now, in the HTML file, we can use the respective data type functions as one would do in general Python Scripting.
The following are the methods used in this Jinja template:
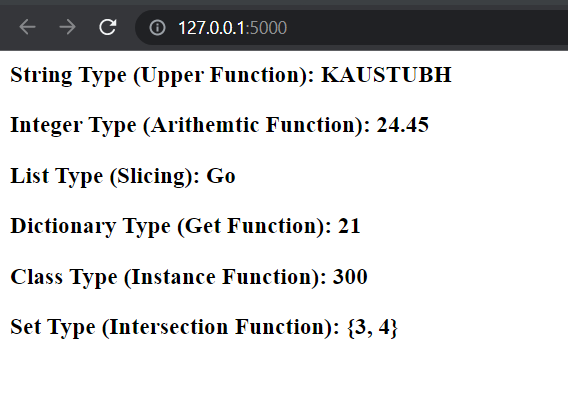
- For string type, the upper case function is used
- For an integer type, an arithmetic addition operation is performed
- For the list type, slicing is done
- For dictionary type, get accessor is used
- For a custom class type, the instance method was called in the Jinja expression
- For set type, the intersection of two sets is done
The output for this will be the same as it would have returned in Python execution:
In the same way, other functions can be used directly in the Jinja expressions only. But what about the functions that are built and take these data types or literals as input to provide output? These functions can be implemented using the Piping operator, which is discussed in the next section.
Piping/Filter Functions
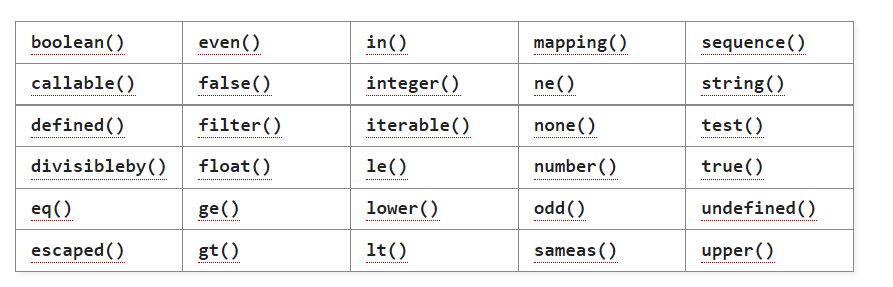
There are many functions, such as length, round, map, reduce, join, and min-max, that take in the data types and then return the result. These functions are usually not chainable and hence, we cannot use them directly as we did in the last section. Jinja proposed a piping method to implement these in-built functions. Currently, these are the supported filters:
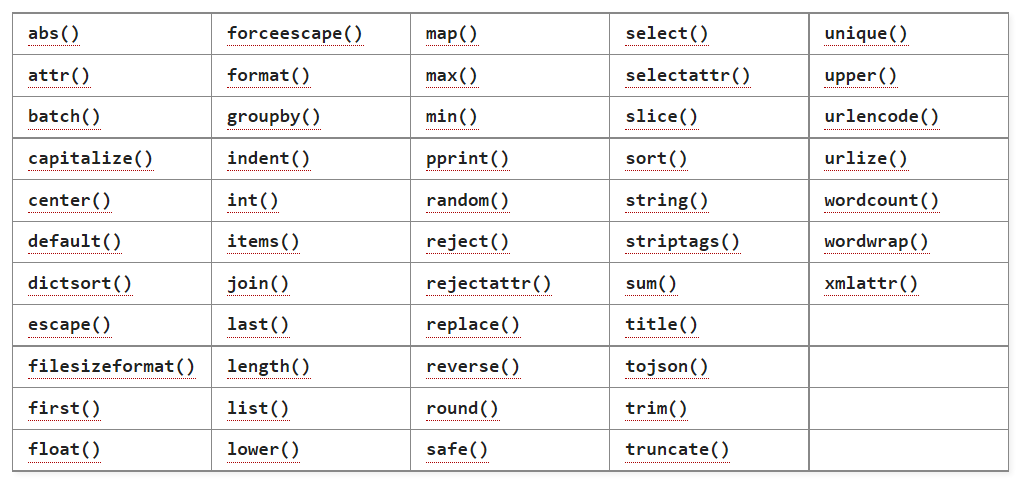
Available filters in Jinja.
The native Python functions are supported along with various Jinja-specific filters. Take a look at some of the interesting filters:
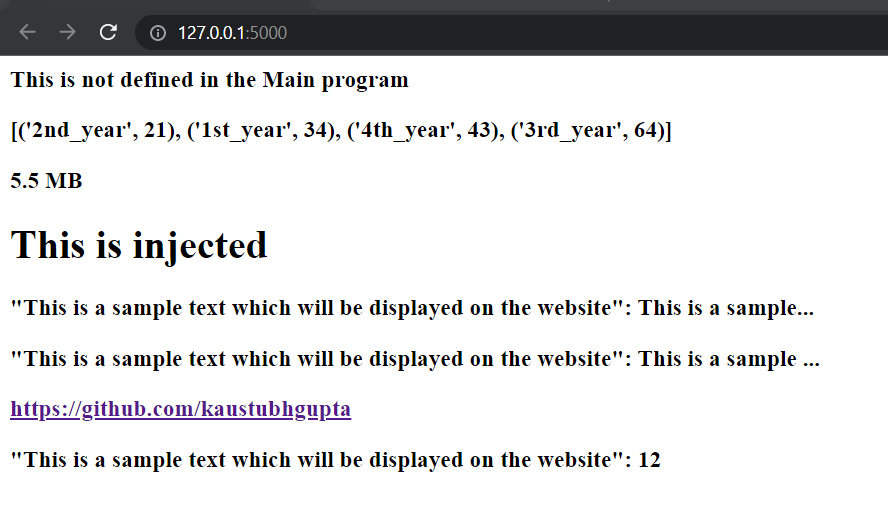
- default: This filter allows handling of the cases when the variable is not defined. A default value can be passed to this filter, which can help in error handling.
- dictsort: This filer allows the sorting of dictionaries by keys or values. It has parameters for reversing the sort or making a case-insensitive sort.
- filesizeformat: This filter is useful for converting a literal into a human-readable file size format. It means that a collection of numbers would be automatically converted into KB, MB, and GBs without explicitly passing the converted values from the backend.
- safe: This is the most used and known filter. It allows the HTML code to be embedded via the backend leaving it as an exception from escaping these characters from normal rendering. It was done to make sure that only a certain portion of the code can render HTML and therefore avoid injection attacks.
- truncate: This returns the truncated version of the string passed. It is extremely useful in cases when you want to shorten a long-running paragraph or title without any extra check. This takes in the max character length, optionally the character to be truncated with (default is ellipses: “…”) and kill words parameter. Killwords allow you to control whether the truncation should happen at text length.
- unique: It returns the unique values from the given iterable. Using this, you will no longer need to convert the iterable into a set and then pass those values. This filter will work the same way.
- urlize: It allows the links in the text to be treated as clickable URLs. It is very helpful in situations where you cannot add anchor tags in the text to be rendered on the web.
- wordcount: It returns the word count for the given string.
Here is an example of implementing each of the mentioned filters:
And this will be the output for this:
Test Functions
Test functions are very much similar to the filters we saw in the last section. These functions generally return results as boolean values and are used in the same piped format as the filter functions. The value is True is when the given literal or all the elements of the iterable satisfy the conditions of the test else it will return False. The test functions are usually used as part of other code logic, such as conditional statements, loops, or other user input-based elements. Jinja supports the following test at the time of writing this guide:
Some interesting tests are discussed here:
- defined: This returns whether the variable is defined or not. It can be used in cases where a variable number of arguments are passed to the template and a specific element on the template is only dependent on the existence of this variable.
- divisibleby: It returns whether a number satisfies a particular divisibility test. Now, you won’t need to create a specific class for visibility check.
- even, odd: This check returns if the number is even or not and odd or not.
- comparison operators: All types of comparison operators, such as greater than (gt), less than (lt), greater than equal to (ge), less than equal to (le), and equal to (eq) are supported in Jinja. These representations are very much common and also resemble MongoDB’s way of filtering data.
- iterable: It returns whether a sequence can be iterated over or not
These tests function can also be used with filters. One such filter is: reject. It rejects all the values of an iterable that does not pass the test.
Loops, Conditional Statements & Macros
Like every programming language has conditional statements with looping control, Jinja has support for “For” loops, if-else-elif statements, and special user-defined functions known as “macros”. Also, for these control structures, we will be using statement syntaxes instead of expression syntax.
The “For” loop in Jinja is designed in the same way as it is present in native Python. The only difference here is that it requires an end block at the loop termination. The end block for the loop is “endfor”. The basic syntax of the “For” loop is:
The “break” and “continue” statements support is not by default and requires external extension loading. Although, they work similarly as they would work in programming languages. The break statement terminates the loop and the continue statement skips the current iteration. We will see this in detail in the “Extensions” section of the article.
The “if-else” statements are used for applying conditional rules. The “if” block also requires terminating the “endif” block. The else block needs to be in between the “if” and “endif” blocks. There are also “elif” statements that are used to implement nested if-els statements. The syntax for these statements is:
Some special variables are accessible inside a “for” loop. These accessors allow you to get more information about the current looping iterations or the about-to-come iterations. Some of these interesting accessors are listed below:
- loop.index, loop.index0: Returns the current index of the iteration starting with 1. loop.index0 will start indexing from 0
- loop.first, loop.last: Returns True if the iteration is first in case of the loop.first and True if it’s the last iteration for the loop.last
- loop.previtem, loop.nextitem: Returns the item next in the iteration and the previous item to the iteration
Next to this is Macros. These are user-defined functions that can be used to consolidate frequently used components with parameters to control the additional requirements. These are the functions we use in general programming and having this support in templating formats will allow you to build separate logic for the frontend in the respective files only.
A macro takes in the inputs just like the functions, starts with the “macro” block, and ends with “endmacro”. Here is a simple macro to render a list out of the list elements passed:
The macro “generateList” will return an unordered list of the items passed to this macro.
Template Inheritance
Object-oriented programming is the most common paradigm that is followed by all software engineering techniques. There are basic 4 to 5 pillars in this paradigm and a detailed explanation of these is widely available. Jinja supports one of the most important pillars of OOP, which is “Inheritance”. It means taking all the features from the parent/base template and creating a new template that includes all the features of the base template, along with additional features created for the child template.
The inheritance feature in Jinja allows one to create websites that follow the same structure, basic UI, and the essential components that need to be present on every webpage. We usually create follow this pattern while working in Jinja: Base template → child templates. To extend/inherit a template to another, the “extends” block statement is used. It takes the name of the file/template which you want to extend. This helps in having a constant interface across all pages. See an example below:
This is the content for base.html:
To implement the child class, we will simply extend this file using the “extends” block and override the empty contents of the “content” block with our content.
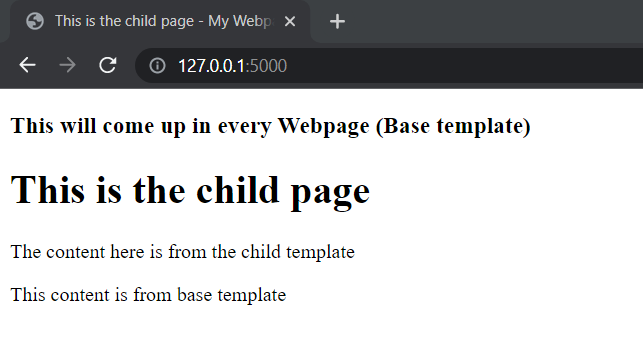
Now, if you check the rendered website, it will have the contents of both base and child templates:
Jinja also supports the concept of the super() keyword, which renders the contents of the base template at the desired position. You can also make some of these blocks as required, which will make sure that the inherited class is compulsorily overriding these blocks. This ensures consistency across all templates.
Variable & Block Assignments
Like any other programming language, we can do variable assignments in Jinja too. This will allow us to program every component of the webpage dynamically. The “set” keyword is used for the assignment. This assignment is the same as Python-like variable creation. The variables created can be used across all the macros and conditional statements to follow. See an example below:
You can also create a block as a variable that can store all the properties required. This can be called a static alternative to the macros. This block definition syntax is as follows:
And we also have the support for the “with” keyword that defines an inner scope of variables. It means that the variables defined between the opening (“with”) and closing (“endwith”) blocks will not be accessible to the outside templates.
Include and Import Statements
There can be situations where you cannot follow the OOP paradigm but still want to access specific sections or the whole template in another template. Both of these situations can be addressed and resolved using the include and import keywords.
Include keyword allows you to render the whole template into another template and output the result in the called template. It can be useful for cases such as using header and footer templates. It takes in the name of the template to be rendered.
Import keyword allows you to dump specific elements or all from the given template into a variable and then access the required components via this variable. This is very much similar to what we do in Python. The advantage of this method is that we can have a helper template that has all the macros and any new template can use these macros by importing them.
Let’s understand this with an example. Suppose there is a macro in helper.html to generate an unordered list out of the Python lists. The code of helper.html would be:
Now, to import this in our new template, we can simply call the “import” keyword in a variable and use that variable to access this macro:
Extensions
Extensions in Jinja are nothing but the additional libraries that extend the functionality of the Jinja. It empowers Jinja to provide functions that are not present by default, but enabling these extensions will provide access to these functions. Like in Python, we have a huge pool of libraries to perform a wide variety of tasks. Jinja does have a few interesting extensions that we can use in our environment.
One such extension which we can enable is the “Loop Controls”. This extension adds support for “break” and “continue” statements. These are the same statements as they would work in general programming. To enable a Jinja extension in the Flask server, we simply need to add the import name in the “jinja_env” using the add_extension method. See the code below:
Conclusion on Jinja Template
This article presents all the features from basic to advance levels in the Jinja template. Although documentation is the best way to learn more about these concepts, I have tried to provide a wider and more practical scenario where you can apply these concepts. I hope you got a better understanding of the Jinja templating programming. If you want to read/explore every article of mine, then head over to my master article list which gets updated every time I publish a new article on any platform!
Hope you liked my article on the Jinja template. For any doubts, queries, or potential opportunities, you can reach out to me via:
1. LinkedIn — in/kaustubh-gupta/
2. Twitter — @Kaustubh1828
The media shown in this article is not owned by Analytics Vidhya and is used at the Author’s discretion.
Kaustubh Gupta is a skilled engineer with a B.Tech in Information Technology from Maharaja Agrasen Institute of Technology. With experience as a CS Analyst and Analyst Intern at Prodigal Technologies, Kaustubh excels in Python, SQL, Libraries, and various engineering tools. He has developed core components of product intent engines, created gold tables in Databricks, and built internal tools and dashboards using Streamlit and Tableau. Recognized as India’s Top 5 Community Contributor 2023 by Analytics Vidhya, Kaustubh is also a prolific writer and mentor, contributing significantly to the tech community through speaking sessions and workshops.


