Introduction
The data researchers no longer depend only on interviews, surveys, observational studies to collect data. Instead, they have switched to the faster ways of data collection which includes leveraging internet, cameras, smartphones, drones, bots and many more.
Later, the collected data is used by organization / governments to make business decisions. But, before that, they require a device or system which can store and secure such big data sets. One such system is Hadoop File Distribution System, commonly known as HDFS.
If you are new to HDFS architecture, let me provide a simple picture of what it does:
In simple terms, HDFS stores raw data is such a manner that the data is easily extracted at a later stage. Data is stored in clusters to enable parallel mode of extraction. After the data is stored in HDFS, we use query languages (such as SQL) to extract the data and use it for analysis / modeling purposes.
In this tutorial, we will look into basic concepts of Hadoop Distributed File System and the various components that make up HDFS. In the end, we’ll learn about a data integration tool DMX-h for practical understanding.

What is Hadoop Distributed File System (HDFS)?
The ‘D’ in HDFS refers to breaking the files into various subsets and storing it in different clusters. This provides much needed pace and scalability for big data processing.
HDFS is highly fault-tolerant and is designed to be deployed on low-cost hardware. HDFS provides high throughput access to application data and is suitable for applications which have large data sets.
It has a well structured architecture and incorporates MapReduce technique for processing and distributing large data sets. Let’s start with the architecture.
What are the components of HDFS Architecture?
There are 3 major components which supports HDFS architecture namely Client machines, Master nodes, and Slave nodes. Let’s understand each of them:
Master Node: It oversees the two key functional pieces that make up Hadoop: storing lots of data (HDFS), and running parallel computations on all that data (Map Reduce).
Slave Node: It makes up the vast majority of machines and do all the dirty work of storing the data and running the computations, hence the name ‘Slave’.
Client Machines: Client machines are those which have hadoop installed with default clusters settings and assist in loading data and steers the complete cycle of data processing.
Let’s dive deep into nodes. Nodes in HDFS are made up of a two components: Master Node and Multiple Worker Nodes. The master node consists of a Job Tracker, Task Tracker, NameNode and DataNode.
A name node manages the file system metadata and data node store the actual data. A data node stores data in the [Hadoop File System]. A functional filesystem has more than one DataNode, with data replicated across them. A slave or worker node acts as both a DataNode and TaskTracker, though it is possible to have data-only worker nodes and compute-only worker nodes.
Below are some important points which every big data / database analyst must know about HDFS:
- In clusters, data is written only once. No random writing to files takes place.
- Designed for large streaming data reads as opposed to random data reads.
- On a Hadoop Cluster, data is stored on nodes in 128MB data blocks. This is a particular scenario, the data block size can vary depending on configuration and needs of the business.
- Each data block is replicated on three nodes for fault tolerance.
- It is anticipated that “inexpensive” Hadoop nodes will sometimes fail. Fault tolerance is an important concept with Hadoop.
- Includes 5 Services, 3 Master (Name Node, Secondary Name Node, Job Tracker), 2 Slave (Data Nodes, Job Tracker).
- Client requests Name Node to store files, Named Node will communicate back the data nodes available.
- Client will then send the data files to the Data Nodes.
- HDFS will also maintain redundant copies of the data, so that when a server crashes the other up servers can pick up.
What is MapReduce?
MapReduce is a processing technique and a program model for distributed computing based on java. The mapreduce algorithm contains two important tasks, namely Map and Reduce.
Map takes a set of data and converts it into another set of data, where individual elements are broken down into tuples (key/value pairs). Reduce takes the output from a map as an input and combines those data tuples into a smaller set of tuples.
As the sequence of the name MapReduce implies, the reduce task is always performed after the map job.
Advantages of MapReduce
The major advantage of using MapReduce is that it is easy to scale data processing over multiple computing nodes.
MapReduce can be used to perform intensive operations such as change data capture. Change Data Capture is a processing intensive methodology used to make current data available to users. Because, it is so processing intensive, it often makes sense to perform the processing on Hadoop as opposed to Teradata or other platforms.
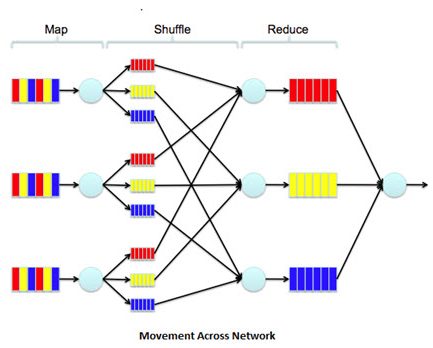
MapReduce Process Flow
Below is the complete process flow of MapReduce technique:
MapReduce – It steers the complete processing of data.
- JobTracker takes care of processing the request.
- JobTracker sends request to named node and apply the program on data.
- Named Node provides metadata to Job Tracker.
- JobTracker then assigns the task tracker to run the programs.
- Then, task tracker runs the program on the nearest data node. This process is called as Map.
- There are input splits (split the file into chunks), the number of mappers depends on input splits.
- Task Tracker provides heartbeat back to the Job Tracker (this indicates task tracker is working fine).
- Then, output is combined by Reducer. The number of output files depends on number of reducer.
- When data node is gives heartbeat to the named node, if that data node has reducer, it provides that output information to named node. The client gets the output via named node which has metadata including the location of the output.
Until here, we discussed about theoretical aspects of data integration, let’s now practice it using DMX-h in order to develop even better understanding.
Using DMX-h for Data Integration
One of the key functions that is involved working with Hadoop/Big data is ETL (Extract, Transform, Load). In addition, we still moving data from HDFS/Map Reduce outputs to, let’s say, other traditional data warehouses, basically perform data integration. One of the tools that is available in the market today is called DMX-h from Syncsort .
It’s not an open source tool. Hence, for installation you need to create a one time account for installation here.
There are 2 major components of DMX-h. They are:
- DMX-h Task Editor : It deals with source files and target files.
- DMX-h Job Editor : It deals with adding tasks to jobs and running them eventually.
Task Editor Explained
The DMX-h Task Editor provides the feature to create tasks that deal with movement of data. If you are an experienced professional, the interface in certain ways might remind you of SQL Server Integration Services (SSIS).
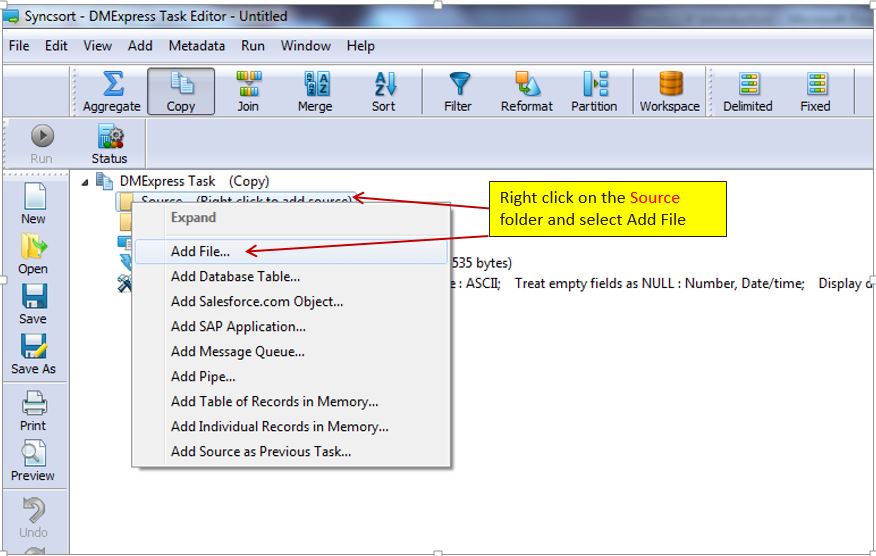
The following demo shots explain how data can be copied from source to target.
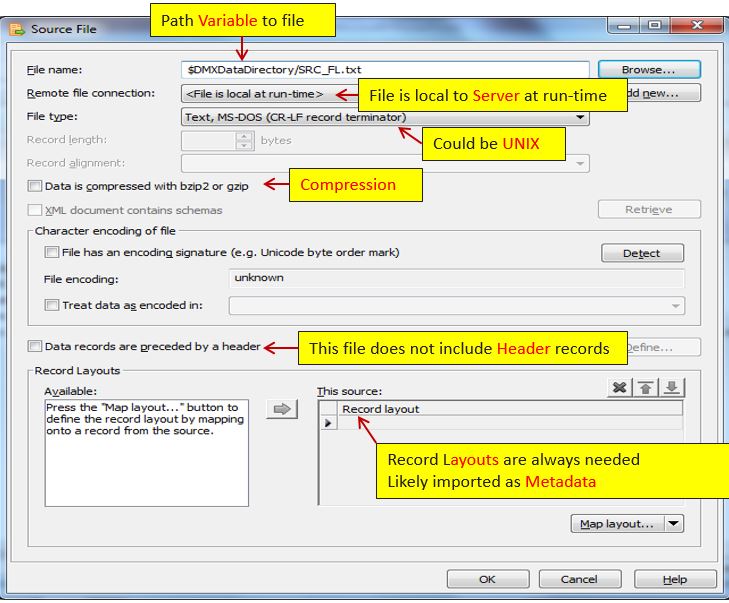
1. Right Click on Source and Target to add the source and destination location of the files.

2. Now move to target file. It simply means assigning a file to the target location.


3. Once the source and target file locations have been assigned, the task is saved in the DMX-h Task Editor.
Job Editor Explained
Now, we move to the DMX-h Job editor where we can load all the tasks created in the DMX-h Task Editor. Then, we connect them according to the data transformation requirements.
4. In the screen shot below, we load the Sample_File_Copy Task created in the Task Editor to the Job editor.

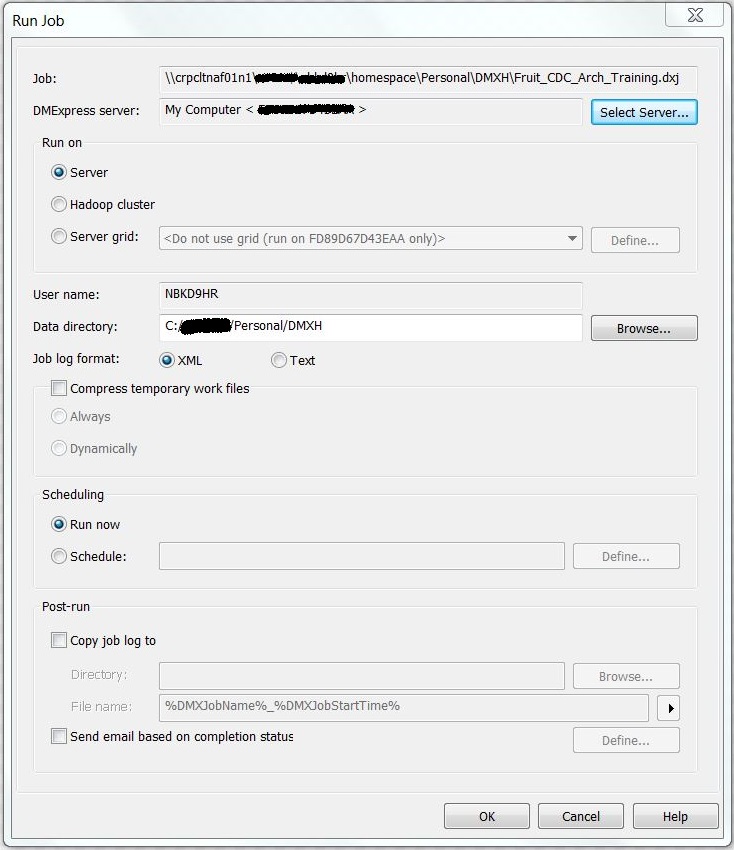
5. Now, we’ll run the job in the editor with the results of execution of the job (for privacy purpose, username is masked).
Once the job has been completed, we should verify if the source file has been successfully copied to the target location. Here I have demonstrated a simple example, this can be expanded to perform CDC operations and MapReduce Functionality.
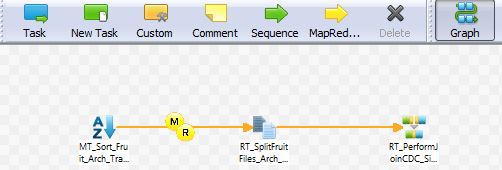
6. The screenshot below shows how we can have different tasks (sort, split) in a job editor and also how we use the MapReduce component in the Job Editor.
End Notes
I hope this article provided you with the basic construct of HDFS and how tools like DMX-h can be used to perform different file operations on a Hadoop Cluster. In the end, I would like to thank Debra Aaron (from bank of America) for providing crucial inputs to the article.
In this article, we discussed about the basics of HDFS & Mapreduce and its practical implementation using DMX-h tool. While writing this article, I was keen to understand the role of open source tools in Big Data. If anyone of you have any experience, I would love to interact in comments.
About Author
Ramdas Narayanan is currently working as a Data Architect at Bank of America with focus on Business Intelligence and Data integration for Mortgage Technology. He has more than 22 years of experience in Information Technology, ERP and Relational Database Systems.
Did you like reading this article ? Do share your experience / suggestions in the comments section below.


Thank you Manish for working with me and providing constructive feedback in order to get the article published. I would like to thank Manish and team at analytics vidhya for providing me with this opportunity and also providing encouragement for my desire of publishing articles. Thank you Ramdas
good one . I was looking for this kind of tool .
Thank you Sanjay