This article was published as a part of the Data Science Blogathon
Introduction
Fast.ai is a deep learning library built on top of Pytorch, one of the most popular deep learning frameworks. Fast.ai uses advanced methods and approaches in deep learning to generate state-of-the-art results. This approach which we will discuss enables us to train more accurate models, more quickly, with less data and in less time and money.
Fast.ai was founded by Jeremy Howard and Rachel Thomas to provide deep learning practitioners with a quick and easy way to achieve state-of-the-art results in standard supervised learning domains of deep learning i.e Vision, Text, Tabular and Collaborative Filtering.
Now let’s get started with Fast.ai.
This tutorial assumes to have basic knowledge of python3. Jupyter notebook with a GPU is required since GPU speeds up the training process by 100x compared to CPU. You can access the same from Google Colaboratory which is a jupyter notebook environment and provides a free GPU. Refer this to enable free GPU on Colab.
Train an Image Classifier
Let’s train a basic MNIST Image classifier using Fast.ai. MNIST dataset consists of images of handwritten digits from 0 to 9. Therefore it has 10 classes and it is a multi-class classification problem. It consists of 60000 images in the training set and 10000 images in the validation set.
Imports
In the first cell, run the following to ensure all the required libraries are installed. If not, the fastai library will be installed and you would have to restart the runtime.
!pip install fastai --upgrade
Then let’s import the fastai vision library,
from fastai.vision.all import *
If you have had any experience in python programming or software development, you might wonder that importing all the submodules and functions from the class (i.e. using *) is an unhealthy practice. But the fastai library is designed in such a way that only required functions are imported and it ensures there won’t be any unnecessary load on memory.
Downloading Data
Now, let’s download the required data,
path = untar_data(URLs.MNIST)
Here we use a fastai function untar_data which takes the URL of the dataset and downloads and extracts the dataset and then returns the path of the data. It returns a Pathlib’s PosixPath object which can be used to access and navigate file systems with ease. We access the MNIST Dataset URL from the fastai URLs method which consists of URLs of many different datasets.
We can check the contents in the path using
#to list the contents
path.ls()
We can see that there are two folders training and testing consisting of training data and validation data respectively.
Loading Data
Now we can load the data,
dls = ImageDataLoaders.from_folder(path=path,
                                   train='training',
                                   valid='testing',
                                   shuffle=True)
ImageDataLoaders is one of the types of class we use to load datasets for computer vision problems. Generally, computer vision datasets are structured in such a way that label for an image is the name of the folder that the image is present in. As our dataset is structured in that way we use a method from_folder to load the images from folders in the given path.
We specify the path of the dataset from where images are loaded in batches, specify the name of the folders which consists of training and validation data that are to be used for training and validation, and then initialize shuffle to True which ensures that while the model is training the images are shuffled and fed into the model.
For more information about any fastai function, we can use the doc() method which shows the brief documentation about that function.
doc(ImageDataLoaders.from_folder)
We can view some of the data using show_batch() method,
dls.train.show_batch()
dls.valid.show_batch()
It displays some images of the training set and validation set respectively.
Model Training
Now let’s create the model,
learn = cnn_learner(dls,
                    resnet18,
                    metrics=[accuracy, error_rate])
Here we are using cnn_learner i.e. specifying fastai to build a Convolutional Neural network model from the given architecture i.e. resnet18 and train on the data loader specified i.e dls and track the provided metrics i.e. accuracy and error_rate.
CNN is the current state-of-the-art approach for creating computer vision models. Here we are using a technique called transfer learning to train our model. This technique uses a Pretrained Model i.e. a standard and already trained architecture for a different purpose. Let’s go into detail in the next section.
Now let’s train (actually fine-tune) the model,
learn.fine_tune(4)
We can see that model starts training on data for 4 epochs. Results resemble the following,

Woah !! accuracy of 99% and almost 0.8% error_rate is literally state-of-the-art results. Also, we were able to achieve this with just 4 epochs, 5 lines of code, and 5 minutes of training.
Putting together,
from fastai.vision.all import *
path = untar_data(URLs.MNIST)
dls = ImageDataLoaders.from_folder(path=path,
                                   train='training',
                                   valid='testing',
                                   shuffle=True)
learn = cnn_learner(dls,
                    resnet18,
                    metrics=[accuracy, error_rate])
learn.fine_tune(4)
This is possible due to a technique called Transfer Learning. Let’s discuss it in some detail.
Transfer Learning
Before continuing further we should know about Pretrained models.
Pretrained models are basically architectures that are already trained on a different dataset and for a different purpose. For example, we have used resent18 as our pre-trained network. Also known as residual networks, resent18 consists of 18 layers and is trained on more than a million images from the ImageNet dataset. This pre-trained network can easily classify images into 1000 classes such as books, pencils, animals, etc. Hence this model knows various objects and things even before it is trained on our dataset. Hence it is called Pretrained Network.
Now transfer learning is the technique that enables us to use a pre-trained model for a new task and dataset. Transfer learning is basically the process of using a pre-trained model for a task different from what it was originally trained for i.e. in this case we are using resent18 to train on images of handwritten digits.
This is possible due to one fundamental step called fine-tuning. When we have a pre-trained model, we are using this step to update the pre-trained model according to the needs of our task/data. Fine-tuning is basically a transfer learning technique that updates the weights of the pre-trained model by training for some epochs on the new dataset.
Hence by using this technique we can achieve state-of-the-art results in our task i.e classifying handwritten digits.
Now let’s do some predictions
Predict Images
First, let’s get all the image paths in the testing set and then convert it into an image and perform prediction.
# get all the image paths from testing folder
images = get_image_files(path/'testing')
# select an image and display
img = PILImage.create(images[4432])
img
Predict the image,
# predict the image class
lbl, _ , _ = learn.predict(img)
lbl
Classification Report
We can also generate classification report from the model for inference
interep = ClassificationInterpretation.from_learner(learn)
interep.plot_confusion_matrix()
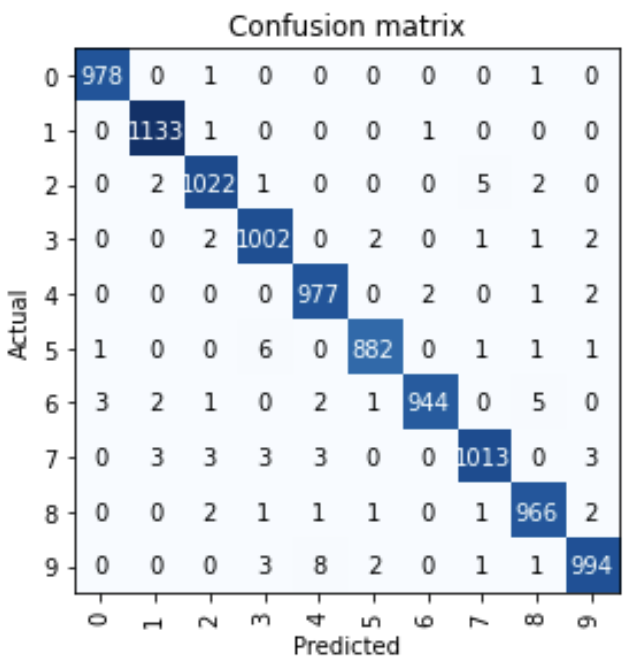
We can see that from almost 10000 images only some images got misclassified.
Thank you and Happy Deep Learning !!
References:
1. Practical Deep Learning for Coders by Jeremy Howard and Sylvain Gugger
By Narasimha Karthik J
You can connect with me through Linkden or Twitter
The media shown in this article on Training state-of-the-art Deep Learning models with Fast.ai are not owned by Analytics Vidhya and are used at the Author’s discretion.


