Introduction
Imagine having your own AI team, each agent finely tuned to tackle diverse tasks, but the thought of coding complexity is holding you back. What if I told you that creating your AI dream team is possible and achievable without extensive coding? This blog is your passport to a realm where the complexities of coding fade away, and you can effortlessly create your AI team using Autogen UI, tailor their workflows, tweak parameters, and enhance their skills—all without diving into the coding.

We’re about to embark on a journey where AI becomes accessible to everyone, irrespective of your coding background. Welcome to a realm where building your AI team is not just a tech fantasy but an accessible reality.
Learning Objectives
- Understand the evolution of AutoGen UI from Assistant to Studio, recognizing enhanced capabilities.
- Explore AutoGen Studio’s user-friendly interface for efficient AI agent development.
- Learn to set up an LLM provider and install AutoGen Studio to prototype AI agents swiftly.
- Grasp the advantages, limitations, and potential enhancements of AutoGen Studio for informed decision-making.
This article was published as a part of the Data Science Blogathon.
Table of contents
- What is AutoGen?
- What is AutoGen Studio?
- What is the Need for AutoGen Studio?
- Evolution of AutoGen Studio
- Getting Started with AutoGen Studio
- Understanding AutoGen Studio’s Interface Structure
- Using Autogen Studio
- Agents Messages
- Advantages and Disadvantages of AutoGen Studio
- Future Enhancements
- Frequently Asked Questions
What is AutoGen?
AutoGen is a framework that enables the development of LLM applications using multiple agents that can converse with each other to solve tasks. AutoGen agents are customizable and conversable and seamlessly allow human participation. They can operate in various modes, employing combinations of LLMs, human inputs, and tools.
What is AutoGen Studio?
AutoGen Studio is an AutoGen-powered AI app (user interface) to help you rapidly prototype AI agents, enhance them with skills, compose them into workflows, and interact with them to accomplish tasks. It is built on the AutoGen framework, a toolkit for building AI agents.
What is the Need for AutoGen Studio?
- Rapid Prototyping: Enables quick development and testing of multi-agent workflows without extensive coding.
- No Coding Required: Streamlines the process by eliminating the need for intricate programming skills.
- User-Friendly Interface: Offers an intuitive UI for effortless navigation and workflow creation.
- Visual Showcase: Demonstrates examples of end-user interfaces, aiding in visualization and design.
- Efficient Team Building: Facilitates the creation of AI teams with minimal time and resource investment.
- Ideal for Prototypes: Designed for the early stages of development, not intended for production, making it perfect for swift idea validation.
Evolution of AutoGen Studio
In the dynamic realm of technology, characterized by constant change, the AutoGen framework marks a significant advancement, revolutionizing our interactions with digital assistants. Originally introduced as AutoGen Assistant, it has evolved into AutoGen Studio, underscoring the developers’ dedication to delivering state-of-the-art tools for multi-agent solutions.
A Swift Evolution: From AutoGen Assistant to AutoGen Studio
AutoGen Assistant (1.12.2023) – The Old Guard:
AutoGen Assistant provided a user-friendly interface in the initial release to define and modify agents and multi-agent workflows declaratively. It allowed users to create chat sessions, explicitly add skills to agents, and publish sessions to a local gallery. A step towards democratizing the orchestration of agents, it showed promise but left room for growth.
AutoGen Studio (24.12.2023) – A Glimpse into the Future:
In a short span, AutoGen has transformed into AutoGen Studio, showcasing a refined and enhanced user experience. Introducing three distinct sections – Build, Playground, and Gallery – brings structure and clarity to the interface, making it more intuitive for users. The name change from Assistant to Studio reflects the upgrade’s scale and hints at the platform’s evolution into a comprehensive tool for rapid prototyping.
What’s New in AutoGen Studio?
The Name Change: The journey begins with the transformation of AutoGen Assistant into AutoGen Studio. This shift in nomenclature signifies more than a mere change in title; it reflects a broader evolution of capabilities and functionalities.
Older Version: AutoGen Assistant
Updated Version: AutoGen Studio
4.2.2 Installation Revamped: With the renaming comes a revamped installation process, simplifying the user experience.
Older Version: pip install autogenra
Updated Version: pip install autogenstudio
Enhanced Interface Sections: The user interface has undergone a significant makeover, introducing three high-level sections – Build, Playground, and Gallery. Each section caters to specific aspects of agent definition, interaction, and artifact sharing.
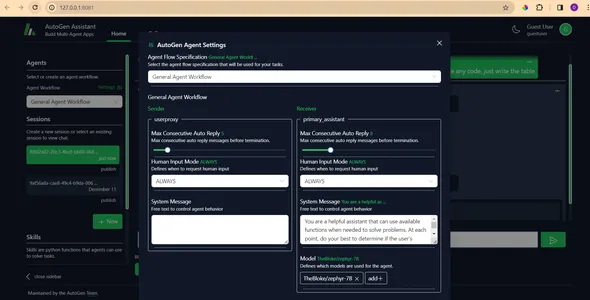
Older Version: It had only two sections: the Home section for defining and modifying agents(by clicking settings), creating chat sessions, and adding skills, and the gallery section.
Autogen Assistant’s Home Section (old version of autogen studio)
Autogen Assistant’s Agent settings
Updated Version: Structured UI with Build, Playground, and Gallery sections, offering a more intuitive and user-friendly experience(In the upcoming section, you will know how the updated version will look).
Getting Started with AutoGen Studio
Launching AutoGen Studio is a breeze – follow these three simple steps: set up an LLM provider, install the application, and run it. Whether you’re a seasoned developer or a newcomer to the AI scene, the onboarding process is designed to be smooth and intuitive.
Setting up an LLM Provider
To begin your experience with AutoGen Studio, you’ll need access to a language model. You can choose any one of the options to access the language model.
Option 1: Configure your environment by setting the OPENAI_API_KEY. In your terminal, you can do this as shown below:
export OPENAI_API_KEY=<your_api_key>Option 2: You can directly specify the model in the agent’s configuration, as demonstrated below:
llm_config = LLMConfig(
    config_list=[{
        "model": "gpt-4",
        "api_key": "<azure_api_key>",
        "base_url": "<azure api base url>",
        "api_type": "azure",
        "api_version": "2023-06-01-preview"
    }],
    temperature=0,
)
Option 3:
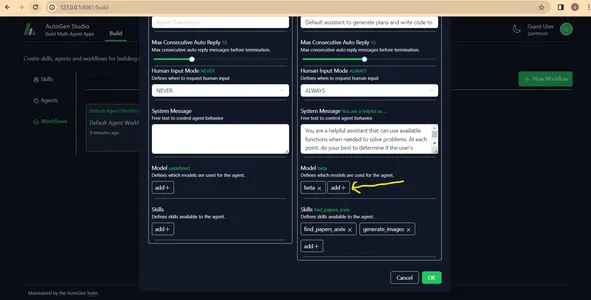
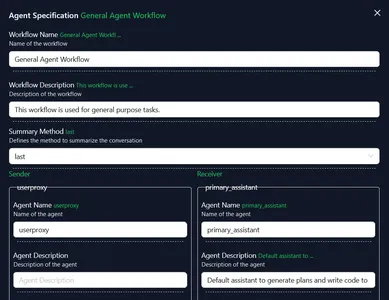
- In the AutoGen Studio UI, navigate to the top and locate the “Build” section. Click on it, then choose “Workflows.”
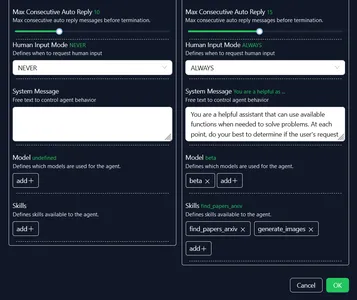
- Select the specific workflow you wish to work on. Within each agent (such as user proxy, primary agent, etc.), find the “Model” section.
- Click on “Add” to insert a new model. Enter the necessary parameters for your model and click “Add Model.”
- Once done, click “OK.” Ensure that the name of your chosen model is displayed next to the model section in green color. Finally, click “OK” again to confirm.
Installation
The next step is to install AutoGen Studio. For a smooth experience, we recommend using a virtual environment (e.g., conda) to avoid conflicts with existing Python packages. With Python 3.10 or newer active in your virtual environment, use the following pip command:
pip install autogenstudioRunning the Application
Once AutoGen Studio is installed, launch the application by entering the following command in your terminal:
autogenstudio ui --port 8081This will start the application on the specified port. Open your web browser and go to http://localhost:8081/ to start your AutoGen Studio experience.
Understanding AutoGen Studio’s Interface Structure
AutoGen Studio’s UI is divided into three high-level sections: Build, Playground, and Gallery.
Build
This section is where you shape the destiny of your AI agents. From specifying their skills to defining agent workflows, the Build section empowers you to create a cast of agents ready to tackle your tasks. The UI provides a clear view of skills, agents, and workflows, making customization a delightful experience.
Specify Agents: Define agent properties, skills, and agent workflows through an intuitive interface.
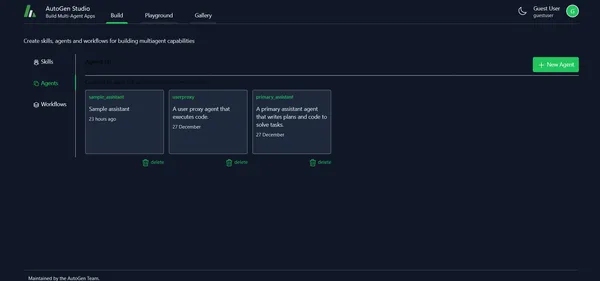
View and Add Skills: Explore, add, or edit skills that agents can leverage for tasks. AutoGen Studio comes pre-loaded with three example skills: fetch_profile, find_papers, and generate_images. These serve as illustrative models, and users are encouraged to delve into the repository to gain deeper insights into their functionality.
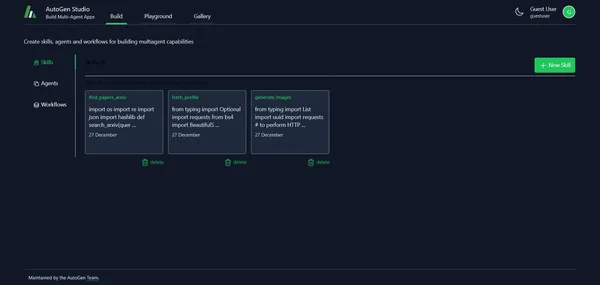
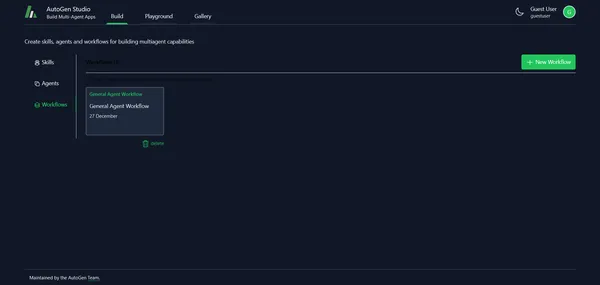
Agents and Agent Workflows: Declaratively specify properties for AutoGen agents and design agent workflows.
Playground
Here’s where the magic happens. The playground section focuses on interaction with the agent workflows defined in the Build section. Picture it as a creative space where you orchestrate sessions, engage in chats, and witness the dynamic collaboration of your AI agents. Sessions can be published in the Gallery, immortalizing your AI endeavors.
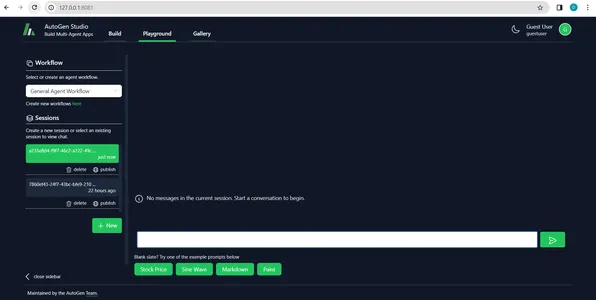
- Session: Engage in continuous interaction or engagement with an agent workflow.
- Chat View: Review sequences of interactions between users and agents.
Gallery
The Gallery is your showcase, a space to share and reuse artifacts. Whether it’s a meticulously crafted workflow configuration or a captivating session, the Gallery transforms AutoGen Studio into a collaborative platform, fostering a community of AI enthusiasts.
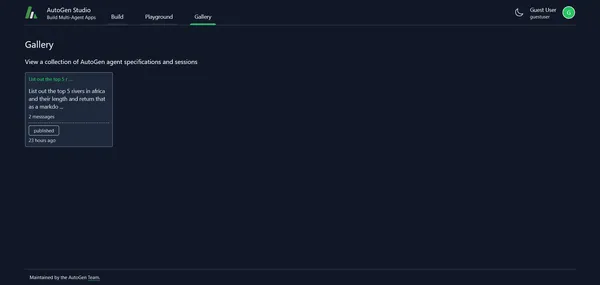
- Share and Reuse: Focus on sharing and reusing artifacts, including workflow configurations and sessions.
In summary, AutoGen Studio seamlessly integrates the design of intelligent agents (Build), the dynamic interaction with these agents (Playground), and the collaborative sharing of knowledge and workflows (Gallery). As you explore each section, you’ll unlock the full potential of agent-driven capabilities, making the future of human-agent interactions even more exciting.
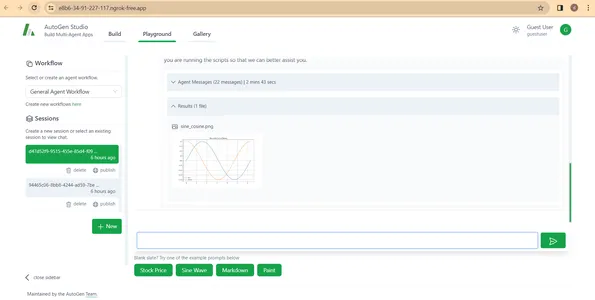
Using Autogen Studio
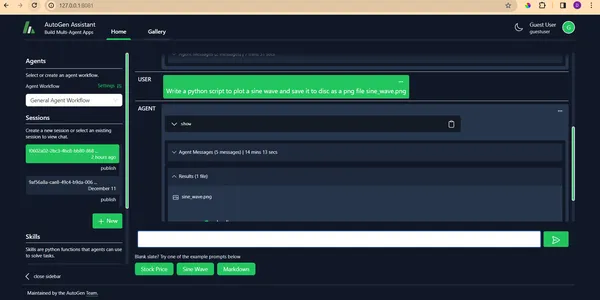
Consider the following query
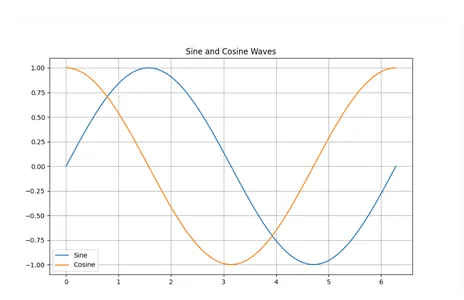
Write a Python script to plot a sine and cosine wave and save it to disc as a PNG file.
Agents Messages
userproxy ( to primary_assistant )
Write a Python script to plot a sine and cosine wave and save it to disc as a PNG file.
primary_assistant(to userproxy)
Here’s an example Python script using NumPy and Matplotlib to generate and save a plot of a sine and cosine wave as a PNG file.
import numpy as np
import matplotlib.pyplot as plt

# Generate data for the sine and cosine waves
x = np.linspace(0, 2 * np.pi, 1000)
y_sin = np.sin(x)
y_cos = np.cos(x)

# Create a figure with the given figure size (width x height) and save it as a PNG file
fig, ax = plt.subplots(figsize=(10, 6))
ax.plot(x, y_sin, label="Sine")
ax.plot(x, y_cos, label="Cosine")
ax.legend()
ax.set_title("Sine and Cosine Waves")
ax.grid()

# Save the plot as a PNG file named 'sine_cosine.png' in the current directory
plt.savefig('sine_cosine.png')

# Close the figure to release system resources
plt.close(fig)
To run this script, save it to a .py file (e.g., ‘plot_sin_cos.py’), and then execute it using your preferred Python interpreter or IDE:
python plot_sin_cos.py This will generate the plot and save it as a PNG file named ‘sine_cosine.png’ in the current directory.
userproxy( to primary_assistant)
exitcode: 2 (execution failed)Code output: python3: can’t open file ‘/usr/local/lib/python3.10/dist packages/autogenstudio/web/files/user/198fb9b77fb10d10bae092eea5789295/scratch/plot_sin_cos.py’: [Errno 2] No such file or directory
primary_assistant( touserproxy)
The code snippet provided is incomplete. The autogenstudio package and its related directory structure are mentioned but not imported or defined in the script you’ve shared. Here’s a complete version of the script using NumPy and Matplotlib:
import numpy as np
import matplotlib.pyplot as plt

# Generate data for the sine and cosine waves
x = np.linspace(0, 2 * np.pi, 1000)
y_sin = np.sin(x)
y_cos = np.cos(x)

# Create a figure with the given figure
#size (width x height), save it as a PNG file
#named 'sine_cosine.png' in the current directory, and show it

plt.figure(figsize=(10, 6))
ax = plt.gca()
ax.plot(x, y_sin, label="Sine")
ax.plot(x, y_cos, label="Cosine")
ax.legend()
ax.set_title("Sine and Cosine Waves")
ax.grid()
plt.savefig('sine_cosine.png')
plt.show()
You can execute this script using your preferred Python interpreter or IDE:
python3 plot_sin_cos.py This will generate the plot and save it as a PNG file named ‘sine_cosine.png’ in the current directory. Then, the Matplotlib library will display the plot for a brief moment before closing it.
You can also modify the script to change the figure size or save the plot in a different format (e.g., PDF, SVG, or JPG) by updating the figsize argument and using other plt.savefig() functions, respectively:
# ...
# Create a figure with the given figure
#size (width x height), save it as a PNG
#file named 'sine_cosine.png', and show it

plt.figure(figsize=(6, 4))
ax = plt.gca()
ax.plot(x, y_sin, label="Sine")
ax.plot(x, y_cos, label="Cosine")
ax.legend()
ax.set_title("Sine and Cosine Waves")
ax.grid()
plt.savefig('sine_cosine.png')
plt.show()
To run this script, save it to a .py file (e.g., ‘plot_sin_cos.py’), and then execute it using your preferred Python interpreter or IDE:
userproxy( toprimary_assistant)
exitcode: 2 (execution failed)Code output: Figure(1000×600) python3: can’t open file ‘/usr/local/lib/python3.10/distpackages/autogenstudio/web/files/user/198fb9b77fb10d10bae092eea5789295/scratch/plot_sin_cos.py’: [Errno 2] No such file or directory
primary_assistant( to userproxy)
It looks like there’s a mistake in the path provided when trying to execute the script. The error message indicates that Python cannot find the file ‘plot_sin_cos.py’. To run your script, save it in a directory of your choice and ensure that the Python interpreter can access it by providing the correct path or running the command from the directory containing the script.
For example, if you have saved the script to a folder named scripts, you should navigate to that folder using the terminal or command prompt and then execute the script:
cd /path/to/directory/containing/script/folder
python3 scripts/plot_sin_cos.py
This assumes that your Python interpreter is installed in the default location on your system, and the matplotlib library is also installed. If it isn’t, you might need to install both Python and matplotlib before executing the script.
userproxy( to primary_assistant)
exitcode: 2 (execution failed)Code output:: line 1: cd: /path/to/directory/containing/script/folder: No such file or directorypython3: can’t open file ‘/usr/local/lib/python3.10/dist-packages/autogenstudio/web/files/user/198fb9b77fb10d10bae092eea5789295/scratch/scripts/plot_sin_cos.py’: [Errno 2] No such file or directory
It seems that there’s a misunderstanding in the provided instructions. The error message indicates that the terminal or command prompt cannot find the directory “scripts” containing the Python script “plot_sin_cos.py”. To correctly run the script, please follow these steps:
- Create a new folder and name it.
- Save the provided plot_sin_cos.py script inside the newly created folder.
- Confirm that Python and matplotlib are installed on your system. If not, install them using your package manager or distribution-specific instructions.
- For example, on Ubuntu, you can use:
- sudo apt-get install python3
- sudo apt-get install python3-matplotlib
- Open a terminal or command prompt window.
- Using the cd command, navigate to the directory containing the newly created python_scripts folder.
cd /path/to/your/working/directory/python_scripts 5. Run the script using Python and the script name:
python3 plot_sin_cos.pyThis should execute the script, generate the sine and cosine wave plot, save it as a PNG file named ‘sine_cosine.png’ in the same folder, and display it briefly before closing the window.
primary_assistant( to userproxy)
The main issue seems to be not related to the package installation but rather a missing directory, “python_scripts,” that the script you are trying to run expects to exist. Here are some steps to resolve this issue:
- Create the “python_scripts” directory in your home folder or wherever you plan to work from using the command:
- Navigate to the working directory where the script is located and modify it to use a different working directory. Alternatively, remove the reference to “python_scripts” entirely if it is not needed for the script’s functionality. Alternatively, you can change the current working directory before running the script using the command:
- Run the script again and check if the issue has been resolved. If not, provide more context about the error messages and the environment in which you run the scripts so we can better assist you.
To install the required packages, follow these steps:
- Open a terminal window and navigate to your home directory using the command:
- Create a new directory named “packages” using the command:
- Navigate to the “packages” directory using the command:
- Use the package manager of your choice, such as apt, to install the required packages using the following command:
- Create a new directory named “scripts” inside your home directory or wherever you plan to work from using the command:
- Navigate to the “scripts” directory before running any script using the command:
- Install any additional required packages for specific scripts using pip, such as:
These steps should help you resolve the missing “python_scripts” issue and install the required packages successfully. If you encounter any further issues, please provide more context about the error messages and the environment in which you run the scripts so we can better assist you.
Result(1file)
Advantages and Disadvantages of AutoGen Studio
| Advantages of AutoGen Studio | Disadvantages of AutoGen Studio |
|---|---|
| Swift Prototyping: AutoGen Studio expedites the prototyping of AI agents, enabling users to experiment swiftly with diverse agent workflows. | Not Production-Ready: AutoGen Studio is explicitly mentioned as not being a production-ready application. It is intended for prototyping and demonstration purposes, and users should not use it in production environments. |
| User-Friendly Interface: The application offers an interface that is easy to navigate, facilitating the construction, configuration, and interaction with AI agents. This accessibility broadens its user base. | Limited Agent Workflow Support: While the application supports certain agent workflows (e.g., UserProxyAgent and AssistantAgent), more complex workflows like GroupChat are not yet supported. |
| Workflow Composition: Users can effortlessly compose AI agents into workflows, specifying how agents collaborate to accomplish particular tasks. | User Experience Improvements Needed: The user experience, including features like streaming intermediate model output and summarization of agent responses, is identified as an area for improvement in the future. |
| Skill Enhancement: AutoGen Studio supports augmenting agents with various skills, allowing users to tailor agent behavior and capabilities according to their needs. | Interface Building Complexity: Building interfaces in React for those who prefer to install from source might require a certain level of familiarity, making it less straightforward for users without web development experience. |
| Interaction Sessions: Incorporating interaction sessions into a gallery permits users to review, share, and reference specific engagement periods with agent workflows. |
Future Enhancements
- Support for Complex Agent Workflows: AutoGen Studio plans to integrate support for more sophisticated agent workflows, such as GroupChat, allowing richer interactions between multiple agents.
- Improved User Experience: Future releases aim to enhance the user experience, including features like streaming intermediate model output, better summarization of agent responses, and information on the costs of each interaction.
- Expansion of Agent Skills: The application will continue to evolve to improve the workflow for authoring, composing, and reusing agent skills.
- Community Features: AutoGen Studio intends to introduce features facilitating sharing and collaboration within the user community. This includes sharing sessions, results, skills, agents, and agent workflows more easily among users.
- Integration with Shared Repository: Exploring options for contributing to a shared repository of skills, agents, and workflows, fostering a collaborative environment among AutoGen Studio users.
Conclusion
In AutoGen Studio’s realm, AI agents have daunting complexities and development that need to fade away. This platform allows enthusiasts and experts to prototype, customize, and collaborate on AI agents effortlessly. With a commitment to accessibility and continuous evolution, AutoGen Studio paves the way for a future where building AI dream teams is not just a tech fantasy but an achievable reality for all.
Key Takeaways
- Rapid Prototyping: Swiftly develop and test AI agents without intricate programming, perfect for quick idea validation.
- Evolution to Studio: AutoGen’s transition from Assistant to Studio signifies a significant upgrade, offering a refined user experience with three key sections.
- Not for Production: While powerful for prototyping, AutoGen Studio is explicitly not intended for production and is best suited for the early stages of development.
- Effortless Customization: Users can customize AI agents through an intuitive interface without coding or defining skills, workflows, and properties.
Frequently Asked Questions
Q1. Is AutoGen Studio suitable for AI beginners?
A. Yes, it’s designed for beginners, eliminating the need for complex programming and offering a smooth onboarding experience.
Q2. Can AutoGen Studio be used in production?
A. No, it’s not production-ready. It’s intended for prototyping and demonstration purposes during the early stages of development.
Q3. Can I customize AI agents in AutoGen Studio?
A. AutoGen Studio allows you to tailor AI agents by defining their skills, workflows, and properties through an intuitive interface.
Q4. Where can I find the latest updates and support for AutoGen Studio?
A. For the latest updates and further reference, please refer to the AutoGen Studio Readme. Please open an issue on GitHub or ask questions on Discord for additional support.
The media shown in this article is not owned by Analytics Vidhya and is used at the Author’s discretion.
Hello! I'm Divya, "I have a deep passion for constantly expanding my knowledge and skills in the ever-evolving world of technology. Also love to share my knowledge and insights with others, fostering a culture of continuous learning and growth.


