
This article was published as a part of the Data Science Blogathon
Solving Machine learning Problems in a local system is only not the case but making it able to community to use is important otherwise the model is up to you only. When it is able to serve then you came to know the feedback and improvements needed to improve it. Implementing a Machine learning model in a jupyter Notebook is a very easy task. And 90 percent of times when any data science practitioner deploys his problem statement it is in the form of a website. In this article, we will learn how can you convert any Machine learning problem statement into an Android app.

Table of Contents
- ML Project workflow on Android
- Prerequisite to Implement ML on Android
- Hands-on practice with ML on Android
- Define Problem Statement
- Build ML model
- Flask API
- Testing with POSTMAN
- Android UI with Java
- End Notes
Workflow of Machine Learning project on Android
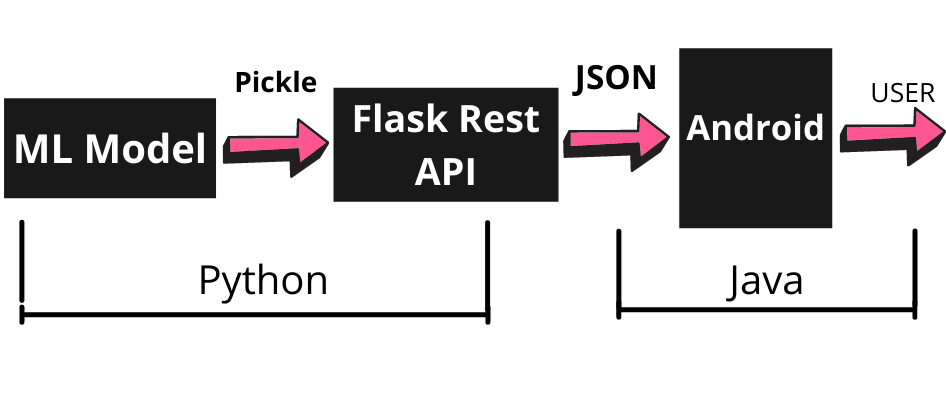
When we deploy machine learning on a website, the basic workflow is implementing the model in any Python IDE, extracting it using a pickle module, and with help of any web framework flask or streamlit to deploy in form of the web app. here the complete implementation from frontend to the backend is in Python.
Now when deploying Machine learning in android there is a little bit of modification in the above workflow. First, we have a model, we pickle it. For implementing Android apps java is popular and working with android studio java is mostly preferred so here our frontend will depend on java and in middle we have to implement a Flask API which is our machine learning model whose output will be in JSON format(JSON is a universal format which any programming language can understand) and through java android app we will hit at Flask API whose response is in JSON and we will parse this JSON and print it in android frontend.
Prerequisite to implement workflow of Machine Learning on Android
The above workflow sounds a little bit difficult while reading meanwhile I hope that through the diagram it is clear and when you will implement it through the article it will completely fit your mind.
- The first thing you should know is the basics of a flask. In our previous tutorial, I have published a complete guide to the flask for data science.
- If you know the basics of Android it is very good. If not please visit this tutorial to familiarize yourself with android programming.
Hands-on Implementation of Machine Learning on Android
Define Problem statement
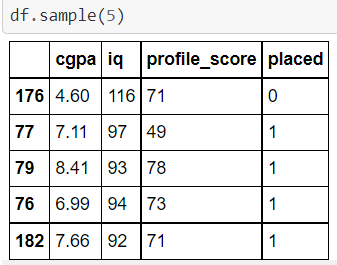
I am taking a very simple problem statement where we have to predict a particular student will be placed or not using CGPA, IQ, and profile score. It is a toy dataset. here our main aim is to learn how to take Machine learning on android not on building a model. You can find a dataset here. The sample look at the dataset looks like the below dataframe.
Building a Machine learning model
This part is straightforward. First, we load a dataset, with a little bit of preprocessing we use a random forest algorithm to train the data on, and we save the model in pickle format.
import numpy as np
import pandas as pd
df = pd.read_csv('students_placement.csv')
df.sample(5)
X = df.drop(columns=['placed'])
y = df['placed']
from sklearn.model_selection import train_test_split
X_train,X_test,y_train,y_test = train_test_split(X,y,test_size=0.2,random_state=2)
#train the model
from sklearn.ensemble import RandomForestClassifier
from sklearn.metrics import accuracy_score
rf = RandomForestClassifier()
rf.fit(X_train,y_train)
y_pred = rf.predict(X_test)
print(accuracy_score(y_test,y_pred))
#save the model in pickle format
import pickle
pickle.dump(knn,open('model.pkl','wb'))
Built Flask API
A user will enter information in the form and while submitting the form it will receive the POST request. And on making a post request Flask API will accept the data entered by a user and pass it to the machine learning model which will predict the output class. The predicted class we will pass to the android app in form of JSON.
from flask import Flask,request,jsonify
import numpy as np
import pickle
model = pickle.load(open('model.pkl','rb'))
app = Flask(__name__)
@app.route('/')
def index():
    return "Hello world"
@app.route('/predict',methods=['POST'])
def predict():
    cgpa = request.form.get('cgpa')
    iq = request.form.get('iq')
    profile_score = request.form.get('profile_score')
    input_query = np.array([[cgpa,iq,profile_score]])
    result = model.predict(input_query)[0]
    return jsonify({'placement':str(result)})
if __name__ == '__main__':
    app.run(debug=True)
Test Application using Postman
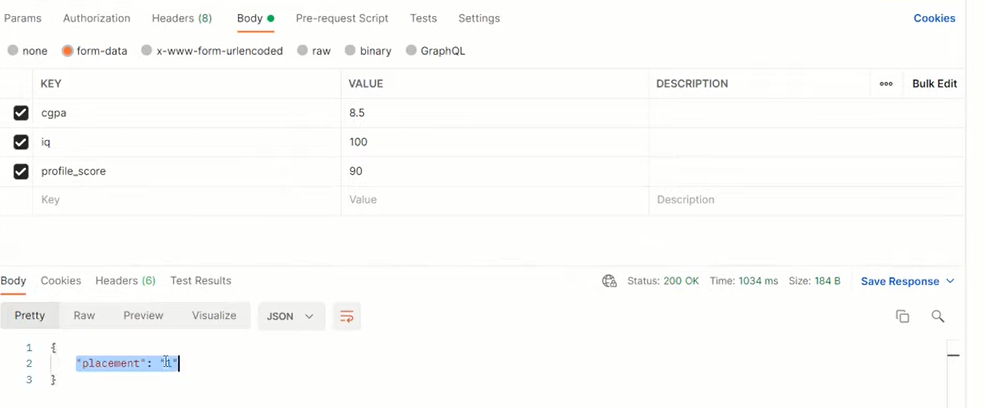
Postman is an automatic and interactive tool used to verify APIs of your project. It is Google chrome App that connects with HTTP API. It works at the backend and allows you to check that your API is working fine as per our requirements. By providing the URL of your running flask API and inserting data in the key and value section you can hit your API and get the desired response.
You can download and install Postman using this link. After successful installation open it and insert the URL of the Flask app. In the key and value section insert the name through which we are accessing the value and value you want to provide.
Create Android App
Install and setup Android Project
To work with Android programming first you need Android studio. If you have not installed it then please follow this link to download Android studio. The download is straightforward, only the studio size is large near about 1GB.
After installation start the Android studio and you will have an option of a new project. Click on the new project and you need to select any activity. select the empty activity and proceed to next where you need to define the name and storage folder of your project. have a look at the below images for any queries on selection.
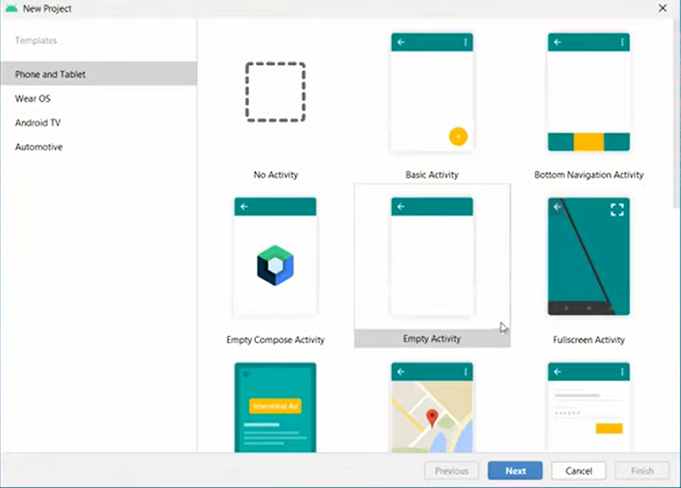
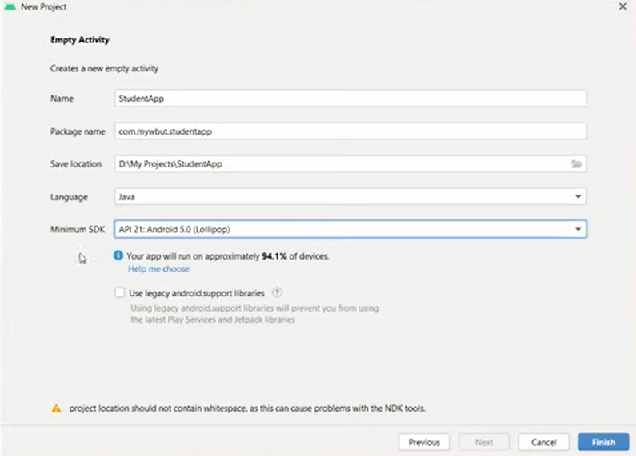
After changing the name of the project keep the rest of things as default, and check finish. As Android studio is a little bit slow so for setting up your project will take a little time so please wait patiently till it set all files of the project as shown in the below image.
Create Android UI
We know that UI is always created in an XML file. Open the XML file named activity main and here we will build a complete frontend UI. You can use the below code snippet. First, we have given the title of the project, three input fields for respective columns, and one button to submit and get results.
<LinearLayout xmlns:android="http://schemas.android.com/apk/res/android"
    xmlns:app="http://schemas.android.com/apk/res-auto"
    xmlns:tools="http://schemas.android.com/tools"
    android:layout_width="match_parent"
    android:layout_height="match_parent"
    tools:context=".MainActivity"
    android:orientation="vertical">
    <TextView
        android:layout_width="match_parent"
        android:layout_height="wrap_content"
        android:text="Student Placement Predictor"
        android:textSize="30dp"
        android:textAlignment="center"
        android:layout_marginTop="30dp">
    <EditText
        android:layout_width="match_parent"
        android:layout_height="wrap_content"
        android:hint="CGPA"
        android:id="@+id/cgpa"
        android:layout_marginTop="20dp"
        >
    <EditText
        android:layout_width="match_parent"
        android:layout_height="wrap_content"
        android:hint="IQ"
        android:id="@+id/iq"
        android:layout_marginTop="20dp"
        >
    <EditText
        android:layout_width="match_parent"
        android:layout_height="wrap_content"
        android:hint="profile_score"
        android:id="@+id/profile_score"
        android:layout_marginTop="20dp"
        >
    <Button
        android:layout_width="match_parent"
        android:layout_height="wrap_content"
        android:text="Predict"
        android:layout_marginTop="30dp"
        android:id="@+id/predict">
    <TextView
        android:layout_width="match_parent"
        android:layout_height="wrap_content"
        android:text=""
        android:textSize="50dp"
        android:textAlignment="center"
        android:layout_marginTop="80dp"
        android:id="@+id/result">
Explanation – We have used a linear layout of the project. For the title of the project, we use TextView which is used to display any text. We can style it the same as in HTML, CSS so set font size, margin, width, height, etc. After that for the input field in Android, we use EditText where we set id for respective column and a hint is used the same as a placeholder in HTML. After that, we use Button to submit the form and on clicking, we will access the data of the form. In last to display the results which is obtained from a flask in form of JSON we again use TextView. At the initial level, we will not display any text in text view, and it will display after receiving the result as we do in a flask web app.
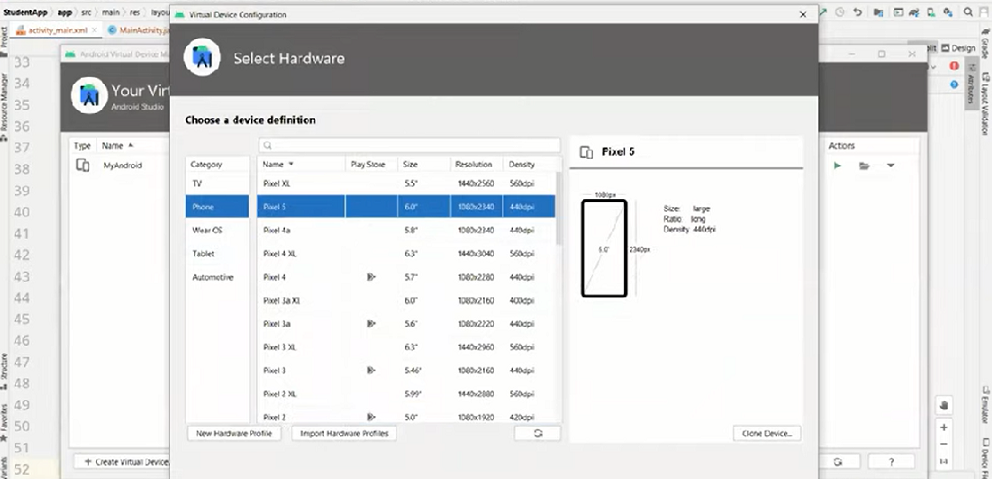
Run your UI using AVD
AVD stands for Android Virtual device using which you can run your application on android which will look the same as your mobile phone. In the top-right corner visit the AVD section and select pixel-5. Click next and select the virtual device through which it will run. you can download Android-Q and click next. You will get the window to name a device and click finish. finally when you can your device run it using the play button and it will start an AVD where your UI will run. After that run the file where we just coded and see the changes in AVD.
Connectivity of API to Android APP
Now you have to write its backend working in java. The logic we have to implement is you will take the inputs from the android app, hit the API, and the response from the API display back in the Android app. So, there is one problem that the API we have implemented is running locally on your system which the Android app cannot detect. so we need to deploy our API online and we will use Heroku for this task.
Deploy API to Heroku
Login to Heroku and create New app by giving it a unique name. You can deploy your GUI using Heroku CLI or GitHub. In our Flask tutorial, we have seen deployment on Heroku in detail and what files you need to create. You need requirements and Procfile. the content of this file you can copy from the below snippets.
In the requirements text file, you need to install the following four libraries.
flask
numpy
sklearn
gunicorn
Procfile contains only a single line code to initialize the web app.
web: gunicorn app:app
After creating files upload to Github by creating a new repository and connecting it with Heroku and deploying a project to the main branch. After successful deployment, you will get an online URL. If you have any queries in deployment please visit the Flask tutorial guide for in detail deployment.
If you need to check your API then you can do it with Postman by providing it a data and a Heroku app URL.
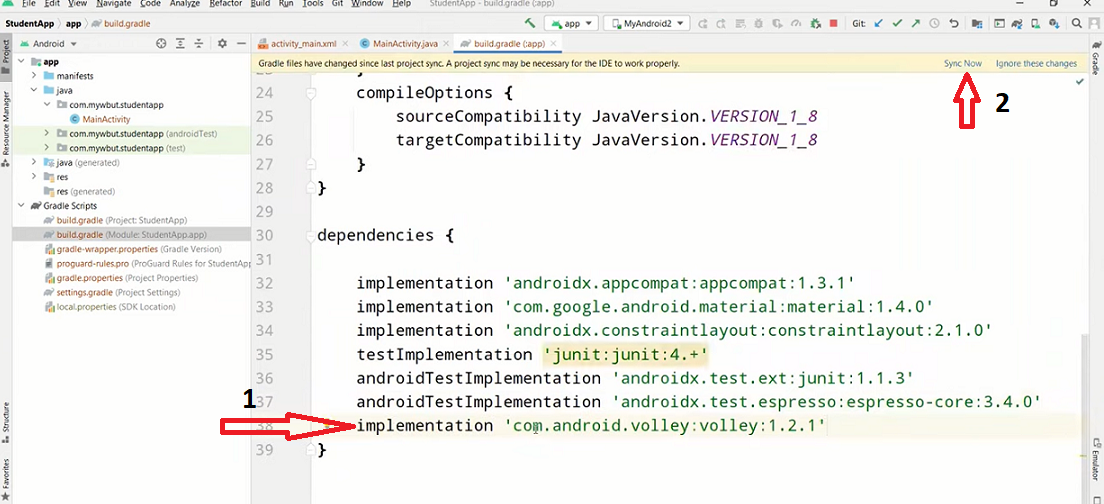
Connect API to Internet
To hit API we need one library named Volley. So to install Volley visit In Gradle scripts in your project directory, and open the build Gradle file and write below one line of code that will install the required library. As you click on sync now on the top right it will start installing required libraries in the project directory.
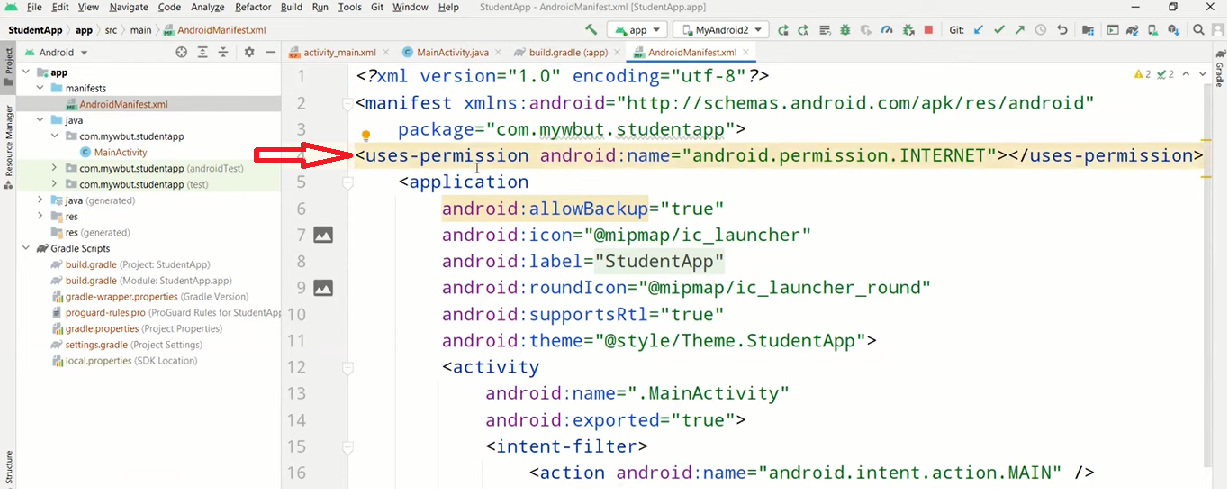
Now to hit the API which is on Heroku you will also need internet permission to open the Manifest file and include the below line of code.
Now we need to include the last bit of code where we use Volley to hit our API. first, you need to create one string request object and define a POST request on Heroku URL.
Write backend logic in java
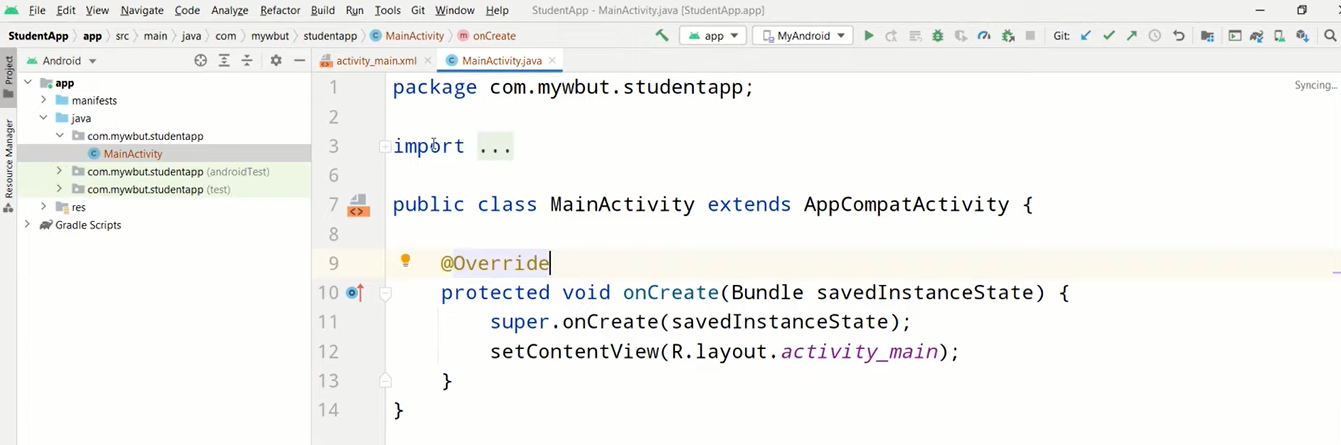
We have designed our UI, Now we need to write backend logic to accept data from the frontend in a java file. The flow is where we have to accept all the three values from the android app and when it click predict button we have to hit API and ret JSON response. keeping all the imports as it is, you can follow the below code from class in the Main Activity java file.
public class MainActivity extends AppCompatActivity {
EditText cgpa,iq,profile_score;
Button predict;
TextView result;
String url = "https://student-placement-app.herokuapp.com/predict";
@Override
protected void onCreate(Bundle savedInstanceState) {
super.onCreate(savedInstanceState);
setContentView(R.layout.activity_main);
cgpa = findViewById(R.id.cgpa);
iq = findViewById(R.id.iq);
profile_score = findViewById(R.id.profile_score);
predict = findViewById(R.id.predict);
result = findViewById(R.id.result);
predict.setOnClickListener(new View.OnClickListener() {
@Override
public void onClick(View view) {
// hit the API -> Volley
StringRequest stringRequest = new StringRequest(Request.Method.POST, url,
new Response.Listener() {
@Override
public void onResponse(String response) {
try {
JSONObject jsonObject = new JSONObject(response);
String data = jsonObject.getString("placement");
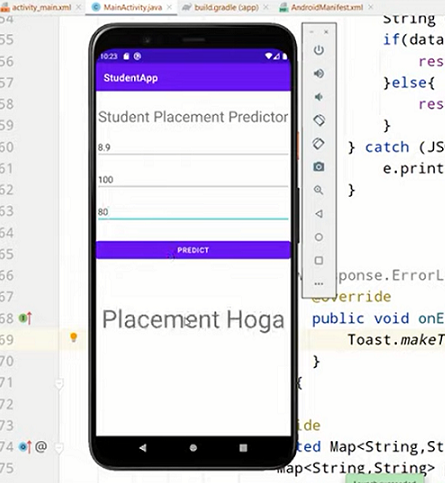
if(data.equals("1")){
result.setText("Placement Hoga");
}else{
result.setText("Placement Nahi Hoga");
}
} catch (JSONException e) {
e.printStackTrace();
}
}
},
new Response.ErrorListener() {
@Override
public void onErrorResponse(VolleyError error) {
Toast.makeText(MainActivity.this, error.getMessage(), Toast.LENGTH_SHORT).show();
}
}){
@Override
protected Map getParams(){
Map params = new HashMap();
params.put("cgpa",cgpa.getText().toString());
params.put("iq",iq.getText().toString());
params.put("profile_score",profile_score.getText().toString());
return params;
}
};
RequestQueue queue = Volley.newRequestQueue(MainActivity.this);
queue.add(stringRequest);
}
});
}
}
Explanation – First we create variables to accept values. To detect the click-on button we need an Event Listener so we use a click listener. In on click function, we created a string request object to make a POST request on Heroku URL. We also have to provide two things, among which the first is the listener which is invoked when we hit API correctly. After that, we created a second listener when there is some error on the API side like server down, connectivity, etc. After that, we created a hashmap to parse all the parameters. The key and value both are in form of a string. At last, we created a request queue using volley to run the above code. If all the things are correct then in the first listener named on the response we pass the JSON object and accept the predicted result. If it is one then the student will be placed else no placement. And in the second listener if any error is there we print the error in Toast.
Now if you run your application on AVD, it will run fine on Android.
Now the APK file is generated, how you can fetch and install the application on your mobile phone. Visit Android studio, then to build, click on build bundle and click build an APK. It will automatically generate an APK file. If you click on locate then it will give you the location of download and through USB you can take it in your Mobile device.
End Notes
Congratulations! we have to deploy the Machine learning model to Android. In this article, we have learned how you can take any machine learning problem statement to an android app from scratch. I know that learning and reading the article without knowledge of android and much on the front end seems a little difficult but If you once read Flask tutorial and Android tutorial first which will take very little time then following up on this will make things streamlined for you. I hope that it was easy to catch up at every step of development and deployment.
If you have any doubts or feedback, feel free to share them in the comments section below.
About The Author
I am pursuing a bachelor’s in computer science. I am a data science enthusiast who loves to learn, play and work with data and data science.
Connect with me on Linkedin
Check out my other articles here and on Blogspot
Thanks for giving your time!
I am a software Engineer with a keen passion towards data science. I love to learn and explore different data-related techniques and technologies. Writing articles provide me with the skill of research and the ability to make others understand what I learned. I aspire to grow as a prominent data architect through my profession and technical content writing as a passion.
Free Courses


Very good article. is the code available on Github?
Great post! I found the step-by-step guide super helpful. It really clarified the deployment process for ML models on Android. Looking forward to trying it out!