This article was published as a part of the Data Science Blogathon.
Introduction
Have you ever wondered how websites track user interactions? Must be pretty hard, isn’t it? Well, yes and no. Simple tracking → super easy but advanced level tracking can send your mind for a six if things don’t work as expected.
In this article, we are going to be looking at how you can set up google tag manager and then use it to set up your analytics tools like Google Analytics, Facebook pixel, and more.
Note: In this tutorial, we will be sticking to just web platforms and not Android/iOS apps.
What exactly is a tag and a tag manager?
A tag is nothing but a snippet of code that you get from your tool provider, in our case Google Tag Manager. This code needs to be placed in your website code to install the tool.
Tag manager, on the other hand, is a platform used to handle these tags. It centralizes all the tags and reduces the burden on web developers. It makes the data collection process simpler and more efficient.
Why do we need a tag manager?
By now you might have a basic understanding of what tags are and how they can be installed, so why do we need a platform like GTM to install tags when you can install them directly? Well, for that, we will look into some common problems that users face without a tag manager.
Complications with Tags and how does tag manager solve it
-
Highly dependent on the IT department:
Whenever you are adding a tag to a website you are basically changing the code and for changing you need access to the website which is with the IT team.
The IT teams have various other requests and if you go to them for implementing something in the middle of their sprint cycles then your request could be rejected and you’ll have to wait for the next cycle to begin for your tag to be implemented.
The IT team just needs to install the tag manager once and then the control can be transferred to the marketing/analytics team.
-
Multiple tags on various places and special cases
Tags need to be placed in various places in a code and tags will be required for tracking different events such as order completions or lead submission etc.
The IT team needs to implement the tags on all the specified places and after that, it will go through audits and validations which can be a time-consuming process.
Tag manager provides an interface to load tags without depending on the IT team. The tag manager gives the user the power to decide things like – where to load the tag, when to load it, etc.
-
Update/Removal of tags
It can happen that you no longer need a tool on the website or you might need to update the 3rd party tools. So to do that, you first need to locate the code on the website and then remove it, which again could be cumbersome.
Tag manager centralizes all the tags in one place for easy removal/update. You just need to update the tag in the interface of the Tag manager and that update will be published on each and every page with that tag.
Hence to summarise,
-
Tag manager provides a platform to host javascript and HTML tags of 3rd party tools.
-
Centralises all the tags for efficient handling
-
Reduces dependency on the IT team. The developer just needs to install the tag of the tag manager once and then control can be transferred to the analytics or marketing team.
-
It makes it easy to update/remove/publish tags
-
It makes it convenient to handle special cases such as installing tags that track only a particular event.
Installation of Google Tag Manager on your site
Okay, so let’s get started with the installation; click on the link below to create an account on GTM.
https://tagmanager.google.com/
Create an account with your company name and select the country as the company HQ.

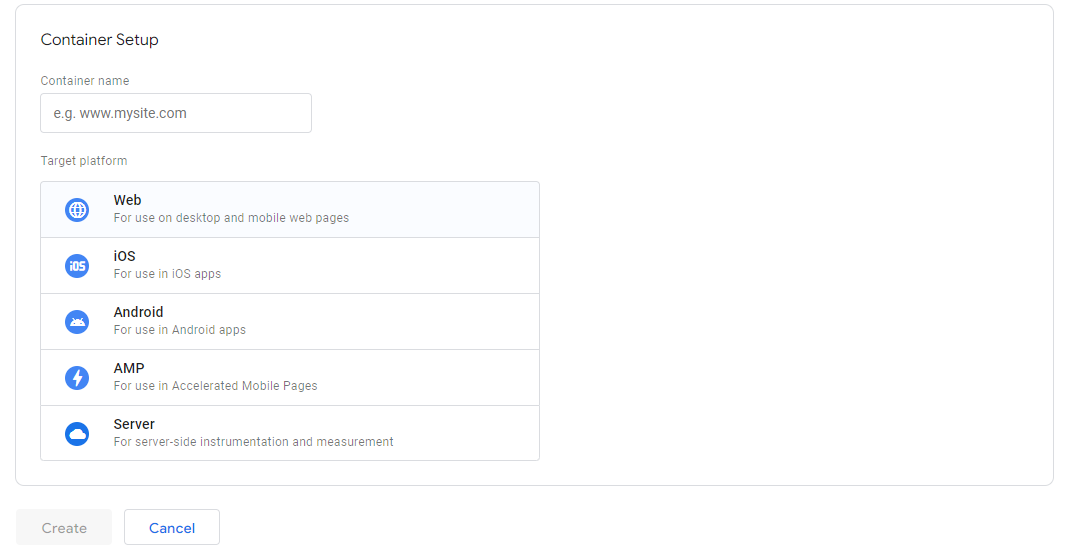
Scroll down to the container setup section, add the container name as your domain name (considered the best practice), and select the platform. You can create multiple containers in a single account for different platforms. For instance, if a company has a web app and an android app, then they can create two containers within the same account but of course with different target platforms. For this tutorial, we will focus on web platforms.
In the end, click “create” and read through the terms and conditions that pop up. After that, you will arrive at the GTM homepage. As soon as you create a new container, you will get a dialog box, something like this:

This code contains a javascript function that is used to install GTM on your webpage. As mentioned in the dialog box, paste this code as high as possible in the tag of all the pages on which you want to install GTM. Furthermore, the second tag is a tag used when the first tag does not work – when users do not enable javascript in the browser or they are using adblockers, etc. Paste this tag in the tag, again as high as possible so that it fires as soon as the page loads.
Just in case, if this dialog box does not show up or you close it, there various other ways to find the installation code.
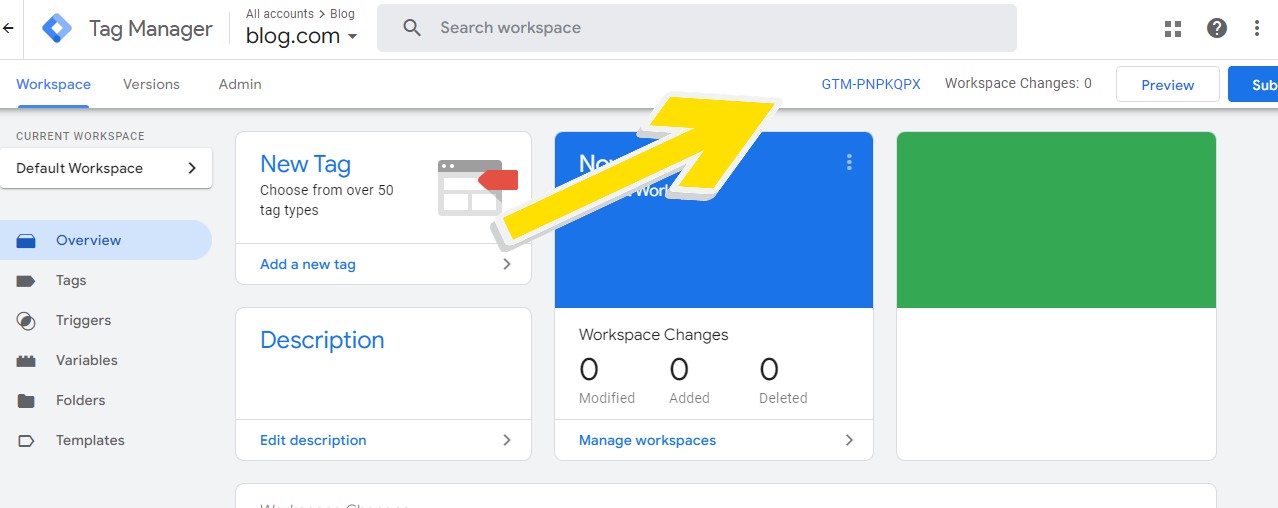
I. Go to admin and find the option of “Install Google Tag Manager”

II. Click on the container ID; your container ID should be something like this, “GTM – ******.” On clicking, the same dialog box with the installation will open up.
Overview of GTM UI
Tags
Within GTM, you will have two broad choices of tags – featured tags (built-in) and custom tags. As the name suggests, featured tags are optimized for use on the platform, whereas custom tags need to be installed manually, although the process is fairly simple.
Triggers
Triggers are basically a group of conditions that, when met will fire certain tags
IF {CONDITION}=TRUE THEN FIRE TAGS
Categories of triggers:
-
Page load
-
Click
-
User Engagement
-
Other
Variables
Variables provide information about the interactions. For example, if it is a page view event, what page is it, what is its URL etc.
Variables are used in
-
Variables in triggers: you can use variables to set triggers, say fire this tag when the page URL contains /thankyou
-
Variables in tags: variables can be used to pass values to tags, such as a conversion tag that will need values like price, product id, etc.
There are two types of variables
-
Built-in variables:
These are built-in variables and are not customizable. New containers do not have any user-defined variables therefore built-in variables are pre-enabled.
According to the container target platform you have different built-in variables in a web container some of the common built-in variables are: page path, page URL, referrer, etc.
-
User-defined variables: The second type of variables is the user-defined variables, where you can define your own variables, and there are several types of user-defined variables categories available such:
Navigation – page URL, HTTP referrer
Page variables – 1st party cookie, custom javascript
Page elements – element visibility, DOM element
Tags – what do you want GTM to do?
Triggers – when do you want to fire these tags?
Variables – what value do you want to pass to these triggers or tags?
Workspaces
In a container, you can have various workspaces; for the free version, up to 3 workspaces are allowed (as of now). Having separate workspaces helps in avoiding overwriting changes made in one workspace. Suppose you are implementing a GA4 tag in your workspace and the other teammate is working on something in the same workspace and saves and publishes the changes. This could lead to overriding and errors.
Preview Mode And Submit
On the right-hand top corner, you will find two buttons, preview and submit.
As the name suggests, this is a feature in GTM that allows users to preview their changes before it is sent live. Since GTM will primarily be used by the analytics and marketing team, they might end up breaking something on the page if not done right. Hence, using this Preview mode, you debug your tags, triggers, and variables.
The submit button is used to push your changes to the environment, it could either be published live to the audiences or forwarded to the quality analysis.
Installation of GA4 tag in GTM
Click on this link and click on “Google Analytics 4”.
-
Add in the account name
-
In the property setup, add the property’s name as the domain name as we did in GTM. If you have an eCommerce site select the currency of your country and also set the timezone as your current time zone.
-
Click on Next and add in your business details, although this is optional.
-
Press Create
-
Select the web platform
-
Add the website URL and give a suitable name to the data stream. Turn on the “Enhanced Measurement” option. This will automatically track basic events like clicks, scrolls, etc.

-
After you do so, you should get a pop-up window like the one shown below:
-
Copy the “Measurement-ID”. This ID is the unique identifier for your data stream. Different GA4 properties will have different measurement IDs.

In Google Tag Manager
-
Go to “Tags” (Available on the left-hand navigation bar)
-
Click on “New”
-
Click on “Tag Configuration” and find the “Google Analytics: GA4 Configuration” tag and click on it.
-
A window will appear, like the one shown below:
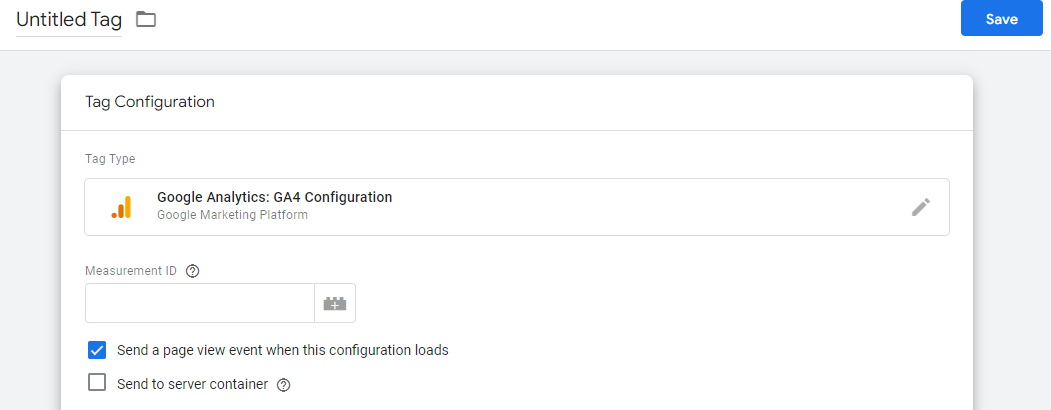
Now here is where you will paste your measurement ID and save the name as
“GA4 – Global – Config”
Scroll down, and you will find the triggering section. This is where you specify when you want to fire this tag.
Click on the pencil icon, and you should find a trigger called “All Pages”

Select that and press “save”
That’s it; you have now connected GA4 to GTM; all that’s left is to “submit” the changes. But before that, let’s preview it.
On your GTM dashboard, click on preview and enter your website URL. Below you will find a checkbox. Make sure the checkbox is ticked since this will allow GTM to send data to GA4’s debug mode.
Note: You need to install this extension for debugging:
https://chrome.google.com/webstore/detail/tag-assistant-legacy-by-g/kejbdjndbnbjgmefkgdddjlbokphdefk
The preview mode will automatically open up your website, and on your site, you should find a pop-up of tag assistant: This will show you if your site is connected to GTM or not.

Next, to verify data is being sent to GA4
Go to your GA4 dashboard and go to “configure” (available on the left-hand nav)
Then go to “debug view” – This feature allows you to debug your website in preview.
Perform some interaction with your site – clicks, scrolls, etc
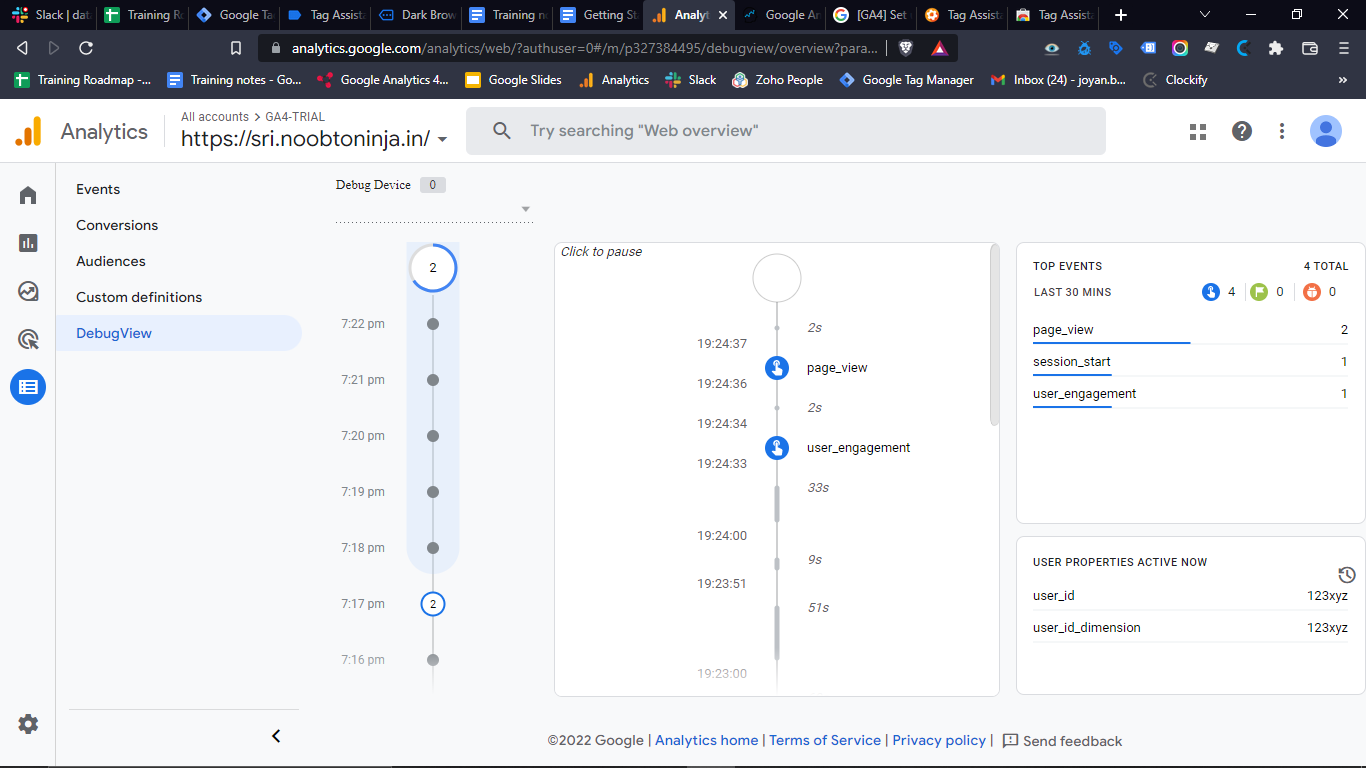
Your debugView should look something like this:
Another way to test your GA4 tag is by using an extension called Omnibug.
Right-click and select “Inspect”
You will find an option of Omnibug. This will show all your tags and their information.
Let’s Track Clicks!
-
In your Google Tag Manager interface, go to the variables section.
Variables > “Built-in Variables” > Click on “Configure”
-
Within the configure section, click the checkboxes of “Click”
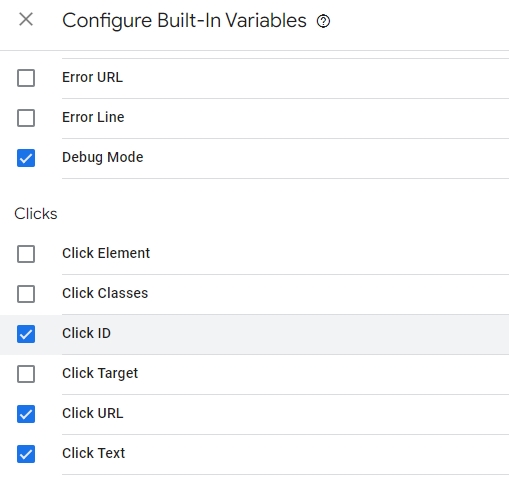
The above 3 click variables should be enough for basic click tracking-
Click ID – returns the ID of the clicked element
Click URL – returns the URL present in the anchor tag of the clicked element
Click Text – returns the text of the clicked element
-
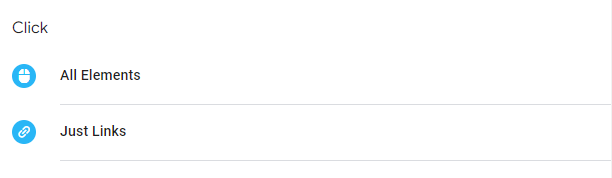
Now, go to the “Triggers” section and click the “New” button to create one.
Select the “Just Links” trigger under the “Click” section
For now, we will fire this trigger on all link clicks, later on, you can narrow it down further.
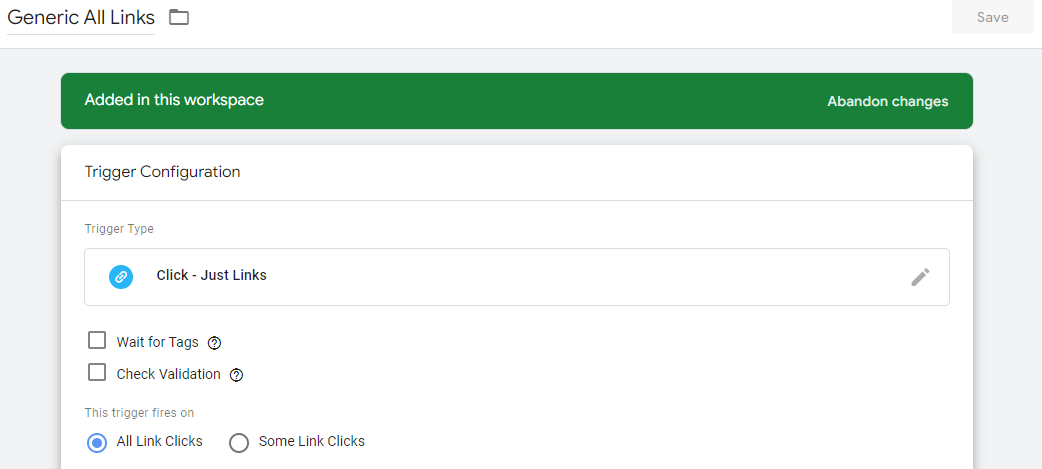
Save the trigger with a suitable name like – “Generic All links”.
-
Now to send the data to GA4, we will need to create a GA4 event tag.
Go to the “Tags” section in the GTM dashboard.
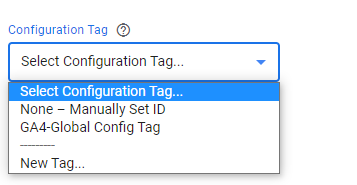
Click on “New” and find the “Google Analytics: GA4 Event” tag under the Featured section and a window like this should pop up.
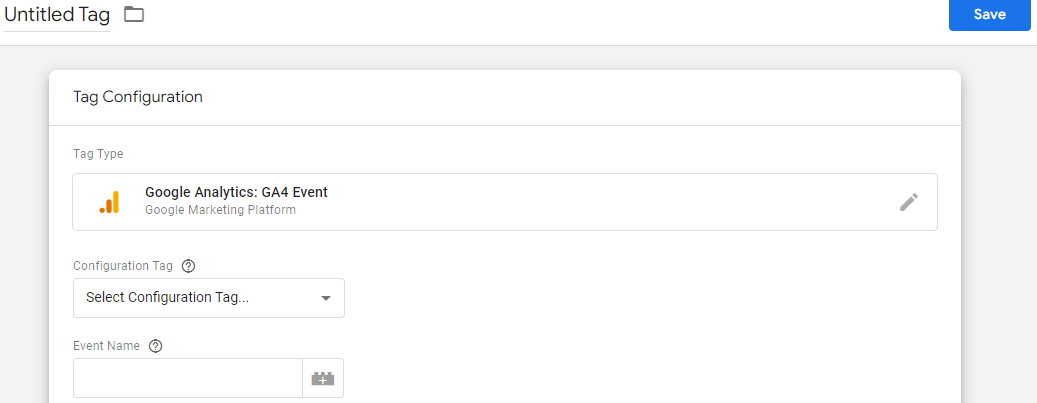
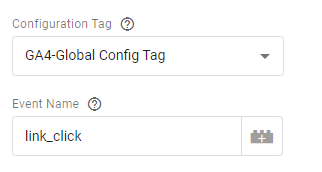
From the drop-down of the configuration tag, select your GA4 global configuration tag that we created while installing GA4 through GTM.
Add in the event name as “link_click”
Now, let’s tell the tag when to fire
Scroll down to the triggering section and after clicking on the pencil icon, select the “just links” trigger that we created.

Name the tag as “GA4 – Event – Link Clicks”
-
Go to Preview Mode and perform some link clicks to verify clicks are being tracked. In the debug window, the screen should look like this:

You can also verify that the click is being tracked in the GA4’s debug view

GA4 – debugView
-
Finally, if everything is working as expected, you can submit the changes, and the tracking will be initiated!
Conclusion
There you have it, getting started with Google Tag Manager. After following up with this article, you should be able to,
1. Install Tag Manager on your site
2. Integrate tools like Google analytics 4 for tracking data
3. Create tags, triggers, and variables in GTM
The next step for you is to start tracking simple events like a scroll or video engagements. You can track various events with a little bit of customization. For instance, in our link clicks tracking, we tracked all the links’ clicks and try to track a specific link only. Hint: You will need to configure the trigger.
Google Tag Manager is a revolutionary tool for web analytics, especially for those lacking technical expertise in web development. Don’t get me wrong, you will use javascript for advanced level tracking but you can do without it for basic level tracking.
The media shown in this article is not owned by Analytics Vidhya and is used at the Author’s discretion.


