If you’re still using a standard chatbot for your AI work, you’re missing a lot of features. And I mean a lot!
AI Studio is the workshop offered by Google, designed for those who want to prototype, build, and deploy without needing a PhD in computer science.
Whether you’re writing for an email, creating an infographic or just building your first personal agent, here is your chronological tour of the tool.
Table of contents
What is Google AI Studio?
Google AI Studio is the “Developer’s Playground” for Gemini. Unlike the Gemini chatbot, this is an environment where you get raw access to the model’s parameters. AI Studio allows you to build, test, and tune AI behavior. Adjusting everything from creativity levels to real-time data access, all within a web-based lab.
Essentially, it gives you more creative control over your models.
Accessing Google AI Studio
Before you start working let’s set the table first. To access Google AI Studio, go to the following link: https://aistudio.google.com.
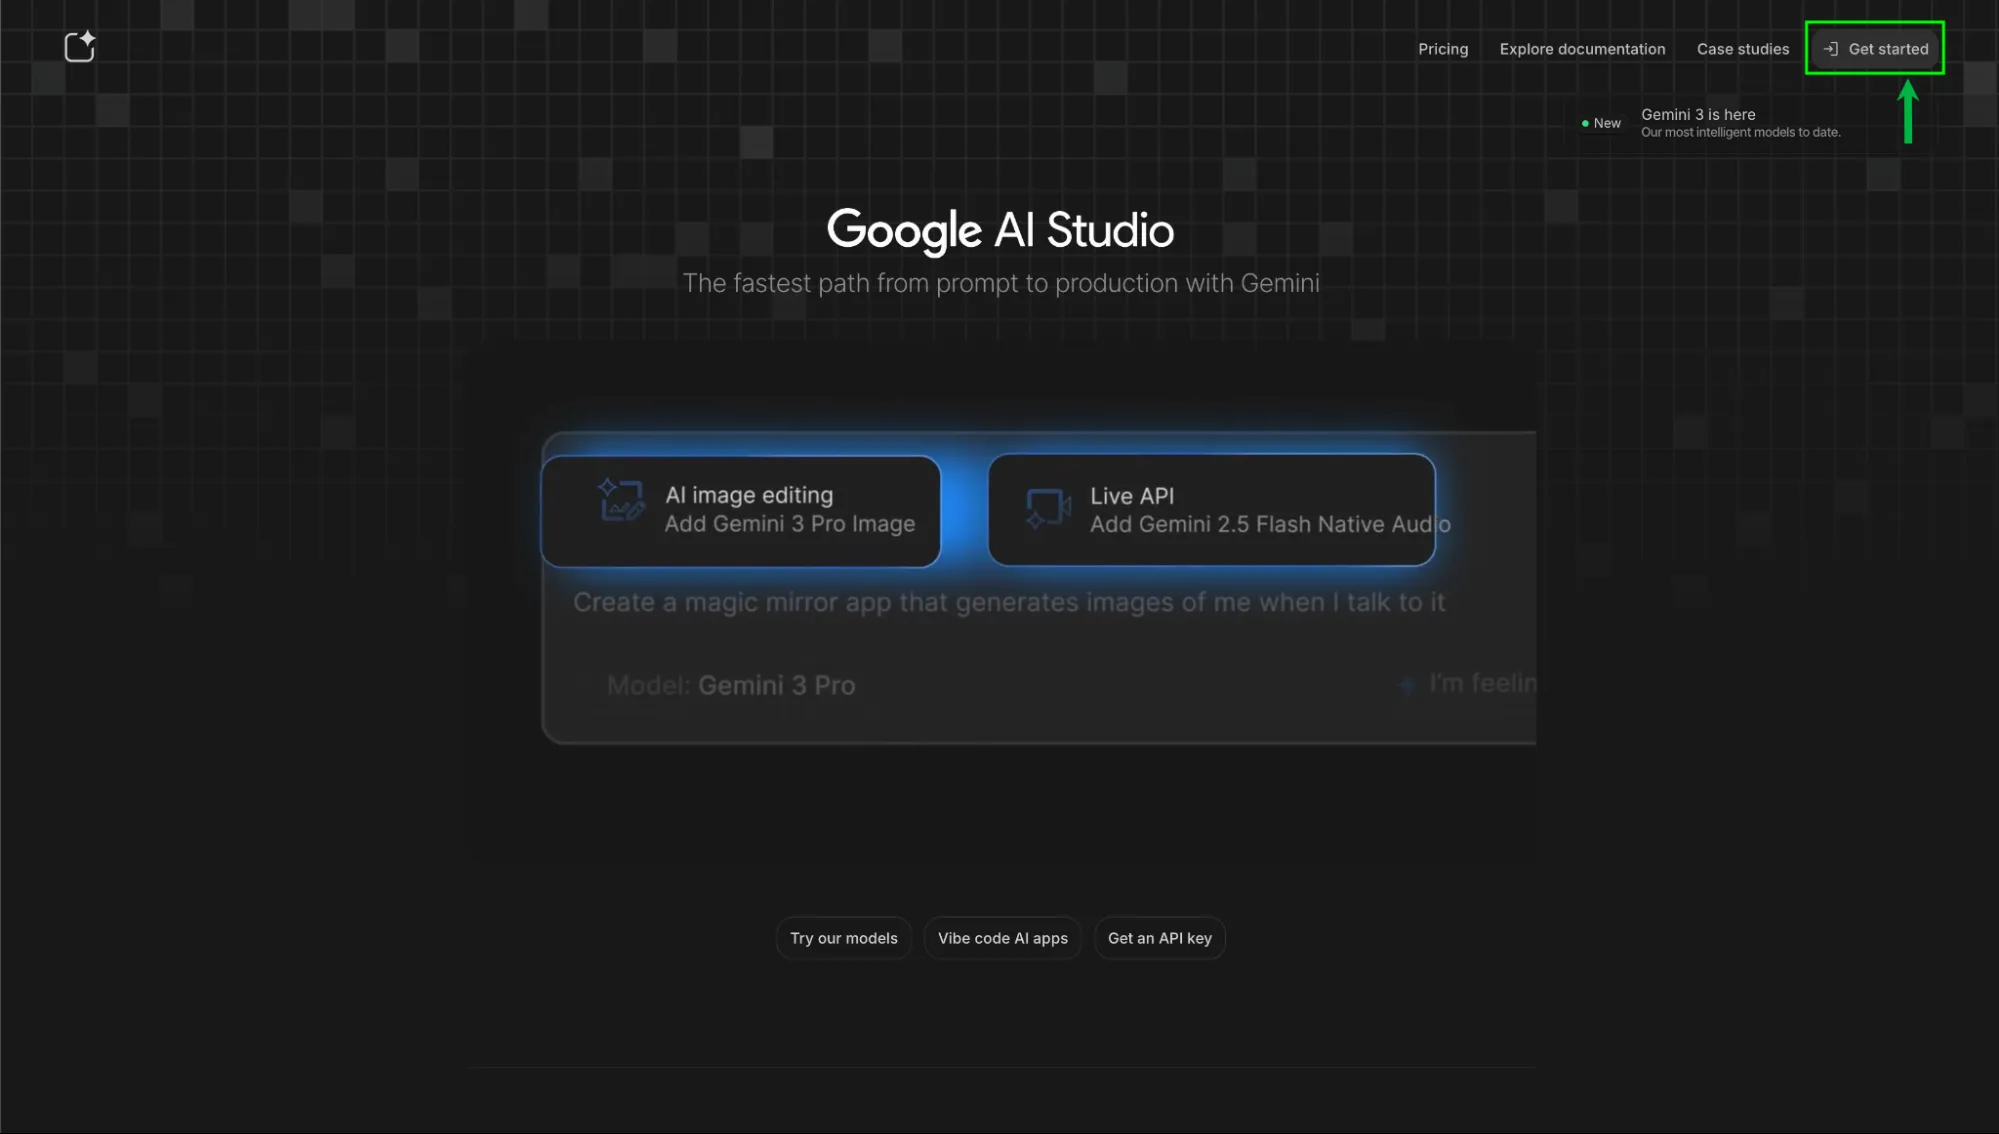
Once you’ve logged in, you’d be greeted with the AI Studio interface. Don’t let the “developer” vibe intimidate you, as it’s all point and click.
Settings Sidebar
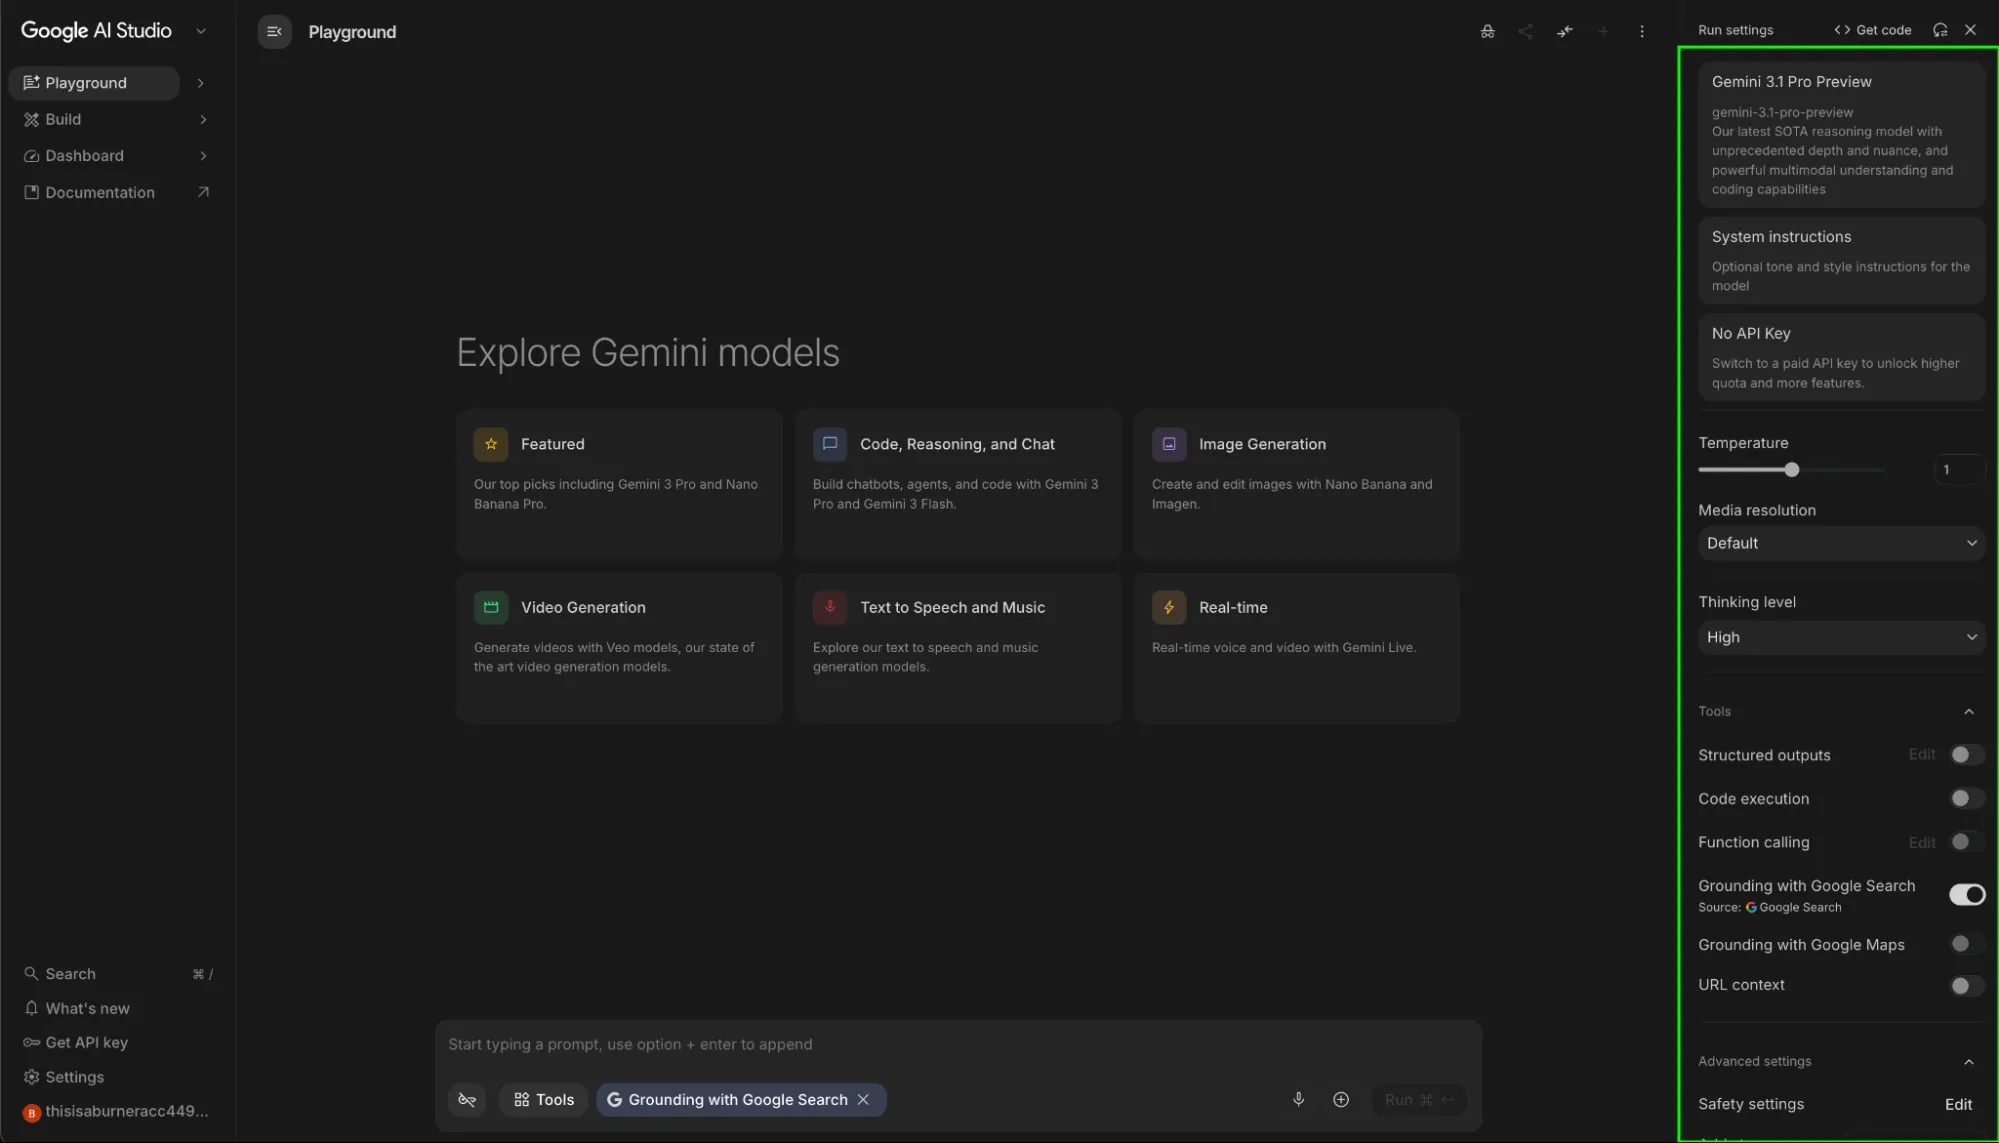
Here is the breakdown of all the features this sidebar offers:
Model Selector
This is where you’ll select the model that you are to use. Unlike the Gemini webapp where the choice of model is very limited, Google AI Studio allows access to all the previous models of Google family:
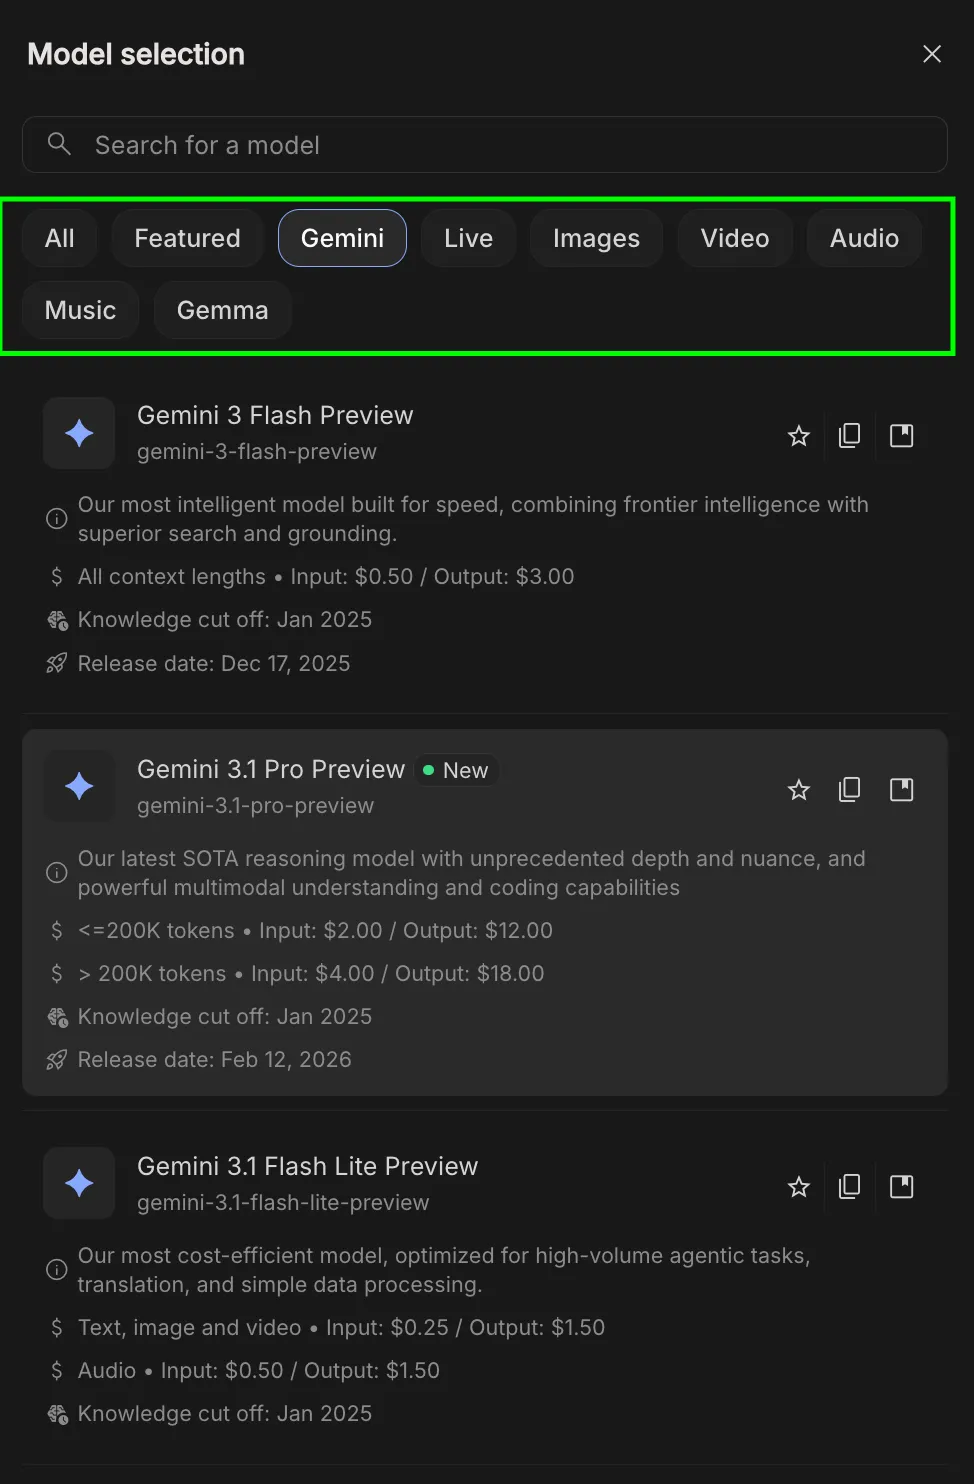
Here you’re able to choose any model released by Google in the past. This spans across different modalities, the most of popular of which being:
- ✦︎ Gemini: General-purpose, multimodal models for text, images, and reasoning. Best default choice for most tasks.
- 🎬 Veo: Text-to-video generation. Creates cinematic clips from prompts with motion, scenes, and transitions.
- 🎵 Lyria: Focused on music and audio generation. Useful for creative and sound-based projects.
- 🖼️ Imagen: Built for generating and editing images from prompts. Ideal for design and visual content.
- 🗣️ Live models: Handle speech-to-text and text-to-speech. Used for voice interfaces and audio apps.
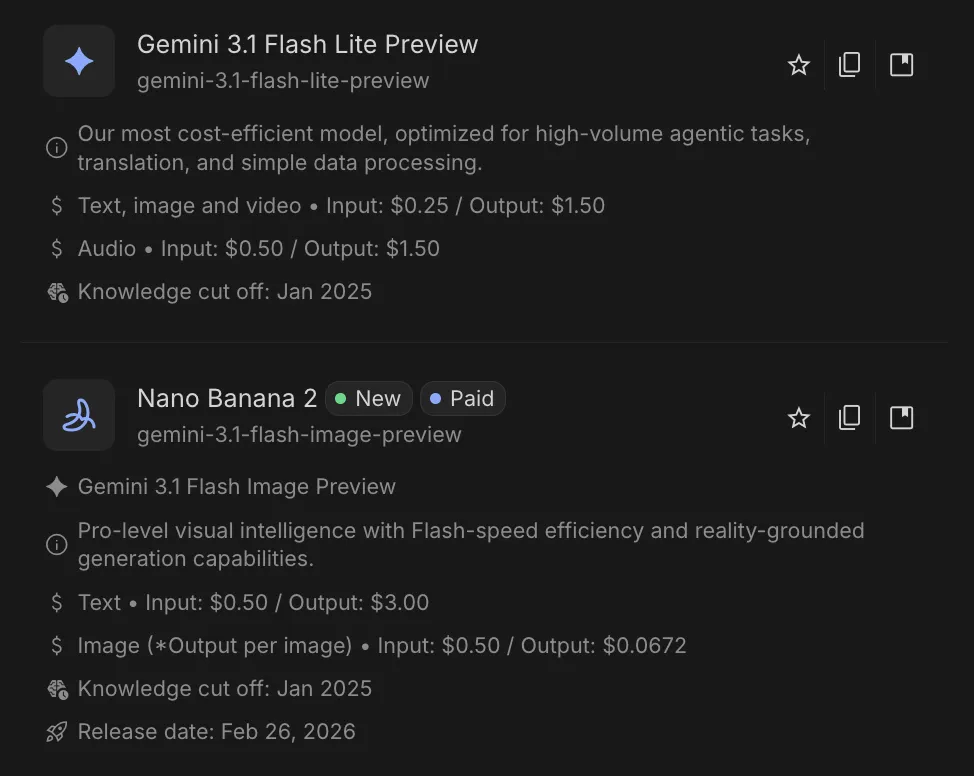
Models that are paid have a Paid Box highlighting the fact. This allows for regular users to choose the model of their choice without hitting paywalls, whereas power users can opt for more stronger SOTA models.
System Instructions
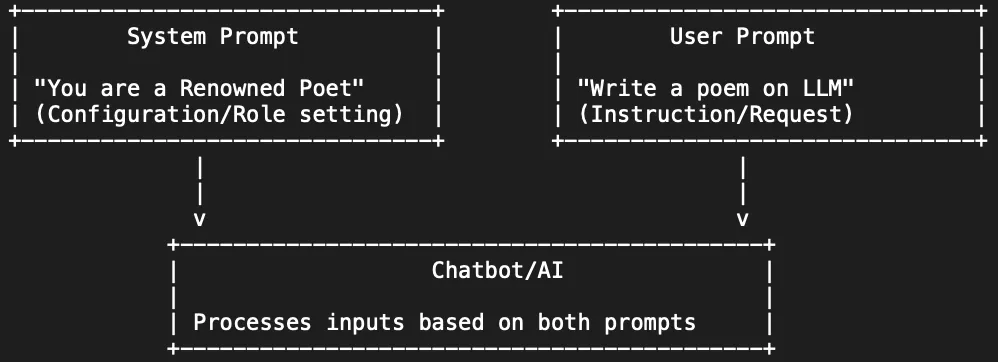
This field defines the “rules of engagement” for the AI. Unlike standard prompts, these are high-priority, persistent constraints used to establish permanent personas, mandatory formatting, or a localized knowledge base for the entire session.
- Example: A system instruction (SI) like “You are an Analytics Vidhya editor. Maintain an academic tone, provide Python snippets by default, and end every response with a ‘Key Takeaways’ table.” would ensure every output follows the same structure automatically.
Temperature
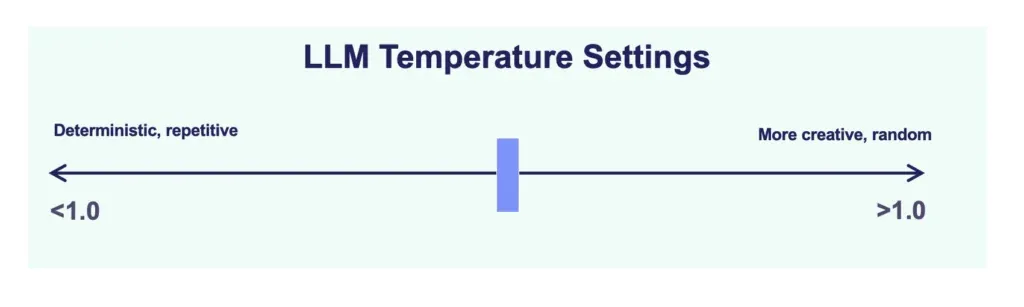
This setting controls the “randomness” or “predictability” of the model’s output on a scale from 0 to 2. It determines how much risk the model takes when selecting the next word in a sequence.
- Low Temperature (near 0): The model becomes deterministic, choosing the most likely word every time. This is essential for factual reporting, data extraction, and tasks where precision is required.
- High Temperature (near 2): The model explores less probable word choices, leading to more creative and varied responses. This is primarily used for brainstorming, storytelling, and creative content generation.
Note: For ideal performance most models would operate in the range of 0 to 1. Range after 1 are experimental.
Thinking Level
Thinking level allows you to control the computational effort the model exerts before providing an answer. It has 3 values:
- Low: Optimizes for latency. Use this when speed is the priority and the task is straightforward.
- Medium: A balanced choice for general-purpose use and solid quality.
- High: Maximizes reasoning depth. The model is allocated more processing time to deliberate on logic, mathematical proofs, and architectural coding tasks.
Grounding with Google Search
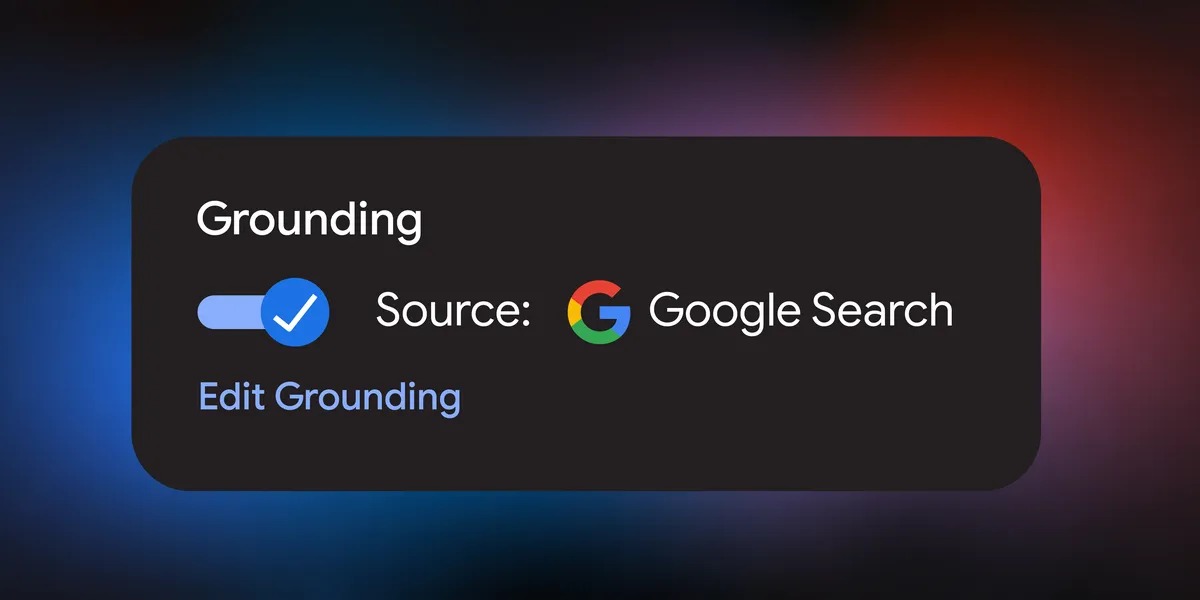
When enabled, this tool connects the model to the live Google Search index. The model will perform real-time queries to verify facts, fetch current events from 2026, and provide citations for its claims. This is the primary method for eliminating hallucinations in technical writing or research-heavy tasks that require up-to-date information not present in the model’s static training data.
Grounding with Google Maps
This tool extends grounding beyond text to spatial and geospatial data. When enabled, the model can verify physical addresses, calculate travel distances, and provide location-specific details. It is the primary tool for research requiring geographic accuracy, ensuring that location-based information is verified against real-world map data rather than generated from training memory.
Note: Grounding with Google Maps and Ground with Google Search are offered alternatively. Meaning if one is enabled, the other can’t be.
Code Execution
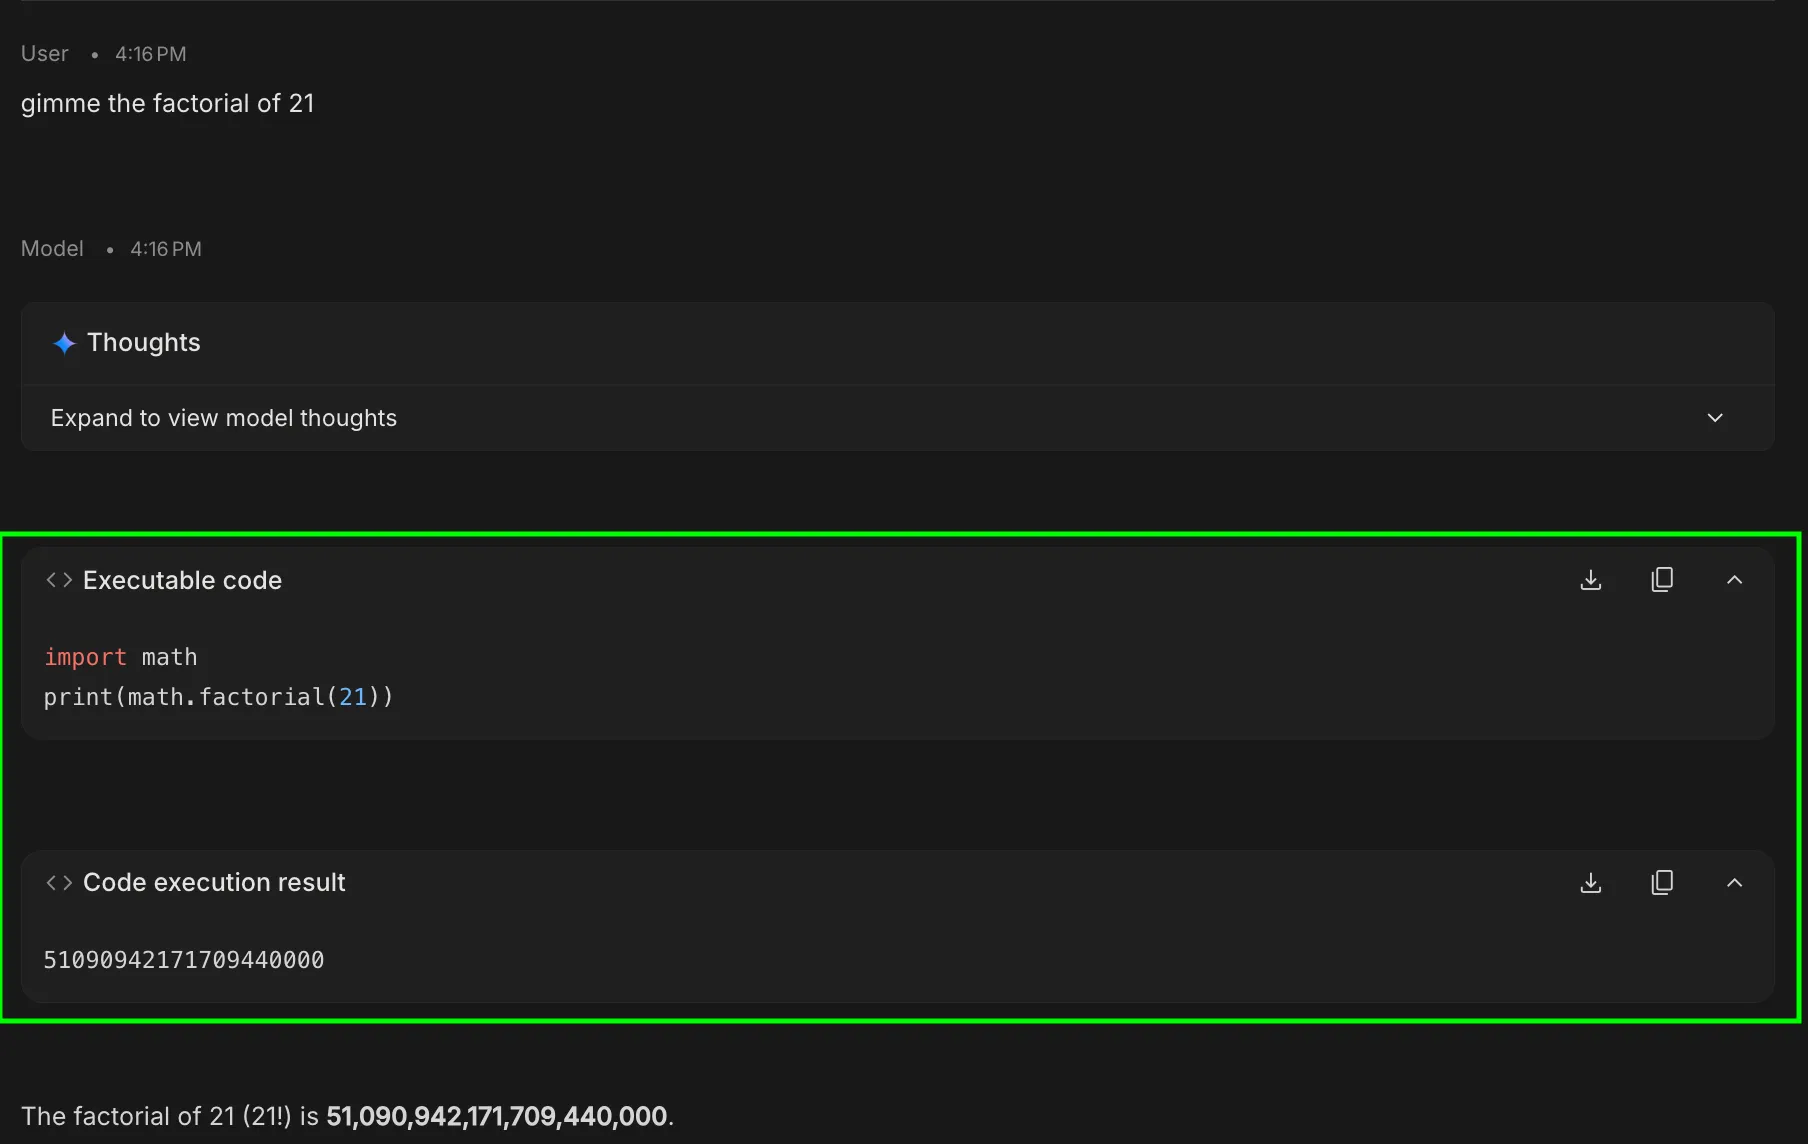
This tool allows Gemini to write and execute Python code within a secure, sandboxed environment. If a prompt requires mathematical calculation, data sorting, or chart generation, the model generates a script, runs it, and outputs the verified result. This allows faster processing for tasks that can be done programmatically.
Structured Outputs
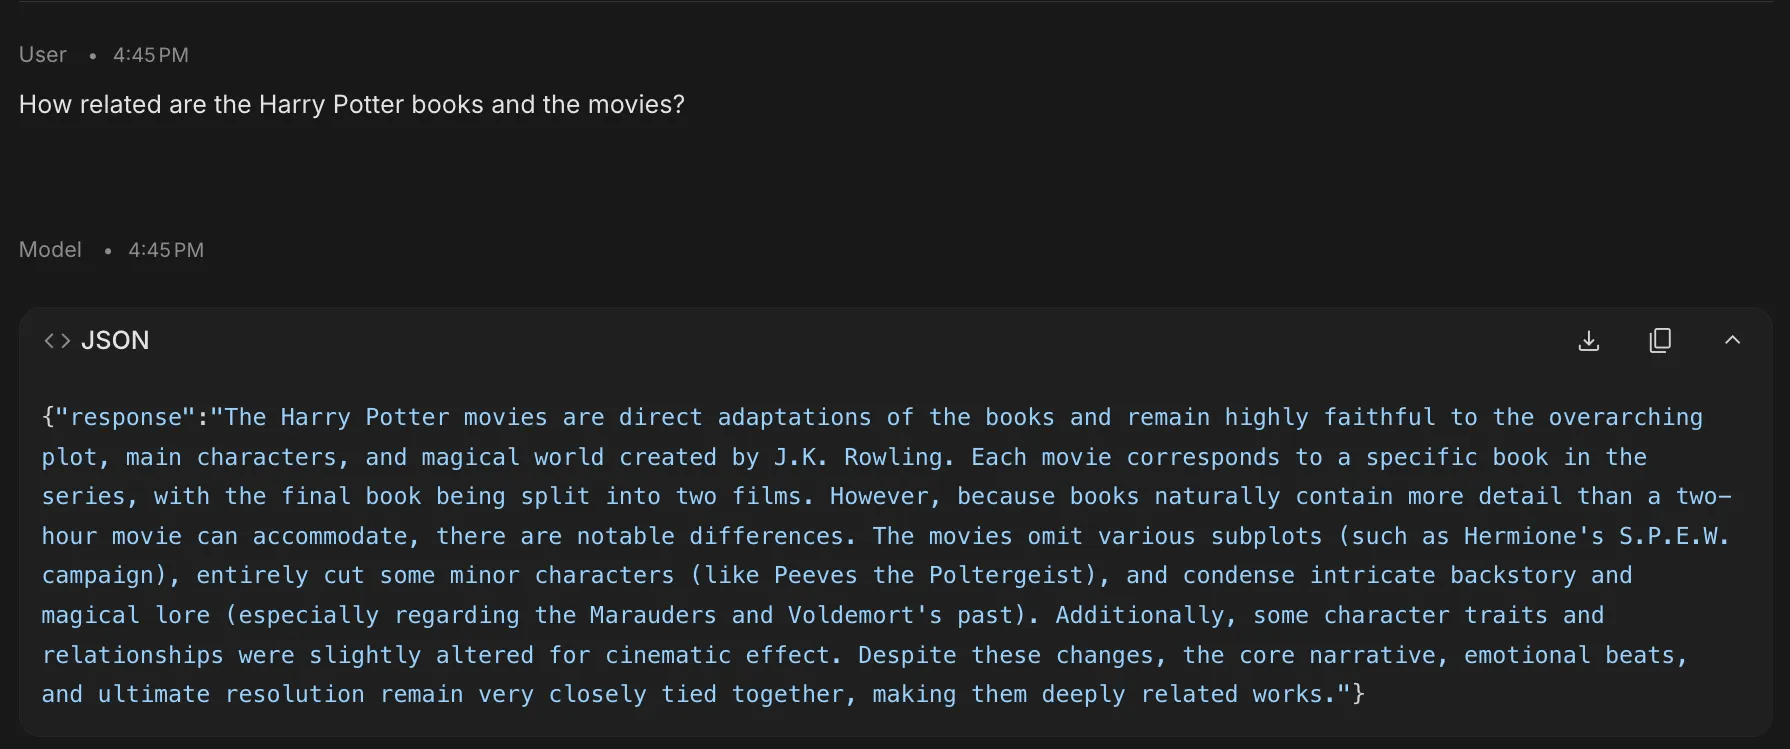
This feature forces the model to adhere to a specific schema, such as JSON, XML, or a predefined table format. By clicking “Edit,” you can define exactly what fields the AI must return. This is super helpful for developers wanting model responses in a specific format.
URL Context
This tool allows the model to ingest and parse specific web links as primary data sources. Technically, it functions by performing a targeted crawl of the provided URL using the browse tool tool usage.
By providing a direct link, you override the model’s static training data with real-time site content. This is essential for auditing live GitHub repositories, summarizing documentation, or extracting data from complex web structures without manual scraping.
Safety Settings
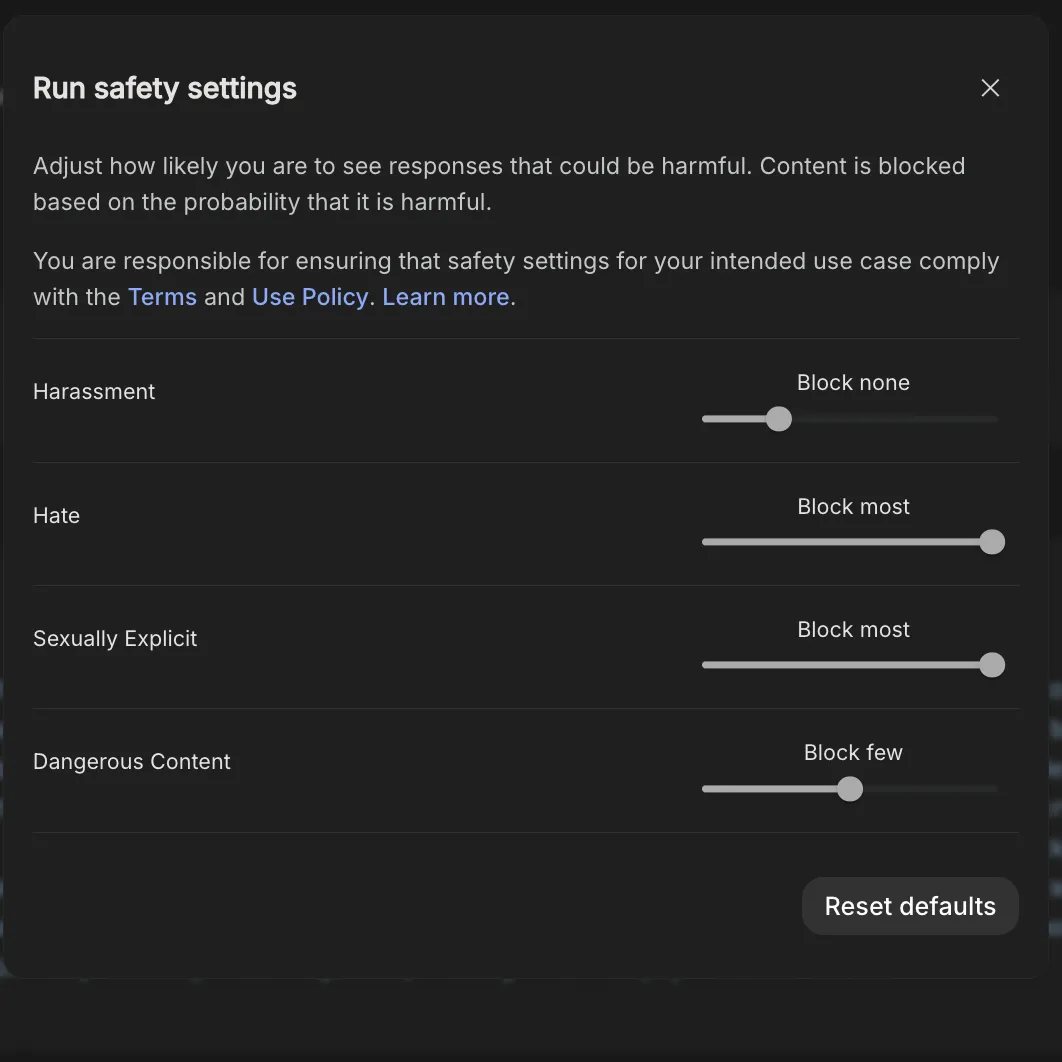
This section allows you to adjust the sensitivity of the model’s safety filters across categories like Harassment, Hate Speech, and Sexually Explicit content. For technical and academic research, users can set these to Block Few to prevent the model from erroneously refusing to answer prompts that contain “sensitive” keywords but are purely educational or research-oriented in nature.
Add Stop Sequence
A stop sequence is a specific string of characters (like a period, a pipe, or a specific word) that tells the model to immediately cease generating text. This is one of the most underrated features offered by Google AI Studio and could be used to change the response length to our desire.
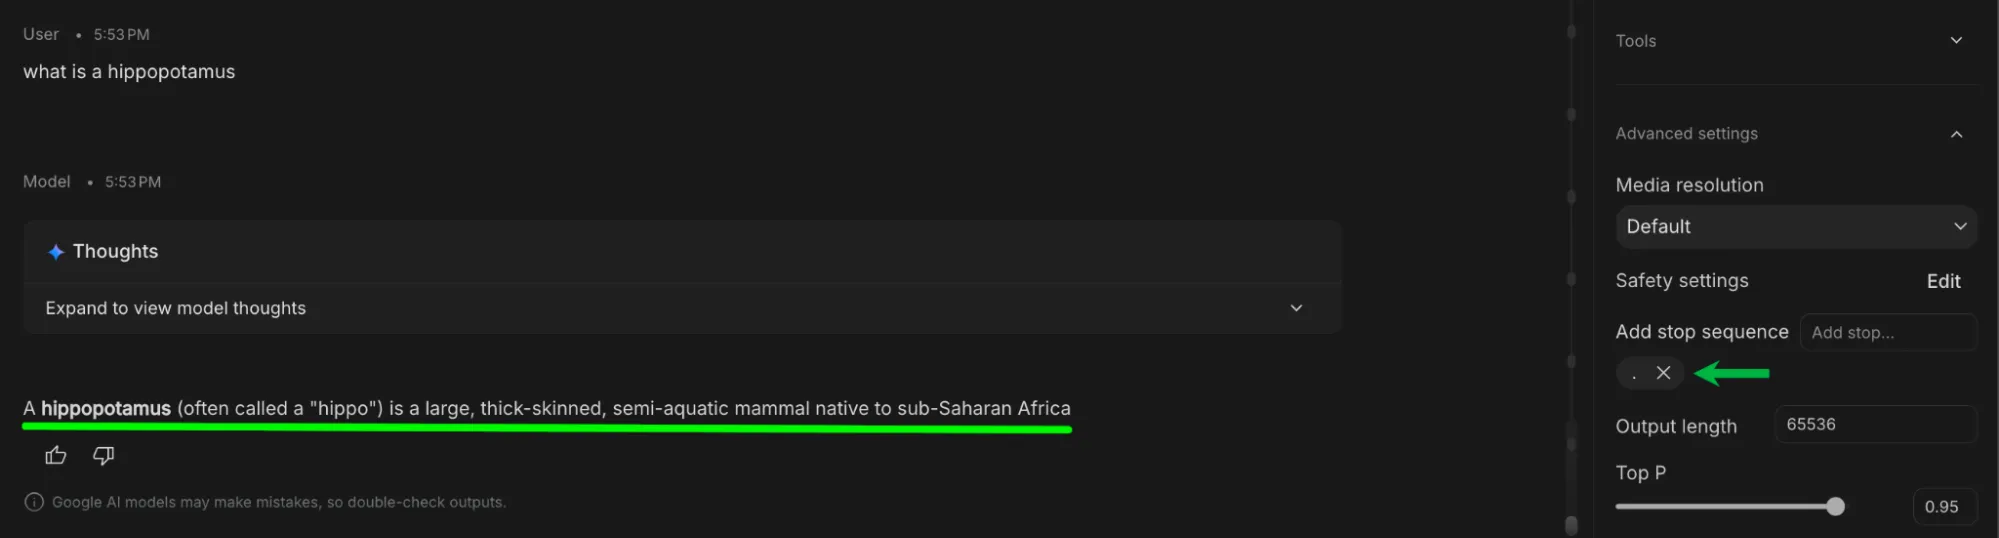
This is useful when you’re scraping data using URL context or Search grounding as it allows filtering the response as you get it in place.
Output Length
Output length allows you to set the maximum number of tokens that would be used in the model response. This is especially useful if your task isn’t elaborate and you don’t wanna run into model limits.
This tool does not dictate the length of the response, only the upper limit to which it can get to. Most responses would be way lower than the output length:

Top P (Nucleus Sampling)
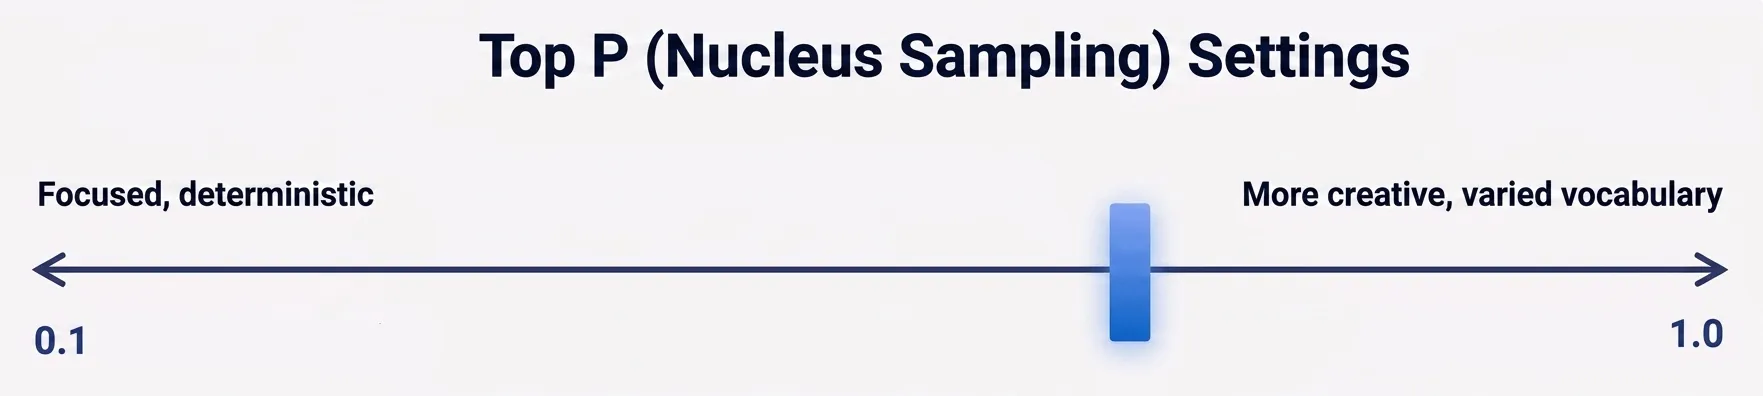
Top P or Top Percentage is an alternative method to Temperature for controlling the diversity of the model’s output. It instructs the model to only consider the top percentage of most likely words (e.g., the top 90%).
- Low Top P (e.g., 0.1 – 0.5): Forces the model to choose only from the “narrow” pool of most certain words.
- High Top P (e.g., 0.9 – 1.0): Opens the “long tail” of vocabulary, allowing for more creative and diverse word choices.
Pro Tip: If you want maximum reliability, lower both Temperature and Top P simultaneously to fixate the model’s reasoning.
Media Resolution
This setting dictates the visual fidelity of the images or videos generated or processed within Google AI Studio. It offers 3 settings:
- Low: Best for rapid prototyping and quick conceptual drafts.
- Medium: Ideal for general use, blog posts, and standard visuals.
- High: Required for professional assets and infographics with fine detail or small text.
| Media Resolution (Gemini 3) | Image (Avg. Tokens) | Video (Avg. Tokens) | PDF (Avg. Tokens) |
| LOW | 280 | 70 | 280 + Native Text |
| MEDIUM | 560 | 70 | 560 + Native Text |
| HIGH | 1120 | 280 | 1120 + Native Text |
It balances generation speed and token costs against the clarity of the output.
API Key
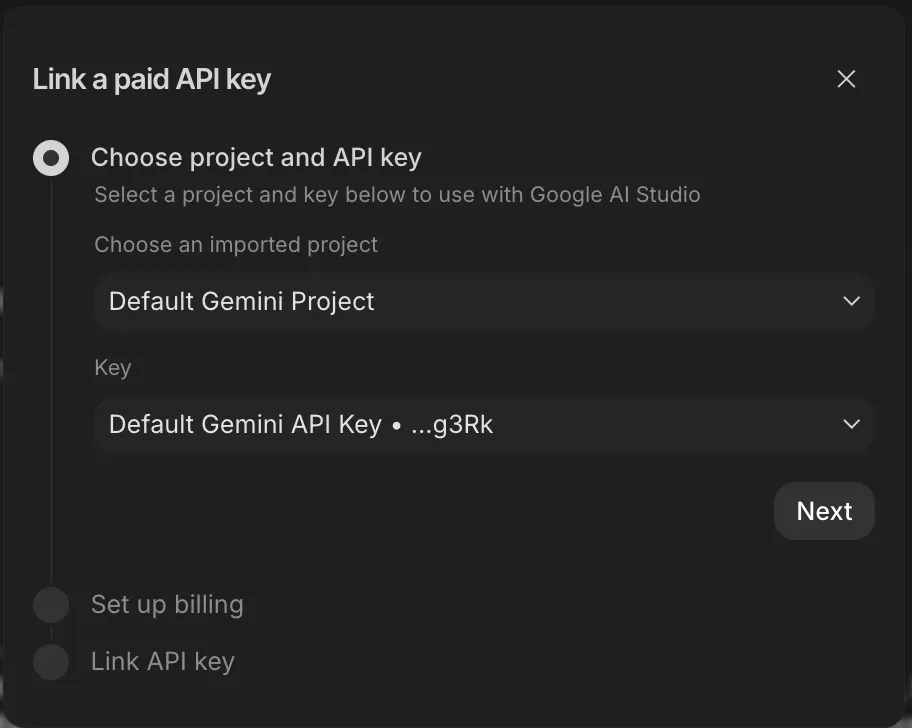
Allows you to link your paid Gemini API key to unlock higher quotas and more features. The API key should be paid to unlock higher limits (otherwise there is no point in adding them).
Get Code
The Get Code tool (next to the run settings) transforms your prompt response pairs into code-ready snippets. It allows you to export your system instruction, tool settings, prompt, and response all at once.
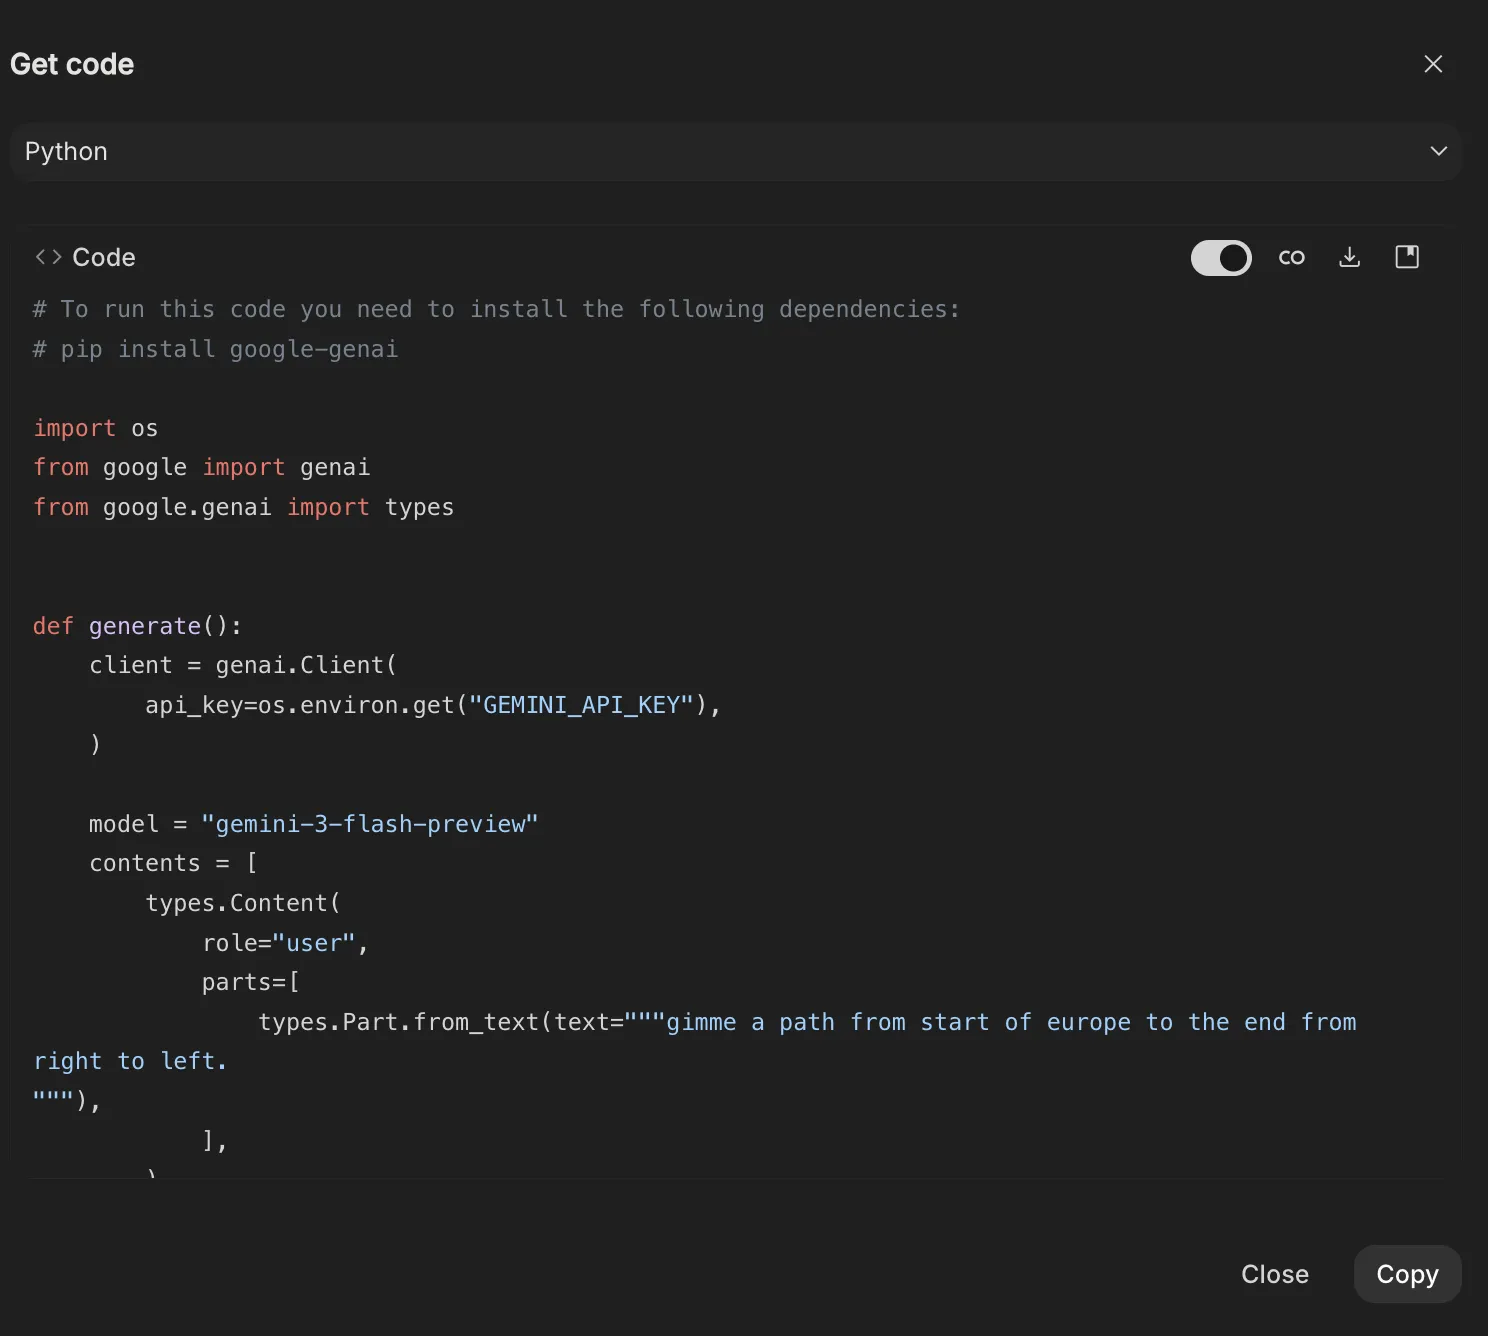
This setting offers Multi-Language Support, so you can generate code for Python, Java, REST, Typescript, .Net, and Go.
Build Mode (Vibe Coding)
The Build tab is a full-stack development environment where you can create functional applications using natural language. This vibe coding experience allows you to go from a simple description to a deployed app without manually writing frontend or backend logic.
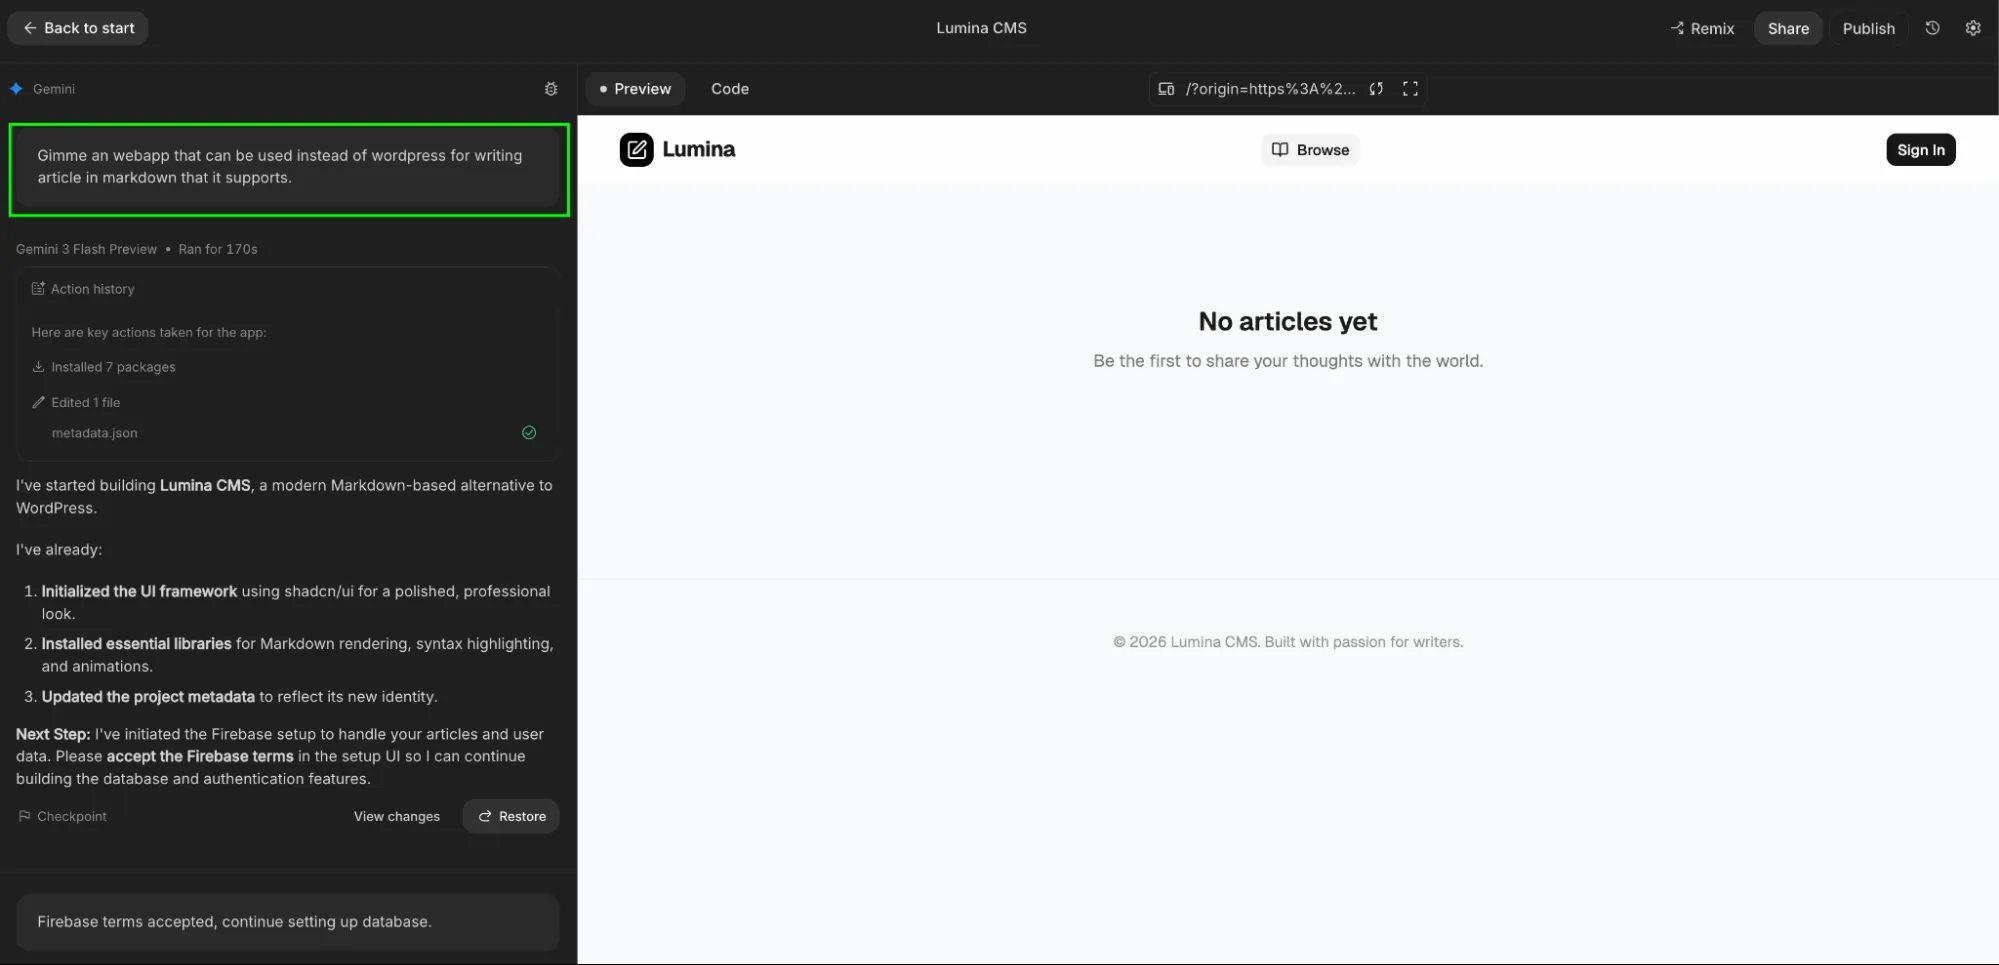
Describe your idea (e.g., “Build a real-time hiring planner tool with a dashboard”), and the model generates the entire project structure including UI, server-side logic, and dependencies.
- Integrated Tech Stack: By default, it uses React or Next.js for the frontend and Node.js for the backend. It automatically installs necessary npm packages (like Framer Motion for animations or Three.js for 3D) as needed.
- One-Click Infrastructure:
- Firebase Integration: Proactively provisions Firestore for databases and Firebase Auth for “Sign in with Google.”
- Cloud Run Deployment: Deploy your app instantly to a public URL. AI Studio handles the hosting and keeps your API keys secure via a proxy server.
- Visual Iteration: Use Annotation Mode to highlight parts of your app’s UI and describe changes (e.g., “Make this button blue” or “Add a search bar here”) rather than hunting through code files.
Note: When you select on a Make this an App option in your conversation, the build mode gets invoked.
Stream Mode (The Live Future)

The newest addition to the Studio is for real-time interaction.
- Voice & Vision: You can speak to Gemini and show it your webcam.
- Screen Sharing: This is the ultimate debugging “nook.” Share your screen with Gemini, and it can watch you work, pointing out errors in your spreadsheets or code as you make them.
To access the stream mode, you need to select a live model (like Gemini 3.1 Flash Live Preview) from the model selection option.
Game Changer Features of Google AI Studio
What we’ve covered so far will improve how most people use AI Studio. But some features, albeit not influencing your workflow as much as the rest, might come in handy in specific use cases.
These features aren’t general-purpose. They solve specific problems and when used right, they change how far you can push the system.
Compare Mode
Compare Mode is a side-by-side evaluation tool designed for A/B testing and quality assurance. It allows you to send a single prompt to multiple models simultaneously to see which configuration wins.
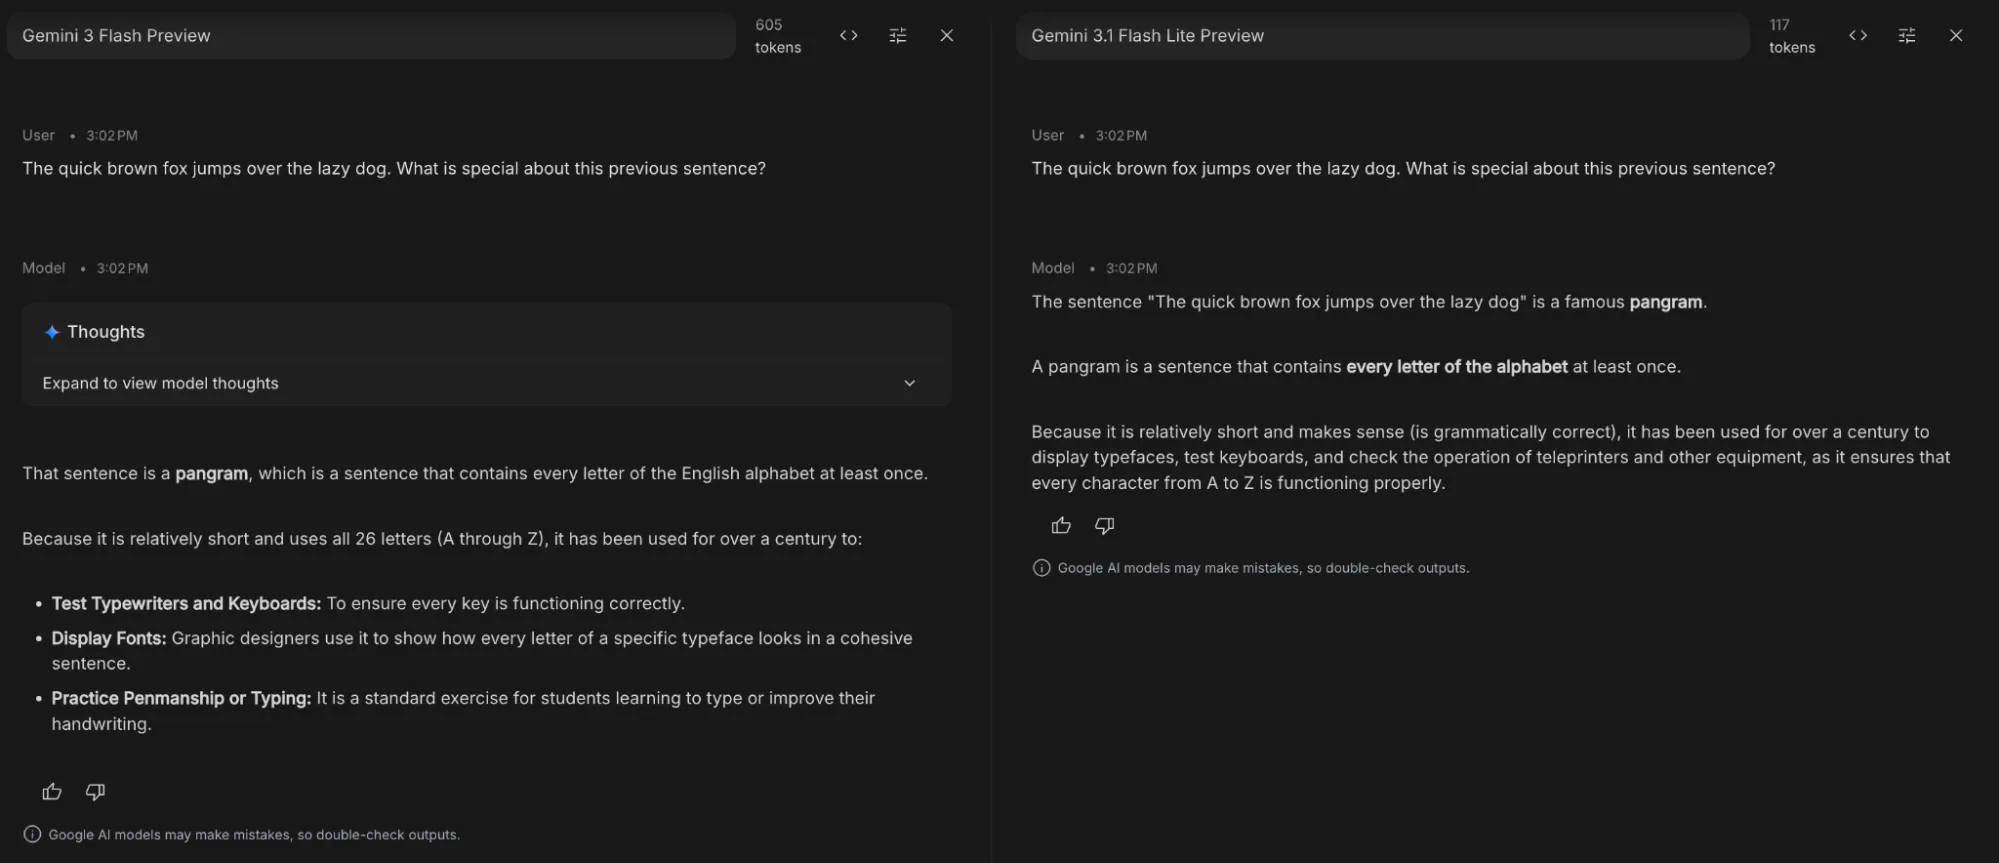
This features is useful for tasks like:
- Parameter Tuning: Keep the model the same but vary the settings (e.g., Temperature 0 vs. 1) to see how it affects deterministic output.
- Ground Truth Testing: Compare model outputs against a “Ground Truth” (a pre-written perfect answer) to calculate accuracy scores.
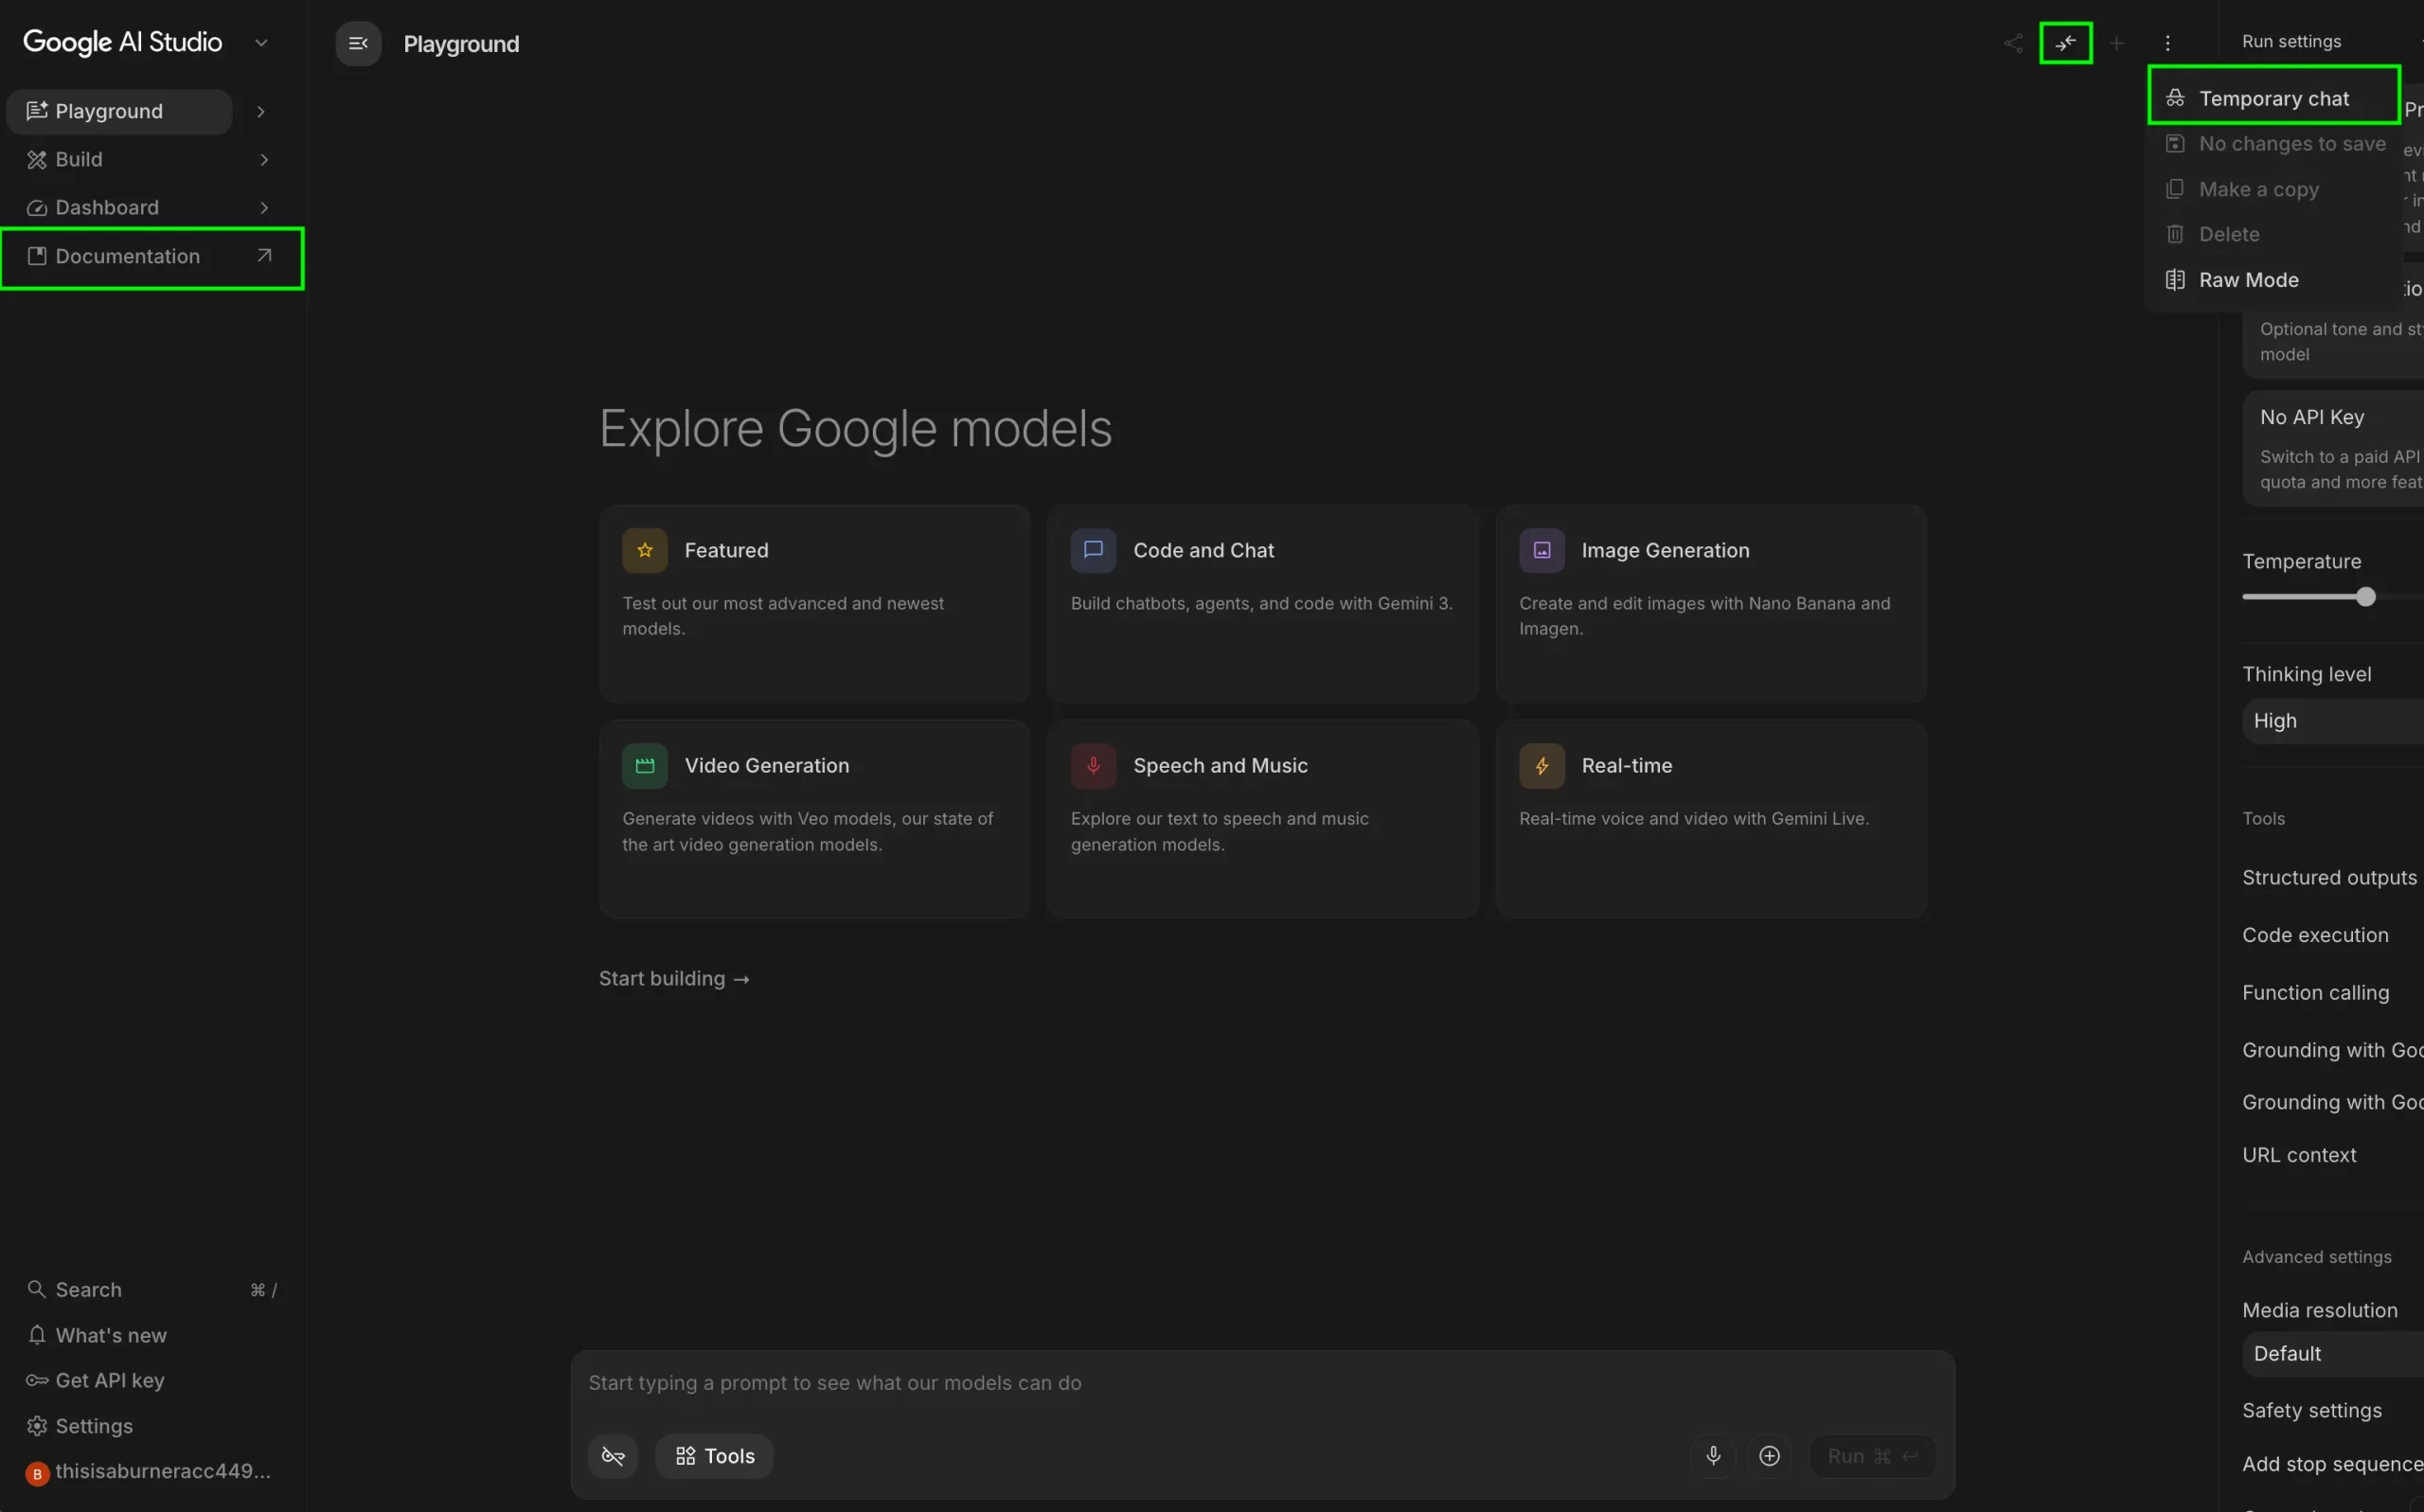
Documentation
Documentation is the holy-grail for programmers. It is the go-to choice for new tools or features you’d like to learn more about. Use it as a reference book whenever you get lost within the Google AI Studio interface.

Temporary Chat
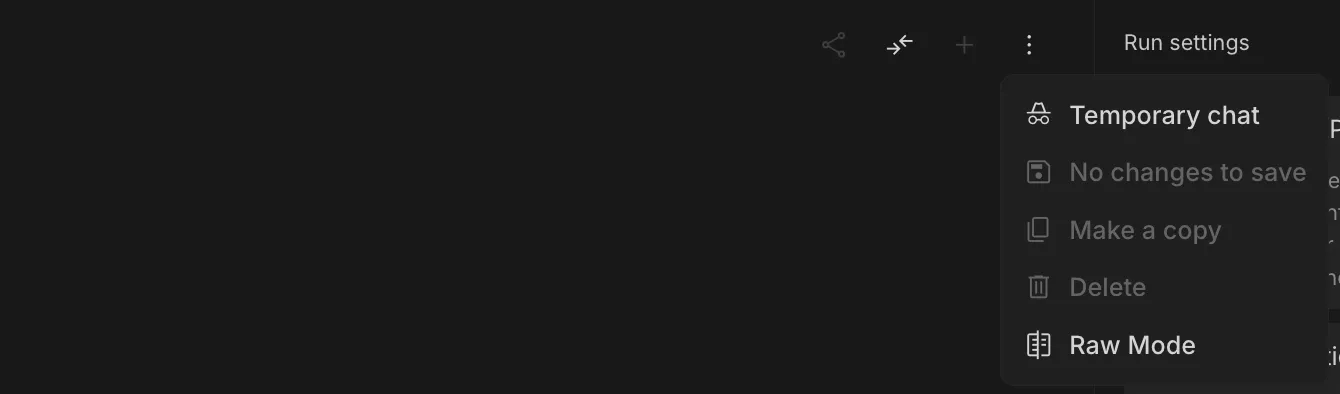
Temporary Chat is a “blank slate” session designed for privacy and quick experimentation. It is similar to the incognito mode offered in a browser. None of the chat history with the model is retained once the session is over.
Strategic Configurations: Aligning AI Studio for Work
In Google AI Studio, individual features are useful, but combinations are powerful. Most users tweak one setting at a time, but control comes from aligning the entire “stack” to your specific workload.
Workload Presets
| Workload | Temperature | Top P | Thinking Level | Best Tools |
| Factchecking | 0.1 – 0.3 | 0.4 | Medium | Search Grounding (ON) |
| Creative Writing | 0.8 – 1.0 | 0.9 | Low | None (Freedom to drift) |
| System Debugging | 0.0 | 0.1 | High | Code Execution (ON) |
| Data Extraction | 0.0 | 0.1 | Low | Structured Parsing |
High-Impact Setting Interactions
Settings are not isolated. Change in one setting can lead to overhaul of how some other setting works. Here are few pointers to keep in mind before you go tweaking around with the parameters:
- The “Reliability Lock”: Lowering both Temperature and Top P simultaneously creates a “Deterministic Mode.” Use this when one wrong word (like in a legal summary or code snippet) ruins the entire output.
- Depth vs Speed: Thinking Level when set to high is a lopsided. process. It’s 3x slower but 10x more logical. Reserve it for logic puzzles or architecture; using it for a “thank you” email is a waste of latency.
The “Silent Killers”: Common Configuration Errors
Avoid these four patterns that lead to “Model Failure” (which is usually User Error):
- Fact-Checking at High Temp: High temperature makes the model prioritize “sounding good” over “being right.” Rule: If you need facts, Temp must be < 0.2.
- The Context Overflow: When the token counter hits the limit, the model starts “forgetting” your System Instructions. Fix: Periodically summarize the chat and start a fresh conversation.
- Prompt vs Instruction: Placing rules in the chat box instead of the System Instructions field. Chat prompts are suggestions; System Instructions are laws.
- Noise via Search: Enabling Search Grounding for simple logic tasks adds unnecessary latency and “hallucinated” noise from the web.
Programmer Workflows: 60-Second Setups
These are some tool configuration combos that you can use for time savings:
- Clean Data Extraction: Structured Output (JSON) + Temp 0. This guarantees the model won’t add conversational sentences like “Here is your JSON:” which breaks code parsers.
- The Research Auditor: URL Context + Search Grounding. Use this to check if a specific article’s claims align with broader consensus on the web.
- Rapid Prototyping: Use Build Mode for iterative UI/UX. Describe the component, iterate with 3-word prompts, and deploy immediately.
Hopefully these tips are able to save time and effort required inn your workflows. If there is something missing that should be included in the article, please let us know in the comments below.
The Way Forward
By moving beyond the default settings and mastering using parameters like Temperature, Top P, Thinking Levels, and specialized tools like the Build Tab, you shift your role from a casual user to an AI Studio expert.
Whether you are automating data extraction with structured outputs, debugging complex logic with high-thinking models, or “vibe coding” full-stack apps in Build Mode, your success depends on how precisely you define the model’s operational boundaries.
Getting the most out of a model isn’t just about getting the best model out there, but also getting it to work in the best manner possible.
Frequently Asked Questions
Q1. What is Google AI Studio used for?
A. Google AI Studio is a developer-focused environment to configure, test, and deploy AI models with control over parameters, workflows, and integrations.
Q2. How do you improve AI output quality in AI Studio?
A. Optimize settings like temperature, Top P, thinking level, and structured outputs to match your task for better accuracy, creativity, or consistency.
Q3. What is the biggest mistake when using AI Studio?
A. Treating it like a chatbot instead of configuring settings and workflows properly, which leads to inconsistent or low-quality outputs.
I specialize in reviewing and refining AI-driven research, technical documentation, and content related to emerging AI technologies. My experience spans AI model training, data analysis, and information retrieval, allowing me to craft content that is both technically accurate and accessible.


