Autonomous AI agents can read requests, retrieve data, reason through options, and trigger actions in seconds. That speed is useful, but it also creates risk when the next step affects money, customer records, or external systems.
Human-in-the-loop checkpoints add control at the moment an agent’s recommendation is about to become a real-world action. In this article, we’ll build a LangGraph refund agent that investigates a request, proposes a refund, pauses for human approval, and only executes the action after review.
Table of contents
- What Is a Human-in-the-Loop Checkpoint?
- When Should an Agent Ask for Approval?
- How the Refund Agent Workflow Works
- Prerequisites
- Create Mock Order Data
- Create the Order Lookup Tool
- Define the Refund Proposal Structure
- Create the LLM and Build the Refund Agent
- Run the Agent Investigation
- Convert the Investigation into a Structured Refund Proposal
- Create the Refund Tool
- Define the LangGraph State
- Create the Agent Node
- Add the Human Approval Checkpoint
- Route the Approval Decision
- Create the Refund Execution and Rejection Nodes
- Build the Complete LangGraph Workflow
- Add a Checkpointer and Compile the Graph
- Run the Workflow and Pause for Approval
- Resume the Workflow After Human Review
- Test the Workflow End to End
- Move the Workflow Toward Production
- Conclusion
- Frequently Asked Questions
What Is a Human-in-the-Loop Checkpoint?
A human-in-the-loop checkpoint is a deliberate pause inside an AI workflow before the agent performs an action that could have meaningful consequences.
The agent can continue working autonomously up to that point. It may understand the request, retrieve information, call tools, and prepare a recommendation. But before executing a sensitive action, the workflow stops and asks a person to review the proposal.
A useful review step should clearly show:
- What the agent wants to do
- Why it chose that action
- What information supports the decision
- What will happen if the action is approved
The timing of the checkpoint is critical.
If an agent sends an email, updates a customer account, or issues a refund and asks for approval afterward, the review is no longer useful.
The checkpoint must happen before execution.
In LangGraph, this can be implemented using interrupt(). The graph pauses at that point, stores its state through a checkpointer, and waits for an external decision before continuing.
Conceptually:
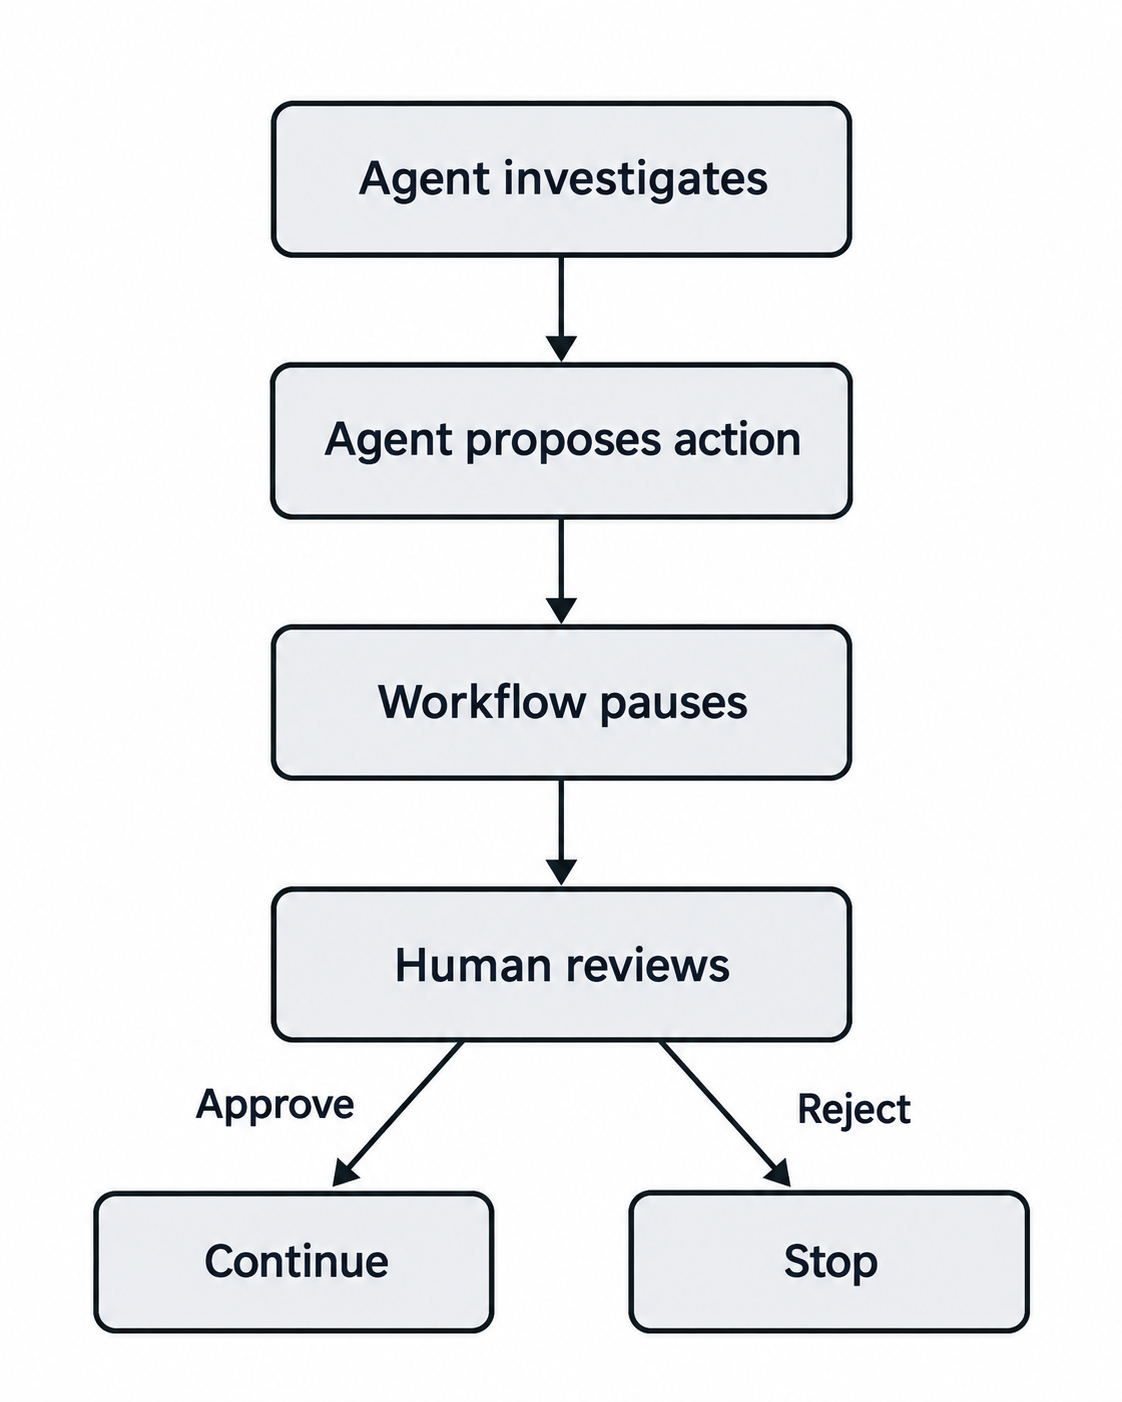
This separates two important responsibilities. The agent decides what it recommends. The application controls whether that recommendation is allowed to become a real-world action.
When Should an Agent Ask for Approval?
Not every action performed by an AI agent needs human approval.
If an agent is only reading information, searching for a knowledge base, or preparing a draft, human intervention may add unnecessary friction. But once the agent is about to change data, contact a customer, move money, or perform another consequential action, a review step can become valuable.
A simple way to think about it is to separate low-risk actions from actions that affect the outside world.
| Agent action | Example | Possible checkpoint |
| Read information | Search a knowledge base | Usually no approval |
| Retrieve data | Check an order status | Usually no approval |
| Prepare content | Draft a customer response | Review before sending |
| Change a record | Update customer information | Approval based on impact |
| Financial action | Issue a refund | Approval before execution |
| Destructive action | Delete data | Approval before execution |
For our refund agent, retrieving an order is a read-only action, so the agent can do it autonomously.
Issuing the refund is different because it changes a financial state. That is where we place the human checkpoint.
The basic principle is:
- Low-risk action → Agent can continue
- High-impact action → Human review before execution
Each organization should define these boundaries based on its own policies, risk tolerance, and the consequences of an incorrect action.
How the Refund Agent Workflow Works
Before writing the code, let’s understand how the complete refund workflow operates.
The process has four main stages: Prepare, Review, Decide, and Act.
1. Prepare
The customer sends a refund request in natural language. The LLM agent reads the request and determines whether additional information is required. If an order ID is available, the agent calls the get_order tool to retrieve verified details such as the product, amount, delivery status, and refund status. Using the customer request and the retrieved order information, the agent prepares a structured refund proposal.
2. Review
The proposal is passed to a human approval checkpoint.
Instead of immediately executing the refund, LangGraph pauses the workflow using interrupt().
The reviewer can inspect the proposed refund amount, order ID, and the reason provided by the agent.
3. Decide
The reviewer approves or rejects the proposal. If the request is approved, the workflow continues to the refund execution step. If it is rejected, the workflow ends without calling the refund tool.
4. Act
Only an approved request reaches the issue_refund tool. The tool performs the mock refund and returns the result. This separation is important. The LLM is responsible for investigation and reasoning, while the application and human reviewer control whether a consequential action is executed.
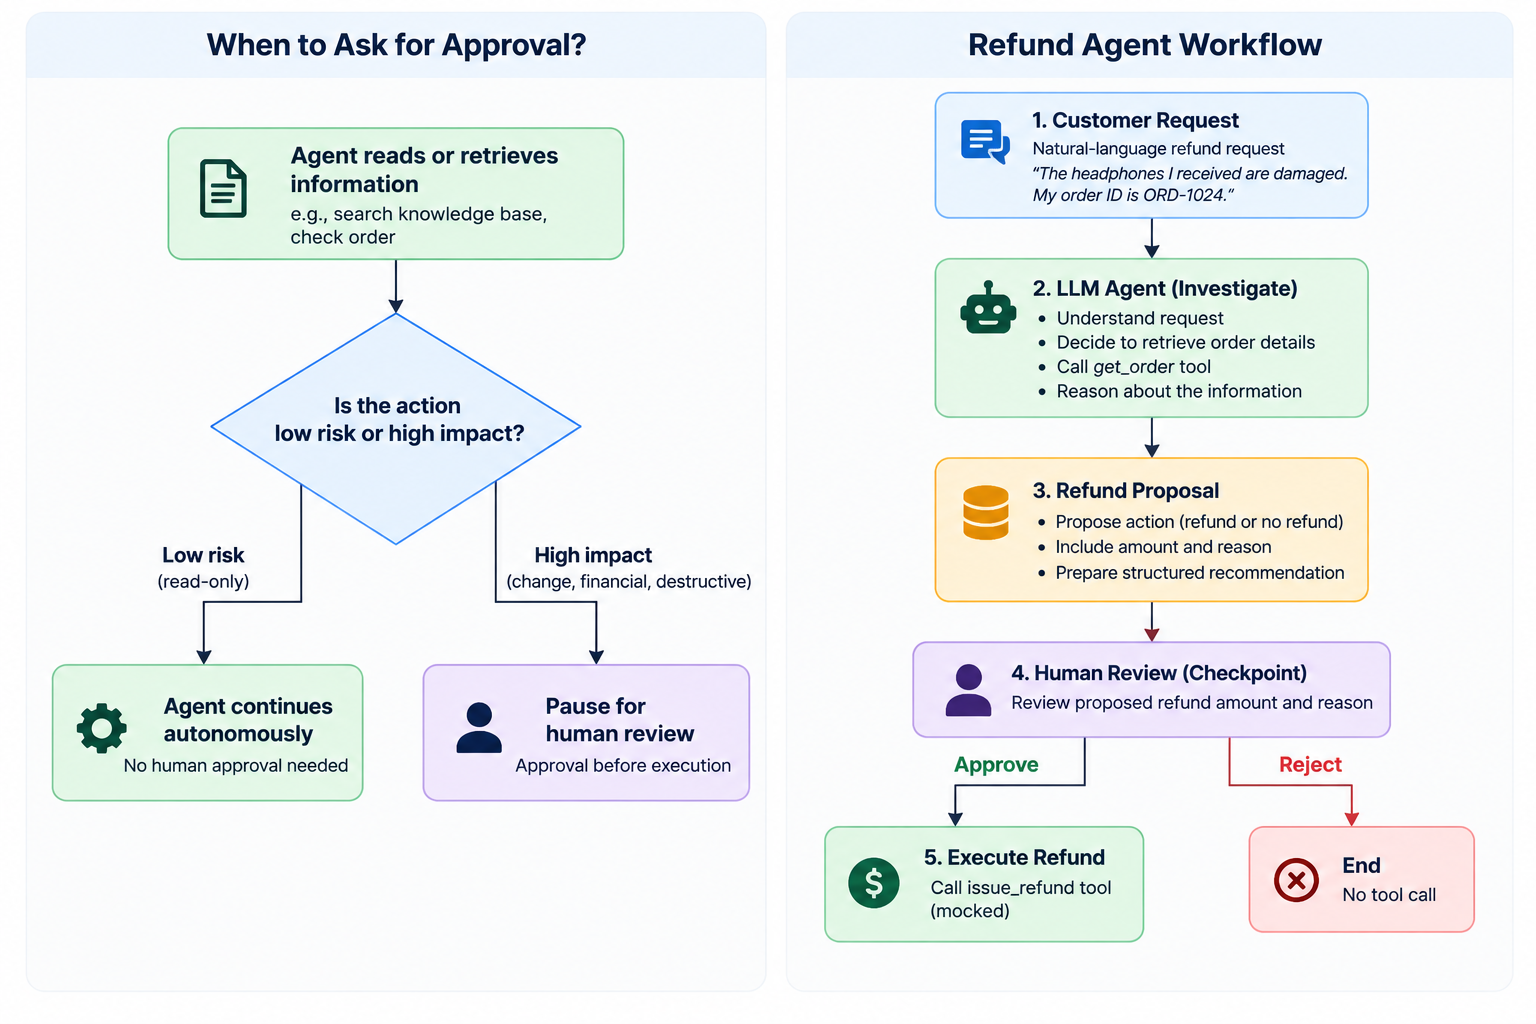
This architecture allows the agent to work autonomously during investigation while placing human oversight exactly where the workflow begins to affect the outside world.
Prerequisites
Before we start building the refund agent, make sure you have the following:
- Python 3.10 or later
- An OpenAI API key
- Basic familiarity with Python
- Basic understanding of LLM agents and tool calling
Install the required libraries:
pip install -U langchain langgraph langchain-openai pydantic We’ll use:
- langchain to define tools and create the agent
- langchain-openai to connect the agent to an OpenAI model
- langgraph to orchestrate the workflow and pause it for human approval
- pydantic to define the structured refund proposal
Set your OpenAI API key before running the code.
On macOS or Linux:
export OPENAI_API_KEY="your-api-key" On Windows PowerShell:
$env:OPENAI_API_KEY="your-api-key" Once the environment is ready, we can start by creating the mock order data that our agent will inspect.
1: Create Mock Order Data
We’ll begin with a small in-memory order store, so the agent has something to inspect.
ORDERS = {
    "ORD-1024": {
        "product": "Wireless Headphones",
        "amount": 79.99,
        "status": "delivered",
        "refunded": False
    },
    "ORD-2048": {
        "product": "Mechanical Keyboard",
        "amount": 119.00,
        "status": "delivered",
        "refunded": False
    }
}
Each order contains four fields:
- product: the item purchased
- amount: the amount that could be refunded
- status: the current order status
- refunded: whether the order has already been refunded
For this tutorial, we keep everything in memory so the example is easy to run.
In a production system, the same information would usually come from a database, commerce platform, CRM, or internal order API.
The important point is that the agent should not invent order information. It should retrieve verified data through a tool.
In the next step, we’ll create that tool.
2: Create the Order Lookup Tool
Now we’ll create a read-only tool that lets the agent retrieve verified order information.
from langchain.tools import tool

@tool
def get_order(order_id: str) -> dict:
    """Retrieve order details for a given order ID."""

    order = ORDERS.get(order_id)

    if not order:
        return {
            "found": False,
            "order_id": order_id
        }

    return {
        "found": True,
        "order_id": order_id,
        **order
    }
The @tool decorator makes the function available to the LLM agent.
The docstring also matters:
“””Retrieve order details for a given order ID.”””
The model uses this description to understand what the tool does and when it should call it.
For example, if the customer says:
My order ID is ORD-1024 and the headphones arrived damaged.
the agent can identify the order ID and decide that it needs more information before making a recommendation.
It can then call:
get_order("ORD-1024") and receive:
{
  "found": true,
  "order_id": "ORD-1024",
  "product": "Wireless Headphones",
  "amount": 79.99,
  "status": "delivered",
  "refunded": false
}
This is an important part of the agent design. The LLM does not guess the product, price, or order status. It retrieves that information from a controlled source. The get_order tool is also read-only. It can inspect data, but it cannot change anything. That makes it suitable for autonomous use by the agent.
In the next step, we’ll define the structure of the refund proposal that the agent will produce.
3: Define the Refund Proposal Structure
The agent should not return an unstructured paragraph that we later need to parse.
Instead, we’ll define a structured refund proposal using Pydantic.
from pydantic import BaseModel, Field
from typing import Literal

class RefundProposal(BaseModel):
    order_id: str = Field(
        description="The order being evaluated"
    )

    action: Literal["refund", "no_refund"] = Field(
        description="Whether a refund should be proposed"
    )

    refund_amount: float = Field(
        description="Refund amount. Use 0 if no refund is proposed."
    )

    reason: str = Field(
        description="Short explanation for the recommendation"
    )
This gives the agent a predictable output format.
For example:
{
  "order_id": "ORD-1024",
  "action": "refund",
  "refund_amount": 79.99,
  "reason": "The customer reported receiving a damaged product."
}
Structured output helps the rest of the workflow because each value can be accessed directly.
For example:
proposal["order_id"]
proposal["refund_amount"]
proposal["action"]
proposal["reason"]
This is much more reliable than extracting values from free-form text.
It also makes the human approval step easier because the application can display the exact order ID, proposed amount, and reason to the reviewer.
In the next step, we’ll create the LLM and use it to build the real tool-using refund agent.
4: Create the LLM and Build the Refund Agent
Now we can create the actual LLM-powered agent.
First, initialize the model:
from langchain_openai import ChatOpenAI

model = ChatOpenAI(
    model="gpt-4.1-mini",
    temperature=0
)
We use a low temperature because the workflow benefits from more predictable responses.
Next, create the agent:
from langchain.agents import create_agent

refund_agent = create_agent(
    model=model,
    tools=[get_order],
    system_prompt="""
You are a customer support refund agent.

Your job is to investigate refund requests.

If an order ID is available, use the get_order tool
to verify the order before making a recommendation.

Never invent order information.

Use the customer request and verified order details
to decide whether a refund should be proposed.

Do not issue refunds yourself.

Your responsibility is to investigate the request
and recommend an action.
"""
)
This is where the workflow becomes genuinely agentic.
The model can analyze the customer request, identify when order information is needed, call get_order, inspect the returned data, and continue reasoning based on that verified information.

The important detail is that the agent only receives the read-only get_order tool. It does not receive the refund execution tool. That separation is intentional. The agent is free to investigate and recommend an action, but it cannot issue the refund on its own.
In the next step, we’ll run this agent on a customer request and inspect how it uses the order lookup tool.
5: Run the Agent Investigation
Now that the agent is configured with the get_order tool, we can send it a real customer request.
Create a small helper function:
def investigate_request(customer_request: str):

    result = refund_agent.invoke({
        "messages": [
            {
                "role": "user",
                "content": customer_request
            }
        ]
    })

    return result
Now try it with a refund request:
customer_request = """
The headphones I received are damaged.
My order ID is ORD-1024.
Please issue a refund.
"""

investigation = investigate_request(
    customer_request
)
The agent receives the request in a natural language.
It can identify the order ID, decide that it needs more information, and call the get_order tool. For ORD-1024, the tool returns:
{
  "found": true,
  "order_id": "ORD-1024",
  "product": "Wireless Headphones",
  "amount": 79.99,
  "status": "delivered",
  "refunded": false
}
The agent then continues reasoning using this verified information. This is important because the LLM is not expected to know the order amount or status on its own. Those details come from the tool. At this stage, the agent has investigated the request, but it has not yet created the final structured refund proposal.
In the next step, we’ll convert the investigation into a predictable RefundProposal object that can be passed into the human approval workflow.
6: Convert the Investigation into a Structured Refund Proposal
The agent has now investigated the customer request and retrieved verified order information. The next step is to convert that investigation into a structured refund proposal that the rest of the workflow can be used reliably.
First, create a structured-output version of the model:
proposal_model = model.with_structured_output(
    RefundProposal
)
Now define a helper function:
def create_refund_proposal(
    customer_request,
    investigation
):

    proposal = proposal_model.invoke([
        {
            "role": "system",
            "content": """
Create the final refund proposal.

Use only the customer request and verified information
collected during the agent investigation.

Do not invent order values.

Return the result using the required schema.
"""
        },
        {
            "role": "user",
            "content": f"""
Customer request:

{customer_request}

Agent investigation:

{investigation["messages"]}
"""
        }
    ])

    return proposal

Now generate the proposal:

proposal = create_refund_proposal(
    customer_request,
    investigation
)

print(proposal)
A possible result is:
RefundProposal(
    order_id="ORD-1024",
    action="refund",
    refund_amount=79.99,
    reason="The customer reported receiving a damaged product."
)
This gives us a clean decision object containing the exact information needed for human review. The workflow can now access:
proposal.order_id
proposal.action
proposal.refund_amount
proposal.reason
At this point, the agent has done its job. It has investigated the request, used the order tool, and prepared a recommendation. But the refund has still not been executed. That is intentional.
In the next step, we’ll create the issue_refund tool that performs the consequential action after human approval.
7: Create the Refund Tool
Now we’ll create the tool that performs the consequential action.
Unlike get_order, which only reads information, this tool changes the state of the order by marking it as refunded.
@tool
def issue_refund(
    order_id: str,
    amount: float
) -> dict:
    """Issue an approved refund."""

    order = ORDERS.get(order_id)

    if not order:
        return {
            "success": False,
            "message": "Order not found."
        }

    if order["refunded"]:
        return {
            "success": False,
            "message": "Order has already been refunded."
        }

    order["refunded"] = True

    return {
        "success": True,
        "order_id": order_id,
        "amount": amount,
        "message": "Mock refund issued successfully."
    }
This tool performs two important checks before returning success.
- First, it verifies that the order exists.
- Second, it checks whether the order has already been refunded.
That prevents a duplicate refund in our mock workflow. The key architectural point is that this tool is not given directly to the LLM agent. The agent can recommend a refund, but it cannot execute one by itself. The issue_refund tool will only be called after the human approval step.
So the separation is:
Agent can read and recommend
Human approves
Application executes the refund
In the next step, we’ll define the LangGraph state that carries the customer request, refund proposal, approval decision, and result through the workflow.
8: Define the LangGraph State
Now that we have the agent, the proposal, and the refund tool, we need a shared state that can move information through the LangGraph workflow.
Define the state using TypedDict:
from typing import TypedDict, Optional

class RefundState(TypedDict):
    customer_request: str
    proposal: Optional[dict]
    approved: Optional[bool]
    result: Optional[dict]
This state keeps track of four things:
- customer_request: the original request from the customer
- proposal: the structured refund recommendation created by the agent
- approved: the human reviewer’s decision
- result: the final outcome of the workflow
At the beginning, the state might look like this:
{
    "customer_request": "...",
    "proposal": None,
    "approved": None,
    "result": None
}
After the agent prepares a recommendation, the proposal field is populated. After human review, approved becomes either True or False. Finally, the workflow stores the refund result or rejection message in result. This shared state is what allows each LangGraph node to read the information it needs and pass updated values to the next step. In the next section, we’ll create the agent node that runs the investigation and generates the refund proposal inside the graph.
9: Create the Agent Node
Now we’ll place the refund agent inside the LangGraph workflow. The agent node will take the customer request from the shared state, run the investigation, generate the structured refund proposal, and write that proposal back into the state.
def agent_node(state: RefundState):

    customer_request = state["customer_request"]

    investigation = investigate_request(
        customer_request
    )

    proposal = create_refund_proposal(
        customer_request,
        investigation
    )

    return {
        "proposal": proposal.model_dump()
    }
The node performs three main tasks.
First, it reads the original customer request:
customer_request = state["customer_request"] Next, it sends that request to the LLM agent:
investigation = investigate_request(
    customer_request
)
The agent can use get_order during this step to retrieve verified order information.
Finally, the investigation is converted into a structured RefundProposal:
proposal = create_refund_proposal(
    customer_request,
    investigation
)
The proposal is converted to a dictionary and returned:
return {
    "proposal": proposal.model_dump()
}
LangGraph merges this value into the shared workflow state.
After the node runs, the state can look like this:
{
    "customer_request": "...",
    "proposal": {
        "order_id": "ORD-1024",
        "action": "refund",
        "refund_amount": 79.99,
        "reason": "The customer reported receiving a damaged product."
    },
    "approved": None,
    "result": None
}
At this stage, the agent has completed the investigation and prepared its recommendation. The next step is where human-in-the-loop behavior actually enters the workflow. We’ll create an approval node that pauses execution using LangGraph’s interrupt().
10: Add the Human Approval Checkpoint
Now we’ll add the most important part of the workflow: the human review step. LangGraph provides interrupt() to pause execution and wait for an external decision.
First, import it:
from langgraph.types import interrupt Now create the approval node:
def approval_node(state: RefundState):

    proposal = state["proposal"]

    decision = interrupt({
        "question": "Approve this refund?",
        "order_id": proposal["order_id"],
        "amount": proposal["refund_amount"],
        "reason": proposal["reason"]
    })

    return {
        "approved": bool(decision)
    }
The node first reads the refund proposal from the shared state.
It then passes the important details to interrupt():
- Order ID
- Refund amount
- Agent recommendation
- Reason for the recommendation
When execution reaches interrupt(), the workflow pauses.
The refund tool has not run yet.
A reviewer can now inspect the proposal and decide whether the action should continue.
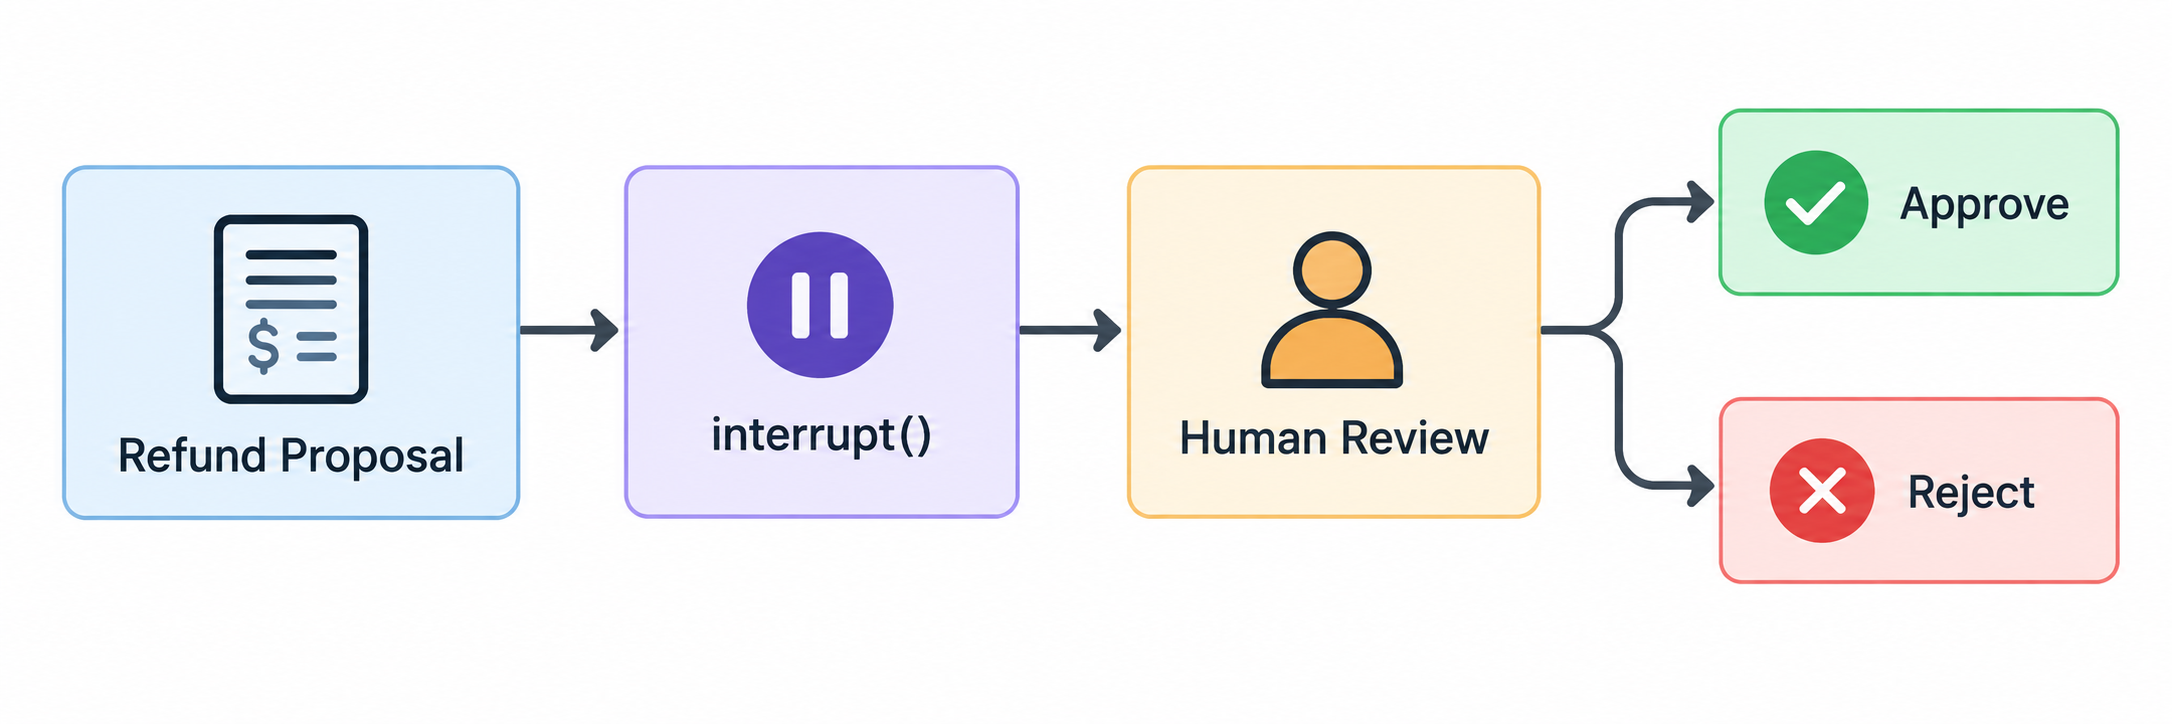
If the reviewer approves, the workflow will later resume with True. If the reviewer rejects the proposal, it will resume with False.
The returned value is stored in the state:
{
    "approved": True
}
or:
{
    "approved": False
}
This is the key control point in the workflow. The agent can recommend a refund, but only a human decision can allow the workflow to move toward execution. In the next step, we’ll route the workflow based on whether the reviewer approves or rejects the proposal.
11: Route the Approval Decision
Once the reviewer responds, the workflow needs to decide what happens next. If the refund is approved, the graph should continue to the refund execution node. If it is rejected, the workflow should stop without calling the refund tool.
Create a routing function:
def route_after_approval(state: RefundState):

    if state["approved"]:
        return "execute_refund"

    return "rejected"
This function reads the approved value from the shared state.
If the reviewer approved the proposal:
state["approved"] == True the function returns:
"execute_refund" If the reviewer rejected it:
state["approved"] == False the function returns:
"rejected" This routing is deliberately deterministic.
The LLM does not decide whether approval is valid or whether the refund tool should run. That decision is controlled by application logic.
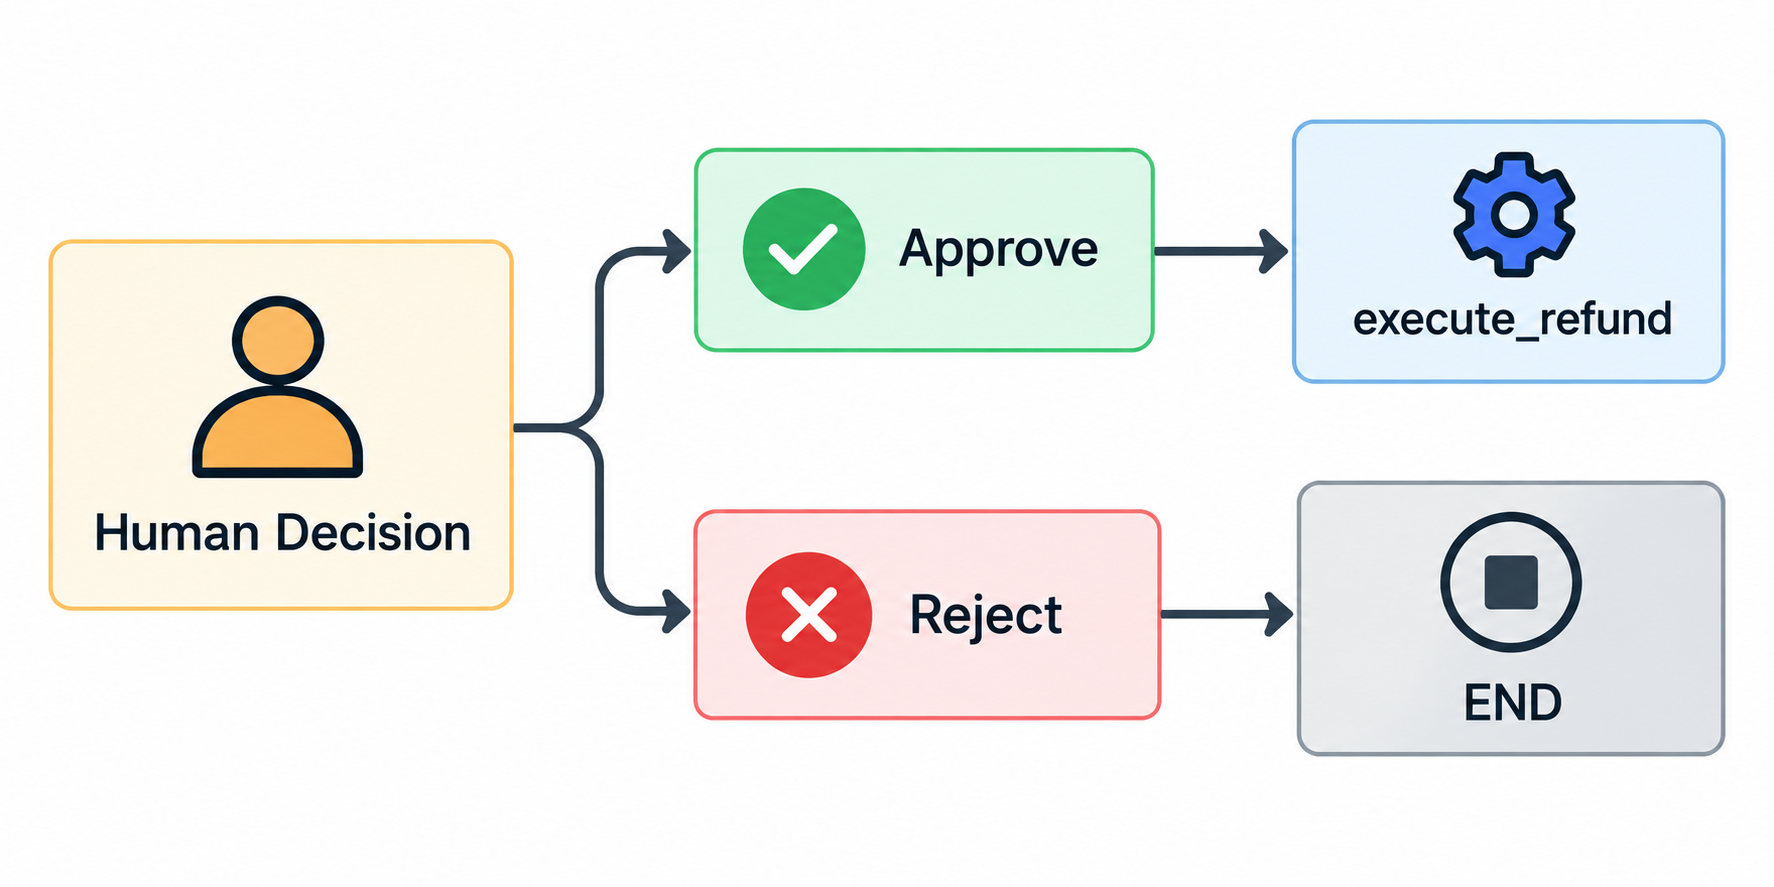
The workflow now has two clear paths:
- Approve → Execute Refund
- Reject → End Workflow
In the next step, we’ll create the node that actually calls the refund tool after approval.
12: Create the Refund Execution and Rejection Nodes
Now we need to define what happens after the reviewer makes a decision.
If the refund is approved, the workflow should call the issue_refund tool.
Create the execution node:
def execute_refund_node(state: RefundState):

    proposal = state["proposal"]

    result = issue_refund.invoke({
        "order_id": proposal["order_id"],
        "amount": proposal["refund_amount"]
    })

    return {
        "result": result
    }
The node reads the approved proposal from the shared state and passes the order ID and refund amount to the refund tool.
For example:
{
    "order_id": "ORD-1024",
    "amount": 79.99
}
The tool then returns the result:
{
    "success": True,
    "order_id": "ORD-1024",
    "amount": 79.99,
    "message": "Mock refund issued successfully."
}
Now create the rejection node:
def rejected_node(state: RefundState):

    return {
        "result": {
            "success": False,
            "message": "Refund rejected by reviewer."
        }
    }
If the reviewer rejects the proposal, the workflow records the result and ends without calling issue_refund.
This gives us two clearly separated outcomes:
- Approved → issue_refund → Result
- Rejected → No tool call → Result
The consequential tool is therefore reachable only through the approved path. In the next step, we’ll assemble all of these nodes into the complete LangGraph workflow.
13: Build the Complete LangGraph Workflow
Now we can connect all the pieces into one LangGraph workflow.
Import the required graph components:
from langgraph.graph import StateGraph, START, END
from langgraph.checkpoint.memory import InMemorySaver
Create the graph:
builder = StateGraph(RefundState) Add the four nodes we created earlier:
builder.add_node(
    "agent",
    agent_node
)

builder.add_node(
    "approval",
    approval_node
)

builder.add_node(
    "execute_refund",
    execute_refund_node
)

builder.add_node(
    "rejected",
    rejected_node
)
Now define the flow.
The workflow starts with the agent:
builder.add_edge(
    START,
    "agent"
)
After the agent prepares the refund proposal, the graph moves to the approval checkpoint:
builder.add_edge(
    "agent",
    "approval"
)
Next, add conditional routing based on the reviewer’s decision:
builder.add_conditional_edges(
    "approval",
    route_after_approval,
    {
        "execute_refund": "execute_refund",
        "rejected": "rejected"
    }
)
Finally, connect both outcomes to the end of the workflow:
builder.add_edge(
    "execute_refund",
    END
)

builder.add_edge(
    "rejected",
    END
)
The complete graph now follows this structure:
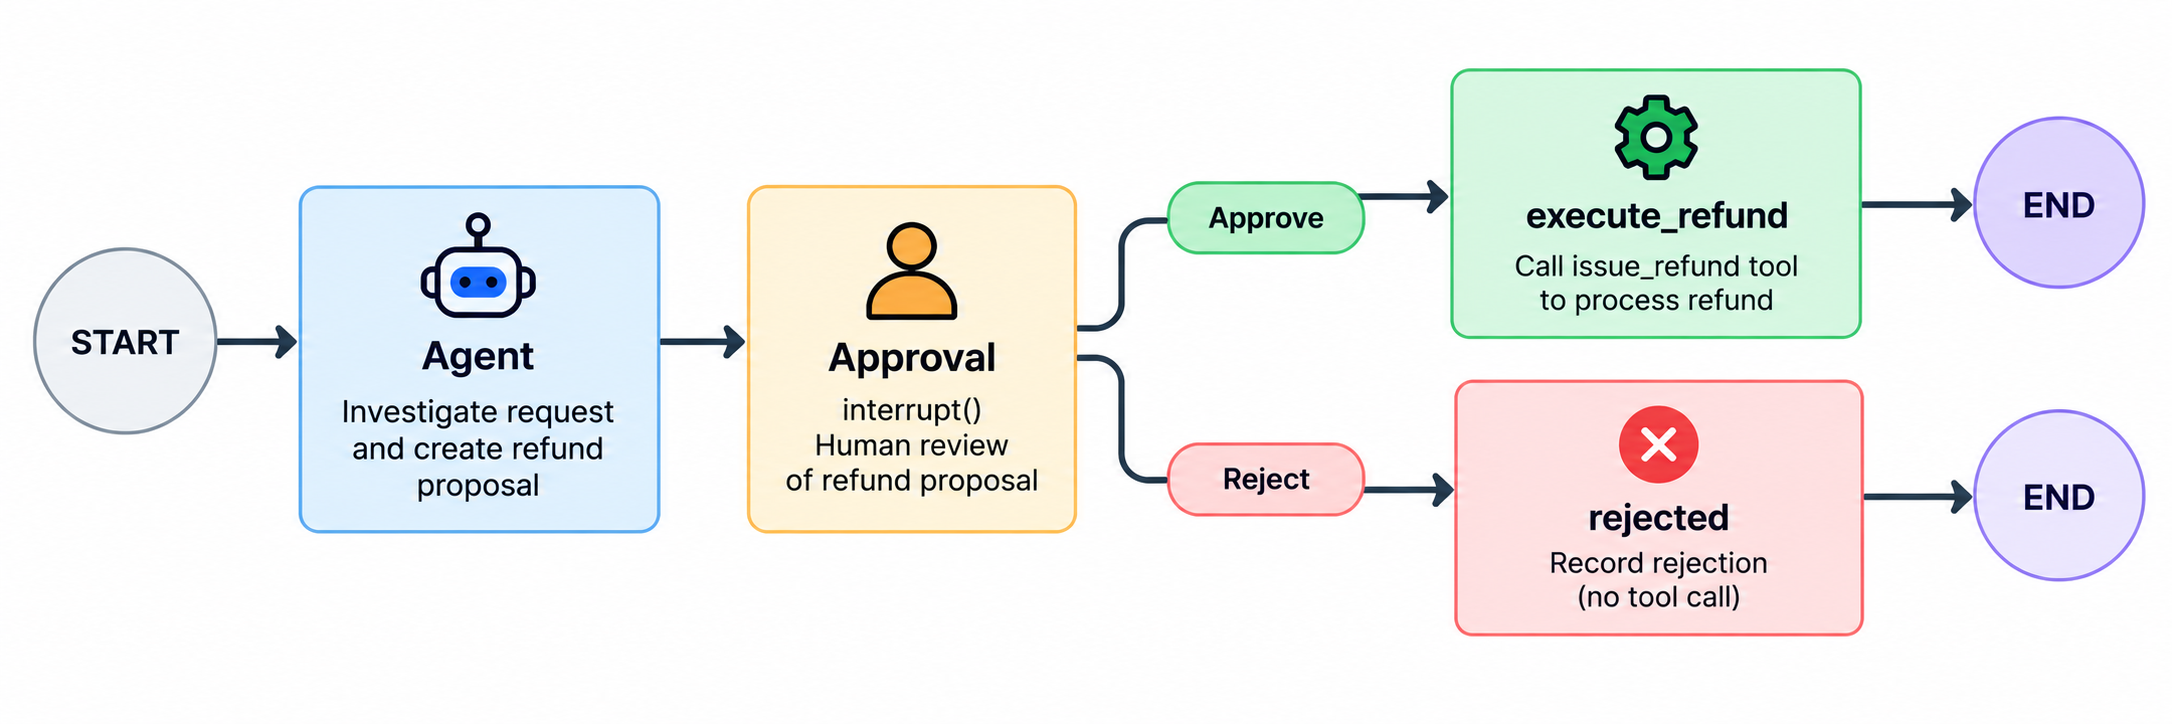
The approved path reaches the refund tool.
The rejected path ends without performing any consequential action.
At this point, the graph structure is complete. We still need one more important component: a checkpointer that can preserve the workflow state when interrupt() pauses execution.
In the next step, we’ll add that persistence layer and compile the graph.
14: Add a Checkpointer and Compile the Graph
Because our workflow can pause at interrupt(), LangGraph needs somewhere to save its state.
For this tutorial, we’ll use an in-memory checkpointer:
from langgraph.checkpoint.memory import InMemorySaver

checkpointer = InMemorySaver()
Now compile the graph:
graph = builder.compile(
    checkpointer=checkpointer
)
The checkpointer stores the workflow state when execution pauses.
That allows LangGraph to remember values such as:
{
    "customer_request": "...",
    "proposal": {...},
    "approved": None,
    "result": None
}
while the workflow is waiting for a human decision.
When the reviewer responds, the graph can resume from the saved state instead of starting the entire workflow again.
For local testing, InMemorySaver is enough.
For a production system, you would normally replace it with persistent storage so that paused workflows can survive application restarts, deployments, or longer approval delays.
The key idea is simple:
interrupt() pauses the workflow
checkpointer saves the state
Command(resume=...) continues the workflow
In the next step, we’ll run the complete graph and see the agent pause at the human approval checkpoint.
15: Run the Workflow and Pause for Approval
Now we can run the complete LangGraph workflow.
Because the graph uses a checkpointer, we need to give each workflow execution a thread ID.
config = {
    "configurable": {
        "thread_id": "refund-ORD-1024"
    }
}
The thread ID allows LangGraph to associate future resume commands with the correct paused workflow.
Next, create the initial state:
initial_state = {
    "customer_request": """
    The headphones I received are damaged.
    My order ID is ORD-1024.
    Please issue a refund.
    """,
    "proposal": None,
    "approved": None,
    "result": None
}
Now invoke the graph:
result = graph.invoke(
    initial_state,
    config=config
)
At this point, the workflow starts from START, runs the agent node, creates the refund proposal, and reaches the approval node.
When it encounters interrupt(), execution pauses.
You can inspect the pending review request:
print(
    result["__interrupt__"]
)
The reviewer will see information similar to:
Approve this refund?

Order ID: ORD-1024
Amount: $79.99

Reason:
The customer reported receiving a damaged product.
Most importantly, the issue_refund tool has not been called yet.
The workflow is now waiting for a human decision.
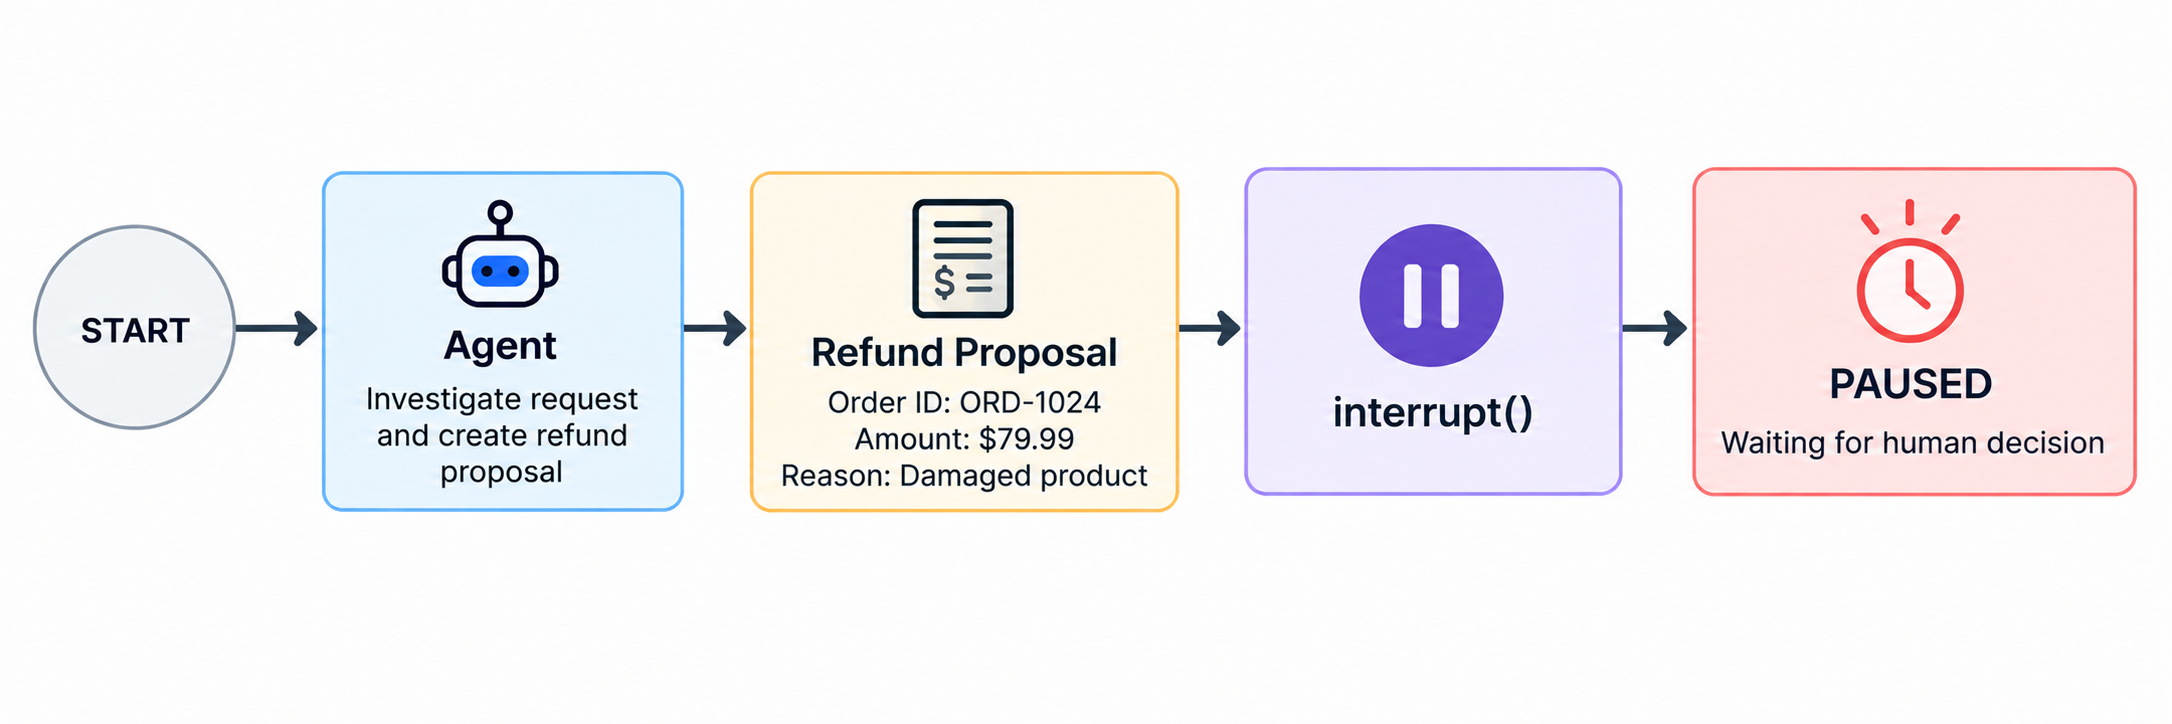
In the next step, we’ll resume this exact workflow and test both approval and rejection.
16: Resume the Workflow After Human Review
Once the workflow is paused, we can resume it using the reviewer’s decision.
Import Command:
from langgraph.types import Command If the reviewer approves the refund, resume the graph with:
final_result = graph.invoke(
    Command(resume=True),
    config=config
)
Because we reuse the same thread_id, LangGraph knows which paused workflow to continue.
The final result may look like:
{
    "success": True,
    "order_id": "ORD-1024",
    "amount": 79.99,
    "message": "Mock refund issued successfully."
}
Now test the rejection path.
If the reviewer rejects the proposal:
final_result = graph.invoke(
    Command(resume=False),
    config=config
)
The workflow follows the rejection branch:
PAUSED
↓
Reject
↓
rejected
↓
END
In this case, issue_refund is never called.
This is the core human-in-the-loop behavior: the workflow pauses, waits for a human decision, and only executes the consequential tool when approval is explicitly provided.
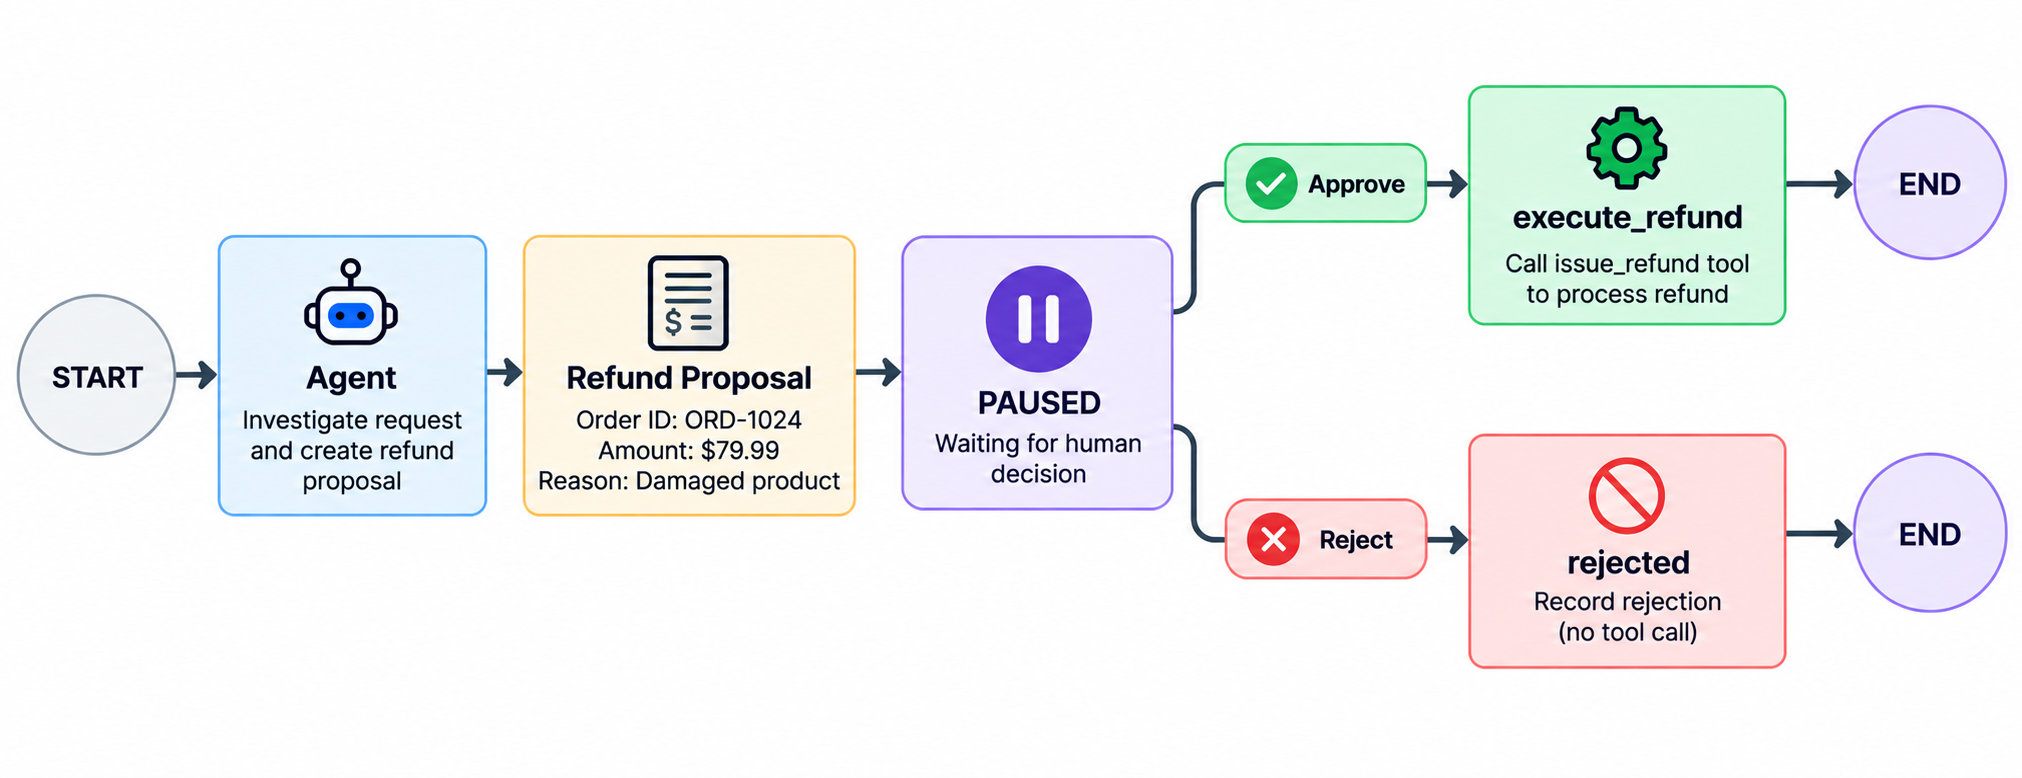
In the next section, we’ll test several end-to-end scenarios to make sure both the agent and approval checkpoint behave as expected.
17: Test the Workflow End to End
Now that the workflow is complete, we should test more than just the successful path.
A human-in-the-loop system needs to behave correctly when the request is approved, rejected, invalid, or already processed.
Scenario 1: Valid Refund Request
Start with:
My order ORD-1024 arrived damaged.
Please issue a refund.
Expected behavior:
- The agent reads the request.
- It calls get_order.
- It prepares a refund proposal.
- The workflow pauses.
- The reviewer approves.
- issue_refund runs.
- The workflow ends successfully.
A possible final result is:
{
    "success": True,
    "order_id": "ORD-1024",
    "amount": 79.99,
    "message": "Mock refund issued successfully."
}
Scenario 2: Reviewer Rejects the Refund
Use the same request, but resume with:
Command(resume=False) Expected behavior:
Proposal created
↓
Human review
↓
Rejected
↓
No refund tool call
The result should indicate that the reviewer rejected the refund.
Scenario 3: Invalid Order ID
Try:
My order ORD-9999 arrived damaged.
Please refund it.
The get_order tool should return:
{
    "found": False,
    "order_id": "ORD-9999"
}
The agent should not invent an amount, product, or order status.
Scenario 4: Already Refunded Order
Set:
ORDERS["ORD-1024"]["refunded"] = True Then run the workflow again.
The agent should see the updated order state, and the refund tool should also block another refund. Testing these paths helps verify that the agent, approval gate, and deterministic business rules are working together correctly.
18: Move the Workflow Toward Production
Our agent now works end to end, but the current implementation is still a safe development version.
Before connecting it to a real payment system, a few parts should be strengthened.
1. Replace In-Memory Checkpointing
We currently use:
InMemorySaver() That is fine for local testing, but the state disappears if the application restarts.
In production, use persistent checkpoint storage so paused workflows can survive restarts, deployments, and long approval delays.
2. Use an Authenticated Approval Interface
The human review step should be connected to a secure interface where the reviewer can see:
- Order ID
- Refund amount
- Agent recommendation
- Reason for the recommendation
- Relevant supporting information
The reviewer should then explicitly approve or reject the action.
3. Verify Reviewer Permissions
Not every reviewer should have the same authority.
For example:
- Support Agent → Refunds up to $100
- Support Manager → Refunds up to $1,000
- Finance Team → Higher-value refunds
These limits should be enforced by application logic, not by the LLM.
4. Add Idempotency
A retry should never create a duplicate refund.
For example, a production system could attach an idempotency key such as:
refund-ORD-1024-review-48392
If the request is retried, the payment service can recognize that the refund has already been processed.
5. Add Audit Logging
Store a trace of the important events:
Customer request
Agent tool calls
Retrieved order data
Refund proposal
Reviewer identity
Approval decision
Timestamp
Refund result
This makes the workflow easier to audit and debug.
6. Keep Hard Rules in Code
The LLM can reason about the request, but critical business rules should remain deterministic.
For example:
if proposal["refund_amount"] > reviewer_limit:
    block_refund()
or:
if order["refunded"]:
    reject_duplicate()
A useful design principle is:
LLM handles reasoning. Application code enforces hard constraints.
These changes turn the demo architecture into something much closer to a production-ready human-in-the-loop agent.
Conclusion
Human-in-the-loop checkpoints are not about slowing agents down. They are about placing control at the right point in the workflow.In this tutorial, the agent was free to understand the customer request, retrieve order information, reason over the verified data, and prepare a refund recommendation.But it could not issue the refund on its own.The workflow paused before the consequential action, waited for human approval, and only then allowed the refund tool to run.
The final pattern was:
Agent investigates → Agent proposes → Human reviews → Application executes
This architecture creates a useful balance between autonomy and control. The LLM handles reasoning.The agent handles tool use and investigation.LangGraph handles orchestration and pause/resume behavior.The human provides authorization where the consequences matter.As agents gain access to more powerful tools, designing these checkpoints carefully becomes an important part of building reliable agentic systems.
Frequently Asked Questions
Q1. Where should I place a human-in-the-loop checkpoint in an AI agent workflow?
A. Place the checkpoint immediately before the agent performs a consequential action, such as issuing a refund, sending a message, updating a record, deleting data, or triggering a payment. The agent can still investigate and prepare a recommendation autonomously, but the workflow should pause before the action affects the outside world.
Q2. Why use LangGraph interrupt() instead of asking the model to wait for approval?
A. LangGraph interrupt() pauses the actual workflow and saves its state through a checkpointer. This is different from only instructing the model to wait. The pause is enforced by the application graph, so the refund tool or any other high-impact tool cannot run until the workflow is resumed with an explicit approval decision.
Q3. Can this human approval pattern be used outside refund workflows?
A. Yes. The same pattern works for email agents, database agents, finance agents, coding agents, HR agents, IT automation, and other workflows where an agent can reason or prepare a recommendation but should not execute a high-impact action without review. The general flow is: agent investigates, agent proposes, human approves, and the application executes.
Hi, I am Janvi, a passionate data science enthusiast currently working at Analytics Vidhya. My journey into the world of data began with a deep curiosity about how we can extract meaningful insights from complex datasets.