Manual data entry from invoices is a slow, error-prone task that businesses have battled for decades. Recently, Uber Engineering revealed how they tackled this challenge with their “TextSense” platform, a sophisticated system for GenAI invoice processing. This system showcases the power of intelligent document processing, combining Optical Character Recognition (OCR) with Large Language Models (LLMs) for highly accurate, automated data extraction. This advanced approach might seem out of reach for smaller projects. However, the core principles are now accessible to everyone. This guide will show you how to replicate the fundamental workflow of Uber’s system. We will use simple, powerful tools to create a system that automates invoice data extraction.
Table of contents
Understanding Uber’s “TextSense” System
Before we build our version, it’s helpful to understand what inspired it. Uber’s goal was to automate the processing of millions of documents, from invoices to receipts. Their “TextSense” platform, detailed in their engineering blog, is a robust, multi-stage pipeline designed for this purpose.
The figure shows the full document processing pipeline. For processing any document, pre-processing is usually common before calling an LLM.
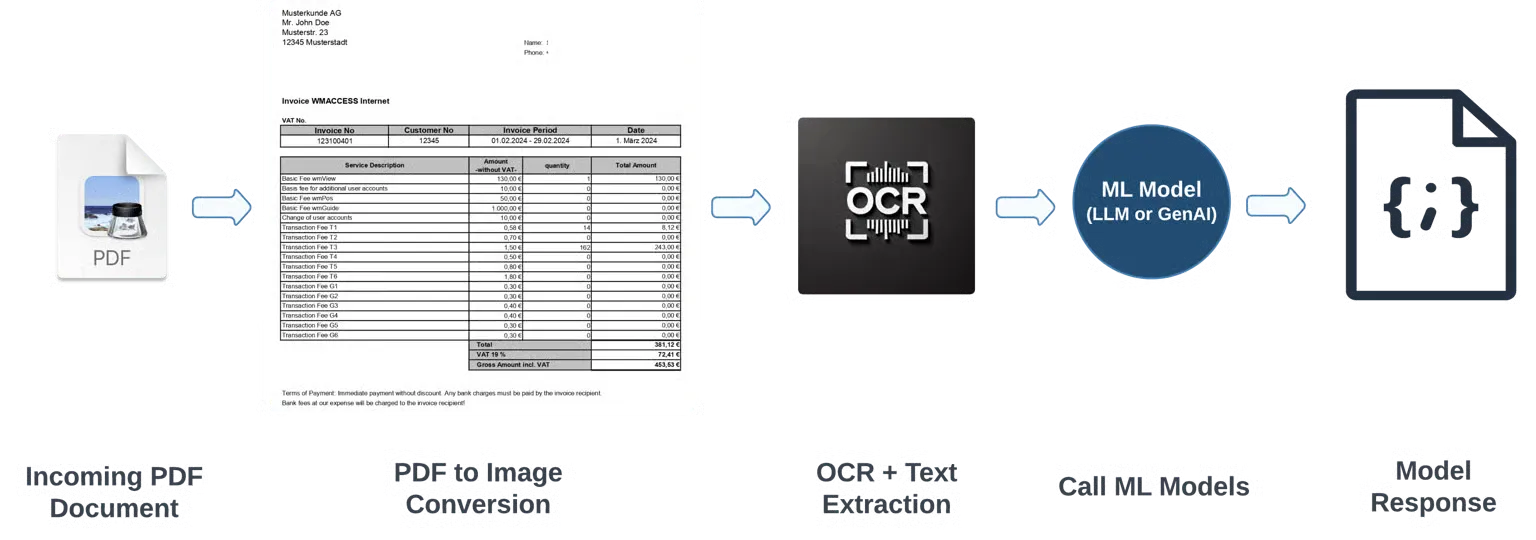
At its core, the system works in three main stages:
- Digitization (via OCR): First, the system takes a document, like a PDF or an image of an invoice. It uses an advanced OCR engine to “read” the document and convert all the visual text into machine-readable text. This raw text is the foundation for the next step.
- Intelligent Extraction (via LLM): The raw text from the OCR process is often messy and unstructured. This is where the GenAI magic happens. Uber feeds this text to a large language model. The LLM acts like an expert who understands the context of an invoice. It can identify and extract specific pieces of information, such as the “Invoice Number,” “Total Amount,” and “Supplier Name,” and organize them into a structured format, like JSON.
- Verification (Human-in-the-Loop): No AI is perfect. To ensure 100% accuracy, Uber implemented a human-in-the-loop AI system. This verification step presents the original document alongside the AI-extracted data to a human operator. The operator can quickly confirm that the data is correct or make minor adjustments if needed. This feedback loop also helps improve the model over time.
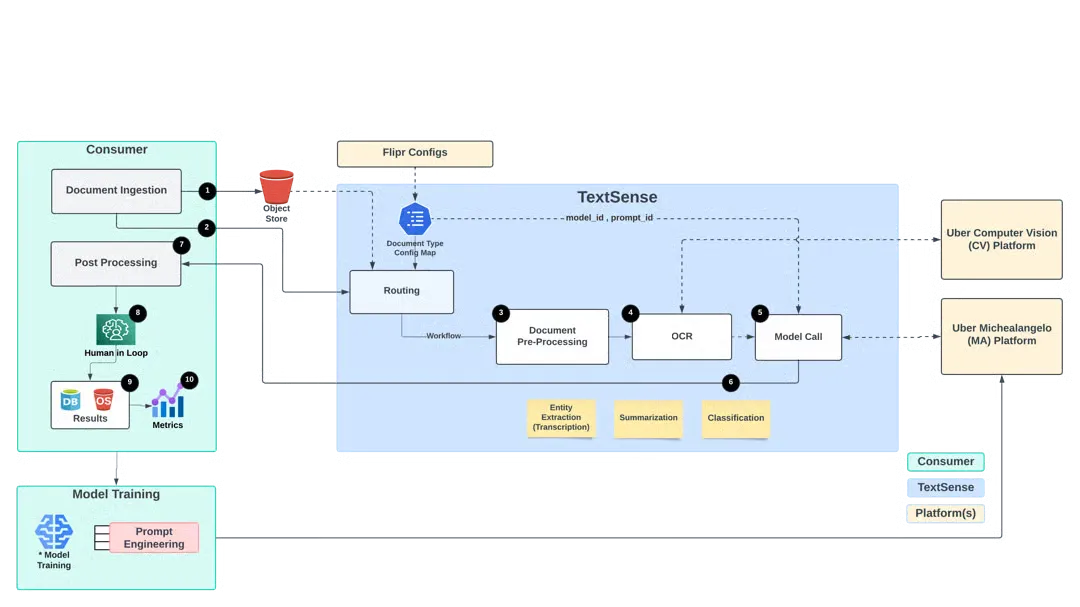
This combination of OCR with AI and human oversight makes their system both efficient and reliable. The following figure explains the workflow of TextSense in a detailed manner, as explained in the above points.
Our Game Plan: Replicating the Core Workflow
Our goal is not to rebuild Uber’s entire production-grade platform. Instead, we will replicate its core intelligence in a simplified, accessible way. We will build our GenAI invoice processing POC in a single Google Colab notebook.
Our plan follows the same logical steps:
- Ingest Document: We will create a simple way to upload a PDF invoice directly to our notebook.
- Perform OCR: We will use Tesseract, a powerful open-source OCR engine, to extract all the text from the uploaded invoice.
- Extract Entities with AI: We will use the Google Gemini API to perform the automated data extraction. We’ll craft a specific prompt to instruct the model to pull out the key fields we need.
- Create a Verification UI: We will build a simple interactive interface using ipywidgets to serve as our human-in-the-loop AI system, allowing for quick validation of the extracted data.

This approach gives us a powerful and inexpensive way to achieve intelligent document processing without needing complex infrastructure.
Hands-On Implementation: Building the POC Step-by-Step
Let’s begin building our system. You can follow these steps in a new Google Colab notebook.
Step 1: Setting Up the Environment
First, we need to install the necessary Python libraries. This command installs packages for handling PDFs (PyMuPDF), running OCR (pytesseract), interacting with the Gemini API, and building the UI (ipywidgets). It also installs the Tesseract OCR engine itself.
!pip install -q -U google-generativeai PyMuPDF pytesseract pandas ipywidgets

!apt-get -qq install tesseract-ocr
Step 2: Configuring the Google Gemini API
Next, you need to configure your Gemini API key. To keep your key safe, we’ll use Colab’s built-in secret manager.
- Get your API key from Google AI Studio.
- In your Colab notebook, click the key icon on the left sidebar.
- Create a new secret named GEMINI_API_KEY and paste your key as the value.
The following code will securely access your key and configure the API.
import google.generativeai as genai

from google.colab import userdata

import fitz  # PyMuPDF

import pytesseract

from PIL import Image

import pandas as pd

import ipywidgets as widgets

from ipywidgets import Layout

from IPython.display import display, clear_output

import json

import io

# Configure the Gemini API

try:

   api_key = userdata.get(“GEMINI_API_KEY”)

   genai.configure(api_key=api_key)

   print("Gemini API configured successfully.")

except userdata.SecretNotFoundError:

   print("ERROR: Secret 'GEMINI_API_KEY' not found. Please follow the instructions to set it up.")
Step 3: Uploading and Pre-processing the PDF
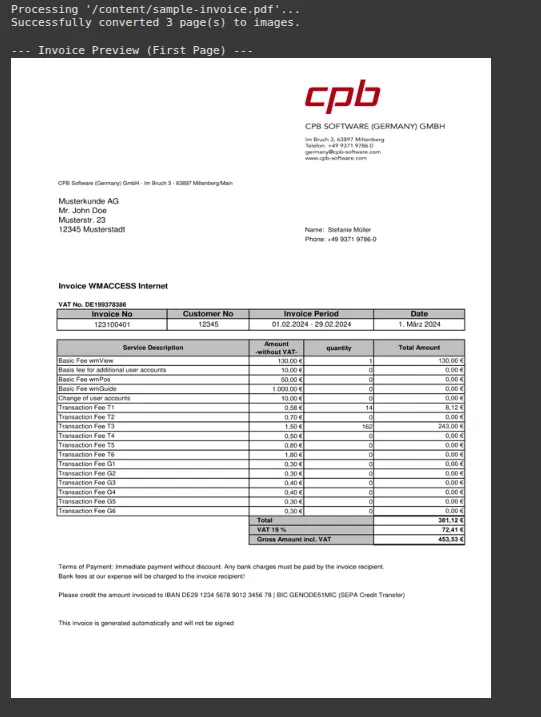
This code uploads a PDF file that is an invoice PDF. When you upload a PDF, it converts each page into a high-resolution image, which is the ideal format for OCR.
import fitz  # PyMuPDF

from PIL import Image

import io

import os

invoice_images = []

uploaded_file_name = "/content/sample-invoice.pdf"  # Replace with the actual path to your PDF file

# Ensure the file exists (optional but recommended)

if not os.path.exists(uploaded_file_name):

   print(f"ERROR: File not found at '{uploaded_file_name}'. Please update the file path.")

else:

   print(f"Processing '{uploaded_file_name}'...")

   # Convert PDF to images

   doc = fitz.open(uploaded_file_name)

   for page_num in range(len(doc)):

       page = doc.load_page(page_num)

       pix = page.get_pixmap(dpi=300) # Higher DPI for better OCR

       img = Image.open(io.BytesIO(pix.tobytes()))

       invoice_images.append(img)

   doc.close()

   print(f"Successfully converted {len(invoice_images)} page(s) to images.")

   # Display the first page as a preview

   if invoice_images:

       print("\n--- Invoice Preview (First Page) ---")

       display(invoice_images[0].resize((600, 800)))
Output:
Step 4: Extracting Raw Text with Tesseract OCR
Now, we run the OCR process on the images we just created. The text from all pages is combined into a single string. This is the context we will send to the Gemini model. This step is a crucial part of the OCR with AI workflow.
full_invoice_text = ""

if not invoice_images:

   print("Please upload a PDF invoice in the step above first.")

else:

   print("Extracting text with OCR...")

   for i, img in enumerate(invoice_images):

       text = pytesseract.image_to_string(img)

       full_invoice_text += f"\n--- Page {i+1} ---\n{text}"

   print("OCR extraction complete.")

   print("\n--- Extracted Text (first 500 characters) ---")

   print(full_invoice_text[:500] + "...")
Output:

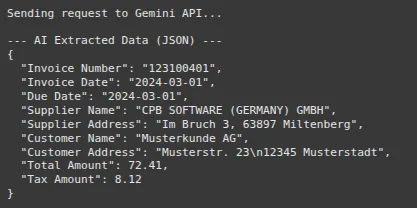
Step 5: Intelligent Extraction with the Gemini API
This is where the GenAI invoice processing happens. We create a detailed prompt that tells the Gemini model its role. We instruct it to extract specific fields and return the result in a clean JSON format. Asking for JSON is a powerful technique that makes the model’s output structured and easy to work with.
extracted_data = {}

if not full_invoice_text.strip():

   print("Cannot proceed. The extracted text is empty. Please check the PDF quality.")

else:

   # Instantiate the Gemini Pro model

   model = genai.GenerativeModel('gemini-2.5-pro')

   # Define the fields you want to extract

   fields_to_extract = "Invoice Number, Invoice Date, Due Date, Supplier Name, Supplier Address, Customer Name, Customer Address, Total Amount, Tax Amount"

   # Create the detailed prompt

   prompt = f"""

   You are an expert in invoice data extraction.

   Your task is to analyze the provided OCR text from an invoice and extract the following fields: {fields_to_extract}.

   Follow these rules strictly:

   1.  Return the output as a single, clean JSON object.

   2.  The keys of the JSON object must be exactly the field names provided.

   3.  If a field cannot be found in the text, its value in the JSON should be `null`.

   4.  Do not include any explanatory text, comments, or markdown formatting (like ```json) in your response. Only the JSON object is allowed.

   Here is the invoice text:

   ---

   {full_invoice_text}

   ---

   """

   print("Sending request to Gemini API...")

   try:

       # Call the API

       response = model.generate_content(prompt)

       # Robustly parse the JSON response

       response_text = response.text.strip()

       # Clean potential markdown formatting

       if response_text.startswith('```json'):

           response_text = response_text[7:-3].strip()

       extracted_data = json.loads(response_text)

       print("\n--- AI Extracted Data (JSON) ---")

       print(json.dumps(extracted_data, indent=2))

   except json.JSONDecodeError:

       print("\n--- ERROR ---")

       print("Failed to decode the model's response into JSON.")

       print("Model's Raw Response:", response.text)

   except Exception as e:

       print(f"\nAn unexpected error occurred: {e}")

       print("Model's Raw Response (if available):", getattr(response, 'text', 'N/A'))
Output:
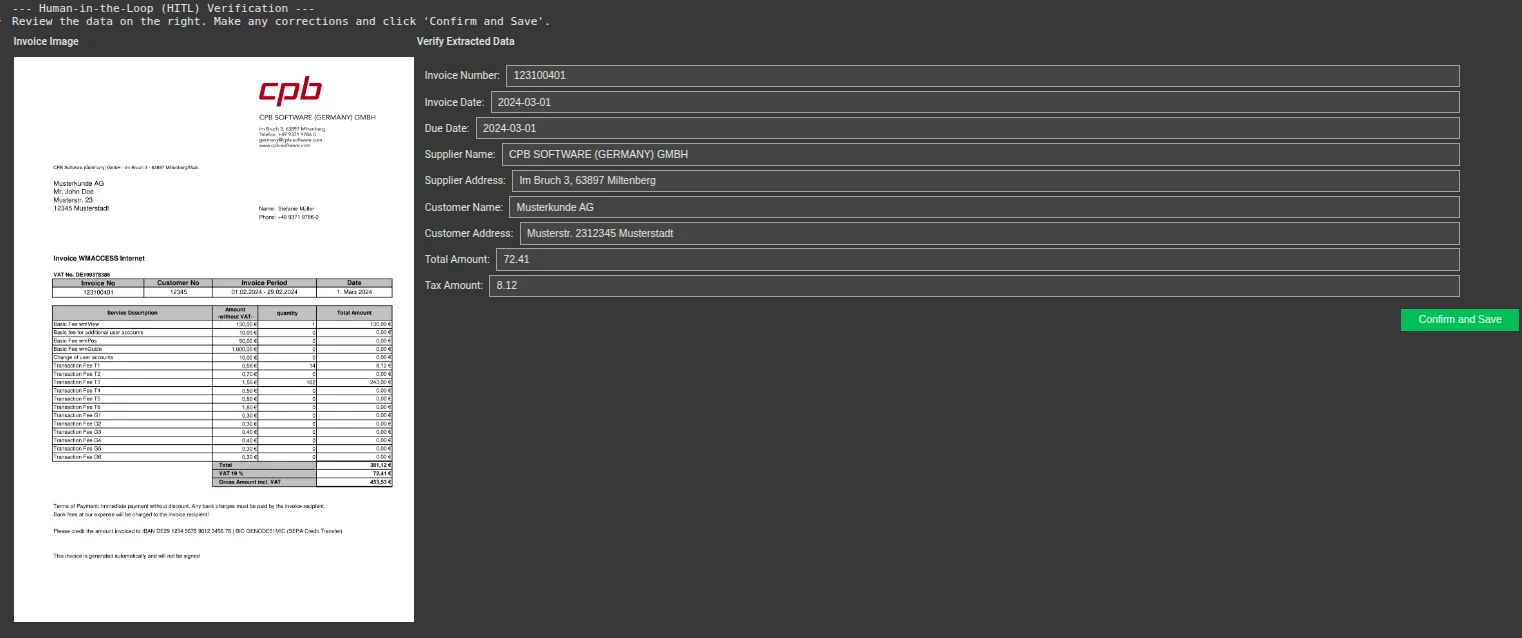
Step 6: Building the Human-in-the-Loop (HITL) UI
Finally, we built the verification interface. This code displays the invoice image on the left and creates an editable form on the right, pre-filled with the data from Gemini. The user can quickly review the information, make any necessary edits, and confirm.
# UI Widgets

text_widgets = {}

if not extracted_data:

   print("No data was extracted by the AI. Cannot build verification UI.")

else:

   form_items = []

   # Create a text widget for each extracted field

   for key, value in extracted_data.items():

       text_widgets[key] = widgets.Text(

           value=str(value) if value is not None else "",

           description=key.replace('_', ' ').title() + ':',

           style={'description_width': 'initial'},

           layout=Layout(width='95%')

       )

       form_items.append(text_widgets[key])

   # The form container

   form = widgets.VBox(form_items, layout=Layout(padding='10px'))

   # Image container

   if invoice_images:

       img_byte_arr = io.BytesIO()

       invoice_images[0].save(img_byte_arr, format='PNG')

       image_widget = widgets.Image(

           value=img_byte_arr.getvalue(),

           format='png',

           width=500

       )

       image_box = widgets.HBox([image_widget], layout=Layout(justify_content='center'))

   else:

       image_box = widgets.HTML("No image to display.")

   # Confirmation button

   confirm_button = widgets.Button(description="Confirm and Save", button_style='success')

   output_area = widgets.Output()

   def on_confirm_button_clicked(b):

       with output_area:

           clear_output()

           final_data = {key: widget.value for key, widget in text_widgets.items()}

           # Create a pandas DataFrame

           df = pd.DataFrame([final_data])

           df['Source File'] = uploaded_file_name

           print("--- Verified and Finalized Data ---")

           display(df)

           # You can now save this DataFrame to CSV, etc.

           df.to_csv('verified_invoice.csv', index=False)

           print("\nData saved to 'verified_invoice.csv'")

   confirm_button.on_click(on_confirm_button_clicked)

   # Final UI Layout

   ui = widgets.HBox([

       widgets.VBox([widgets.HTML("<b>Invoice Image</b>"), image_box]),

       widgets.VBox([

           widgets.HTML("<b>Verify Extracted Data</b>"),

           form,

           widgets.HBox([confirm_button], layout=Layout(justify_content='flex-end')),

           output_area

       ], layout=Layout(flex='1'))

   ])

   print("--- Human-in-the-Loop (HITL) Verification ---")

   print("Review the data on the right. Make any corrections and click 'Confirm and Save'.")

   display(ui)
Output:
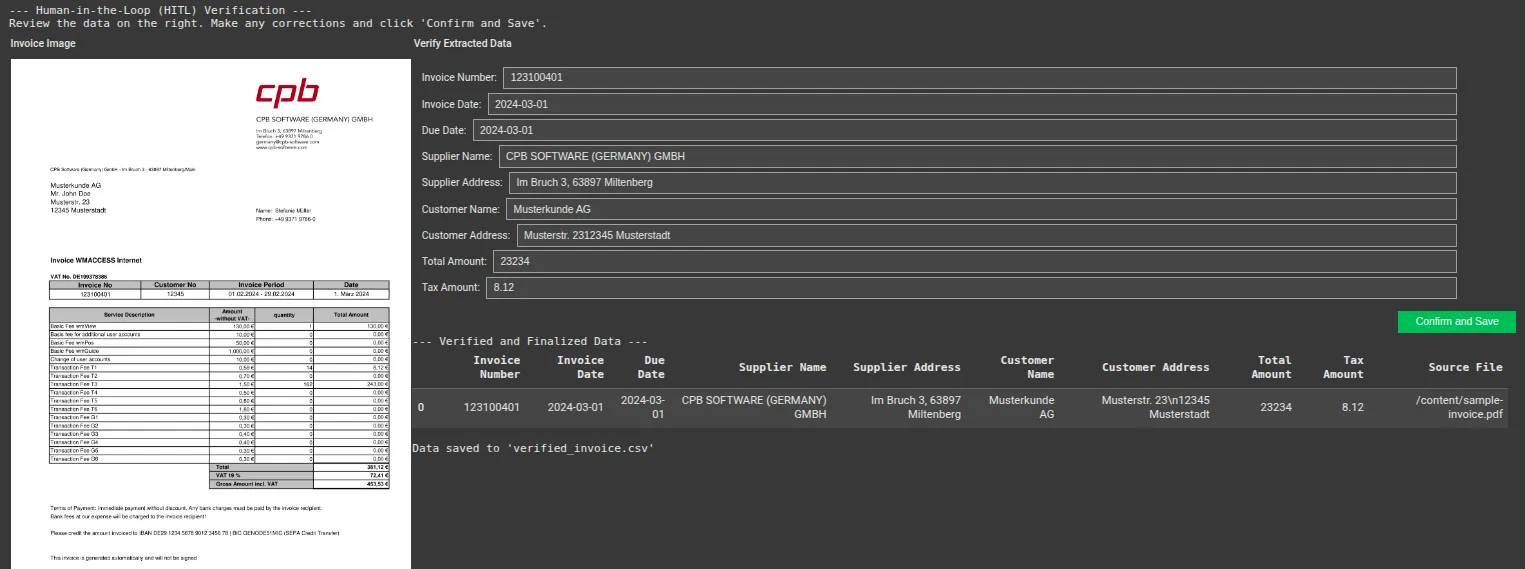
Modify some values and then save.
Output:
You can access the full code here: GitHub, Colab
Conclusion
This POC successfully demonstrates that the core logic behind a sophisticated system like Uber’s “TextSense” is replicable. By combining open-source OCR with a powerful LLM like Google’s Gemini, you can build an effective system for GenAI invoice processing. This approach to intelligent document processing dramatically reduces manual effort and improves accuracy. The addition of a simple human-in-the-loop AI interface ensures that the final data is trustworthy.
Feel free to expand on this foundation by adding more fields, improving validation, and integrating it into larger workflows.
Frequently Asked Questions
Q1. How accurate is the AI data extraction?
A. The accuracy is very high, especially with clear invoices. The Gemini model is excellent at understanding context, but quality can decrease if the OCR text is poor due to a low-quality scan.
Q2. Can this system handle different invoice layouts?
A. Yes. Unlike template-based systems, the LLM understands language and context. This allows it to find fields like “Invoice Number” or “Total” regardless of their position on the page.
Q3. What is the cost of running this POC?
A. The cost is minimal. Tesseract and the other libraries are free. You only pay for your usage of the Google Gemini API, which is very affordable for this type of task.
Q4. Can I extract other fields from the invoice?
A. Absolutely. Simply add the new field names to the fields_to_extract string in Step 5, and the Gemini model will attempt to find them for you.
Q5. How can I improve the OCR quality?
A. Ensure your source PDFs are high-resolution. In the code, we set dpi=300 when converting the PDF to an image, which is a good standard for OCR. Higher DPI can sometimes yield better results for blurry documents.
Harsh Mishra is an AI/ML Engineer who spends more time talking to Large Language Models than actual humans. Passionate about GenAI, NLP, and making machines smarter (so they don’t replace him just yet). When not optimizing models, he’s probably optimizing his coffee intake. 🚀☕