Ever since Google dropped Nano Banana, the internet hasn’t stopped buzzing with AI-generated edits. From the 3D figurine trend to retro Bollywood saree transformations, new styles pop up every day, and people can’t seem to get enough of it. When I first dug into the model’s configuration, I was struck by its precision: the way it blends images, matches lighting, and creates natural-looking outputs. That’s when I had an idea – why not use this power to build a fun Nano Banana app? In this blog, I’ll walk you through how I built Selfie with a Celeb, an AI app that lets you generate a realistic photo with your favorite actor, musician, or public figure. I’ll use Google’s Nano Banana (Gemini 2.5 Flash Image) model as the engine, pair it with Gradio for a simple web interface, and deploy it on Hugging Face Spaces so anyone can try it out.
Table of contents
If you don’t know what Nano Banana is, checkout these blogs:
Project Overview
The goal of this project is to build a simple but fun AI image app called Selfie with a Celeb. The app allows a user to:
- Upload their own photo.
- Upload a photo of their favorite celebrity.
- Generate a realistic composite image where both appear together, as if photographed in the same scene.
To achieve this, the project uses:
- Google’s Nano Banana (Gemini 2.5 Flash Image) as the AI model that performs image blending, lighting adjustments, and background generation.
- Gradio as the framework for creating a user-friendly web interface where users can upload photos and view results.
- Hugging Face Spaces as the hosting platform for free, public deployment so anyone can access and test the app.
The end result is a shareable AI-generated photo that looks natural, consistent, and engaging. Because it is powered by personalization (you plus your chosen celebrity), it taps into what makes content go viral: people enjoy seeing themselves in creative new contexts.
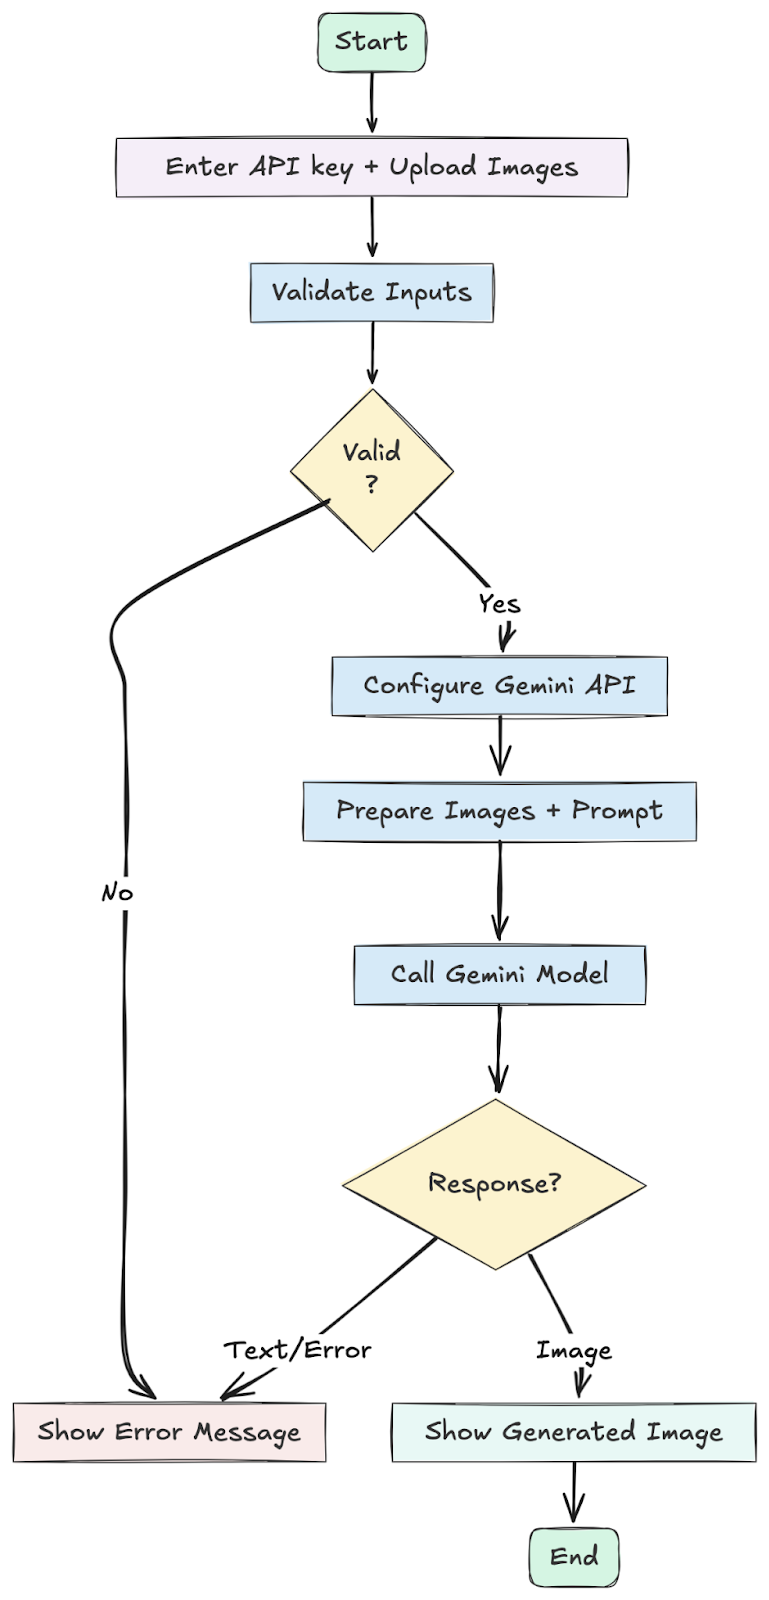
Let’s start building our Nano Banana app:
Step 1: Set Up Your Project
First, create a new folder for your project. Inside that folder, create a file named requirements.txt and add the libraries we need.
requirements.txt
gradio

google-generativeai

pillow
Install these dependencies by running this command in your terminal:
pip install -r requirements.txtOur app.py script might seem long, but it’s organized into logical sections that handle everything from talking to the AI to building the user interface. Let’s walk through it.
Step 2: Imports and Initial Setup
At the very top of the file, we import all the necessary libraries and define some constants:
import os
import io
import time
import base64
import mimetypes
from datetime import datetime
from pathlib import Path

from PIL import Image

import gradio as gr

# --- Gemini SDKs (new + legacy) -------------------------------------------------
# Prefer the NEW Google Gen AI SDK (google.genai). Fallback to legacy
# google.generativeai if the new one is not installed yet.
try:
    from google import genai as genai_new  # new SDK (preferred)
    HAVE_NEW_SDK = True
except Exception:
    genai_new = None
    HAVE_NEW_SDK = False

try:
    import google.generativeai as genai_legacy  # legacy SDK
    from google.api_core.exceptions import ResourceExhausted, InvalidArgument, GoogleAPICallError
    HAVE_LEGACY_SDK = True
except Exception:
    genai_legacy = None
    ResourceExhausted = InvalidArgument = GoogleAPICallError = Exception
    HAVE_LEGACY_SDK = False

APP_TITLE = "Take a Picture with Your Favourite Celeb!"
# New SDK model id (no "models/" prefix)
MODEL_NAME_NEW = "gemini-2.5-flash-image-preview"
# Legacy SDK model id (prefixed)
MODEL_NAME_LEGACY = "models/gemini-2.5-flash-image-preview"- Standard Libraries: We import os, io, time, and base64 for basic operations like handling files, data streams, and delays. PIL (Pillow) is crucial for image processing.
- Core Components: gradio is for building the web UI, and google.generativeai is the official Google library for interacting with the Gemini model.
- Constants: We define APP_TITLE and MODEL_NAME at the top. This makes it easy to change the app’s title or update the model version later without searching through the code.
Step 3: Helper Functions for Robust API Interaction
This group of functions makes our application reliable. They handle the complex API responses and potential network issues gracefully:
# Helper functions
def _iter_parts(resp):
    """Yield all part-like objects across candidates for both SDKs."""
    # New SDK: response.candidates[0].content.parts
    if hasattr(resp, "candidates") and resp.candidates:
        for c in resp.candidates:
            content = getattr(c, "content", None)
            if content and getattr(content, "parts", None):
                for p in content.parts:
                    yield p
    # Legacy SDK also exposes resp.parts sometimes (tool responses, etc.)
    if hasattr(resp, "parts") and resp.parts:
        for p in resp.parts:
            yield p

def _find_first_image_part(resp):
    for p in _iter_parts(resp):
        inline = getattr(p, "inline_data", None) or getattr(p, "inlineData", None)
        if inline and getattr(inline, "data", None):
            mime = getattr(inline, "mime_type", None) or getattr(inline, "mimeType", "") or ""
            if str(mime).lower().startswith("image/"):
                return p
    return None


def _collect_text(resp, limit=2):
    msgs = []
    for p in _iter_parts(resp):
        txt = getattr(p, "text", None)
        if isinstance(txt, str) and txt.strip():
            msgs.append(txt.strip())
            if len(msgs) >= limit:
                break
    return msgs


def _format_candidate_reasons(resp):
    infos = []
    cands = getattr(resp, "candidates", None)
    if not cands:
        return ""
    for i, c in enumerate(cands):
        fr = getattr(c, "finish_reason", None)
        if fr is None:  # new SDK uses enum-ish, legacy uses ints; stringify either way
            fr = getattr(c, "finishReason", None)
        if fr is not None:
            infos.append(f"candidate[{i}].finish_reason={fr}")
        safety = getattr(c, "safety_ratings", None) or getattr(c, "safetyRatings", None)
        if safety:
            infos.append(f"candidate[{i}].safety_ratings={safety}")
    return "\n".join(infos)


def _preprocess_image(pil_img, max_side=512):
    # Smaller input to reduce token/count cost
    pil_img = pil_img.convert("RGB")
    w, h = pil_img.size
    m = max(w, h)
    if m <= max_side:
        return pil_img
    scale = max_side / float(m)
    nw, nh = int(w * scale), int(h * scale)
    return pil_img.resize((nw, nh), Image.LANCZOS)


def _call_with_backoff_legacy(model, contents, max_retries=3):
    """Retries for the legacy SDK on 429/quota errors with exponential backoff."""
    last_exc = None
    for attempt in range(max_retries + 1):
        try:
            return model.generate_content(contents)
        except ResourceExhausted as e:
            last_exc = e
            if attempt == max_retries:
                raise
            time.sleep(2 ** attempt)
        except GoogleAPICallError as e:
            err_str = str(e)
            if "429" in err_str or "quota" in err_str.lower():
                last_exc = e
                if attempt == max_retries:
                    raise
                time.sleep(2 ** attempt)
            else:
                raise
    if last_exc:
        raise last_exc
    raise RuntimeError("Unreachable in backoff logic")

def _extract_image_bytes_and_mime(resp):
    """Return (image_bytes, mime) from response's first image part.
    Handles both SDKs:
      - NEW SDK returns bytes in part.inline_data.data
      - LEGACY SDK returns base64-encoded str in part.inline_data.data
    """
    part = _find_first_image_part(resp)
    if not part:
        return None, None

    inline = getattr(part, "inline_data", None) or getattr(part, "inlineData", None)
    mime = getattr(inline, "mime_type", None) or getattr(inline, "mimeType", None) or "image/png"
    raw = getattr(inline, "data", None)

    if raw is None:
        return None, None

    if isinstance(raw, (bytes, bytearray)):
        # NEW SDK already returns raw bytes
        return bytes(raw), mime
    elif isinstance(raw, str):
        # LEGACY SDK returns base64 string
        try:
            return base64.b64decode(raw), mime
        except Exception:
            # It *might* already be raw bytes in string-like form; last resort
            try:
                return raw.encode("latin1", "ignore"), mime
            except Exception:
                return None, None
    else:
        return None, None


def _guess_ext_from_mime(mime: str) -> str:
    ext = mimetypes.guess_extension(mime or "")
    if not ext:
        # Fallbacks for common cases not covered by mimetypes on some OSes
        if mime == "image/webp":
            return ".webp"
        if mime == "image/jpeg":
            return ".jpg"
        return ".png"
    # Normalize jpeg
    if ext == ".jpe":
        ext = ".jpg"
    return ext
- Response Parsers (_iter_parts, _find_first_image_part, _collect_text, _format_candidate_reasons): The Gemini API can return a complex response with multiple parts. These functions safely search through the response to find the important bits: the generated image data, any text messages, or error/safety information.
- _preprocess_image: To save on API costs and speed up generation, this function takes the uploaded images and resizes them if they are too large. It maintains the aspect ratio while ensuring the longest side is no more than 512 pixels.
- _call_with_backoff: This is a critical function for reliability. If the Google API is busy and tells us to slow down (a “quota exceeded” error), this function automatically waits for a moment and then tries again. It increases the waiting time with each failed attempt, preventing the app from crashing.
Step 4: The Main Generation Logic
This is the heart of our application. The generate_image_with_celeb function orchestrates the entire process, from validating user input to returning the final image.
# Main function
def generate_image_with_celeb(api_key, user_image, celeb_image, auto_download=False, progress=gr.Progress()):
    if not api_key:
        return None, "🔐 Authentication Error: Please provide your Google AI API key.", None, ""
    if user_image is None or celeb_image is None:
        return None, "📥 Please upload both your photo and the celebrity photo.", None, ""

    progress(0.05, desc="Configuring API...")

    client_new = None
    model_legacy = None

    # Prefer NEW SDK
    if HAVE_NEW_SDK:
        try:
            client_new = genai_new.Client(api_key=api_key)
        except Exception as e:
            return None, f"❌ API key configuration failed (new SDK): {e}", None, ""
    elif HAVE_LEGACY_SDK:
        try:
            genai_legacy.configure(api_key=api_key)
        except Exception as e:
            return None, f"❌ API key configuration failed (legacy SDK): {e}", None, ""
    else:
        return None, "❌ Neither google.genai (new) nor google.generativeai (legacy) SDK is installed.", None, ""

    progress(0.15, desc="Preparing images...")
    try:
        user_pil = Image.fromarray(user_image)
        celeb_pil = Image.fromarray(celeb_image)
        user_pil = _preprocess_image(user_pil, max_side=512)
        celeb_pil = _preprocess_image(celeb_pil, max_side=512)
    except Exception as e:
        return None, f"❌ Failed to process images: {e}", None, ""

    prompt = (
        "Analyze these two images. Create a single, new, photorealistic image where the person from the first image is standing next to the celebrity from the second image. "
        "Key requirements: 1) Seamless integration in the same physical space. 2) Generate a natural background (e.g., red carpet, casual street, studio). "
        "3) Consistent lighting/shadows/color tones matching the generated background. 4) Natural poses/interactions. 5) High-resolution, artifact-free output."
    )

    contents = [user_pil, celeb_pil, prompt]

    progress(0.35, desc="Sending request...")
    response = None
    try:
        if client_new is not None:
            # New SDK call
            response = client_new.models.generate_content(
                model=MODEL_NAME_NEW, contents=contents
            )
        else:
            # Legacy SDK call
            model_legacy = genai_legacy.GenerativeModel(MODEL_NAME_LEGACY)
            response = _call_with_backoff_legacy(model_legacy, contents, max_retries=4)
    except Exception as e:
        err = str(e)
        if "429" in err or "quota" in err.lower():
            return None, (
                "❌ You’ve exceeded your quota for image preview model. "
                "Wait for quota reset or upgrade billing / permissions."
            ), None, ""
        return None, f"❌ API call failed: {err}", None, ""

    progress(0.65, desc="Parsing response...")
    if not response:
        return None, "❌ No response from model.", None, ""

    # Robust decode that works for both SDKs and avoids double base64-decoding
    image_bytes, mime = _extract_image_bytes_and_mime(response)

    if image_bytes:
        try:
            # Persist to disk first (works even if PIL can't decode e.g., some WEBP builds)
            outputs_dir = Path("outputs")
            outputs_dir.mkdir(parents=True, exist_ok=True)
            ts = datetime.now().strftime("%Y%m%d_%H%M%S")
            ext = _guess_ext_from_mime(mime or "image/png")
            file_path = outputs_dir / f"celeb_fusion_{ts}{ext}"
            with open(file_path, "wb") as f:
                f.write(image_bytes)

            # Try to open with PIL for preview; if it fails, return the file path (Gradio can render by path)
            img_obj = None
            try:
                img_obj = Image.open(io.BytesIO(image_bytes))
            except Exception:
                img_obj = None

            progress(0.95, desc="Rendering...")

            # Optional auto-download via data-URI (no reliance on Gradio file routes)
            auto_dl_html = ""
            if auto_download:
                b64 = base64.b64encode(image_bytes).decode("ascii")
                fname = file_path.name
                auto_dl_html = (
                    f"<a id='autodl' href='data:{mime};base64,{b64}' download='{fname}'></a>"
                    f"<script>(function(){{var a=document.getElementById('autodl');if(a) a.click();}})();</script>"
                )

            # Return PIL image if available, else the file path (both supported by gr.Image)
            display_obj = img_obj if img_obj is not None else str(file_path)
            return display_obj, f"✅ Image generated ({mime}).", str(file_path), auto_dl_html
        except Exception as e:
            details = _format_candidate_reasons(response)
            return None, f"❌ Failed to write or load image: {e}\n\n{details}", None, ""

    # If no image part → get text
    texts = _collect_text(response, limit=2)
    reasons = _format_candidate_reasons(response)
    guidance = (
        "\nTo get image output you need access to the preview image model "
        "and sufficient free-tier quota or a billed project."
    )
    txt_msg = texts[0] if texts else "No text message."
    debug = f"\n[Debug info] {reasons}" if reasons else ""
    return None, f"⚠️ Model returned text: {txt_msg}{guidance}{debug}", None, ""
- Input Validation: It first checks if the user provided an API key and both images. If not, it returns an error message immediately.
- API Configuration: It uses the genai.configure() function to set up the connection to Google’s servers with the user’s personal API key.
- Image Preparation: It converts the images uploaded via Gradio into a format the API understands (PIL Images) and uses our _preprocess_image helper to resize them.
- Prompt and API Call: It constructs the final prompt, combining the two images and our text instructions. It then calls the Gemini model using our reliable _call_with_backoff function.
- Response Handling: After getting a response, it uses our helper functions to find the image data. If an image is found, it decodes it and returns it to the UI. If not, it finds any text messages and returns those instead, so the user knows what happened.
Step 5: Building the User Interface with Gradio
The final section of the code uses gradio to build the interactive web page:
# Gradio UI

custom_css = """
.gradio-container { border-radius: 20px !important; box-shadow: 0 4px 20px rgba(0,0,0,0.05); }
#title { text-align: center; font-family: 'Helvetica Neue', sans-serif; font-weight: 700; font-size: 2.0rem; }
#subtitle { text-align: center; font-size: 1.0rem; margin-bottom: 1.0rem; }
.gr-button { font-weight: 600 !important; border-radius: 8px !important; padding: 12px 10px !important; }
#output_header { text-align: center; font-weight: bold; font-size: 1.2rem; }
footer { display: none !important; }
"""

with gr.Blocks(theme=gr.themes.Soft(), css=custom_css) as demo:
    gr.Markdown(f"# {APP_TITLE}", elem_id="title")
    gr.Markdown(
        "Uses Gemini 2.5 Flash Image Preview model. Provide your API key (new SDK: google.genai) or legacy SDK key.",
        elem_id="subtitle"
    )

    with gr.Accordion("Step 1: Enter Your Google AI API Key", open=True):
        api_key_box = gr.Textbox(
            label="API Key",
            placeholder="Paste your Google AI API key here...",
            type="password",
            info="Ensure the key is from a project with billing and image preview access.",
            interactive=True
        )

    with gr.Row(variant="panel"):
        user_image = gr.Image(type="numpy", label="Upload your picture", height=350)
        celeb_image = gr.Image(type="numpy", label="Upload celeb picture", height=350)

    with gr.Row():
        auto_dl = gr.Checkbox(label="Auto-download after generation", value=False)

    generate_btn = gr.Button("Generate Image", variant="primary")

    gr.Markdown("### Output", elem_id="output_header")
    output_image = gr.Image(label="Generated Image", height=500, interactive=False, show_download_button=True)
    output_text = gr.Markdown(label="Status / Message")

    # Download button fed by the function (returns a filepath)
    download_btn = gr.DownloadButton("Download Image", value=None, size="md")

    # Hidden HTML slot to run the client-side auto-download script (data URI)
    auto_dl_html = gr.HTML(visible=False)

    generate_btn.click(
        fn=generate_image_with_celeb,
        inputs=[api_key_box, user_image, celeb_image, auto_dl],
        outputs=[output_image, output_text, download_btn, auto_dl_html]
    )

if __name__ == "__main__":
    # Ensure example/output dirs exist
    Path("./examples").mkdir(parents=True, exist_ok=True)
    Path("./outputs").mkdir(parents=True, exist_ok=True)
demo.launch(debug=True)- Layout (gr.Blocks): We use gr.Blocks to create a custom layout. We also pass in our custom_css string to style the components.
- Components: Each element on the page—like the title (gr.Markdown), the API key input field (gr.Textbox), and the image upload boxes (gr.Image)—is created as a Gradio component.
- Arrangement: Components like the two image upload boxes are placed inside a gr.Row to appear side-by-side. The API key field is inside a collapsible gr.Accordion.
- Button and Outputs: We define the “Generate” button (gr.Button) and the components where the results will be displayed (output_image and output_text).
- Event Handling (.click()): This is the magic that connects the UI to our Python logic. This line tells Gradio: “When generate_btn is clicked, run the generate_image_with_celeb function. Take the values from api_key_box, user_image, and celeb_image as inputs, and place the results into output_image and output_text.”
Go Live: Simple Gradio App Deployment on Hugging Face
One of the best parts of this project is how simple the Gradio app deployment is. We will use Hugging Face Spaces, a free platform for hosting machine learning demos.
- Create a Hugging Face Account: If you do not have one, sign up at huggingface.co.
- Create a New Space: On your profile, click “New Space”.
- Space name: Give it a unique name (e.g., celebrity-selfie-generator).
- License: Choose a license (e.g., mit).
- Select the Space SDK: Choose Gradio.
- Hardware: The free “CPU basic” option is sufficient.
- Click “Create Space”.
- Upload Your Files:
- In your new Space, navigate to the “Files and versions” tab.
- Click “Add file” and then “Upload files”.
- Select your app.py and requirements.txt files and upload them.
That’s it! Hugging Face Spaces will automatically install the required libraries and start your application. In a few moments, your app will be live for anyone in the world to use. Because the app requires each user to enter their own API key, you do not need to worry about managing server-side secrets.
Click here to checkout the Selfie with a Celeb app!
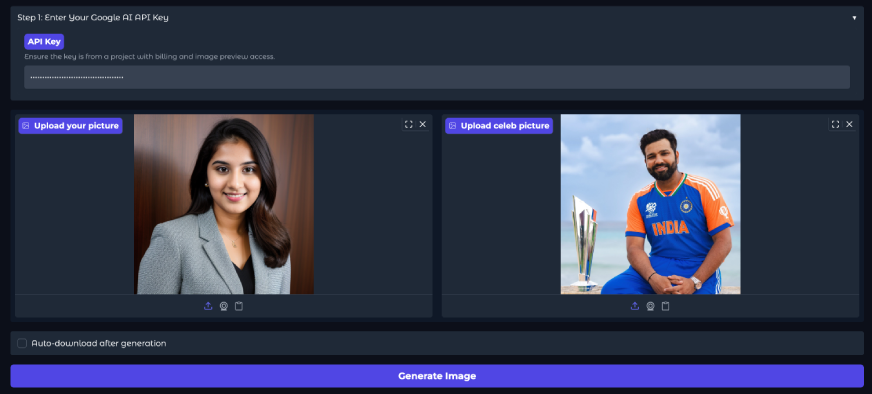
Input:
Output:
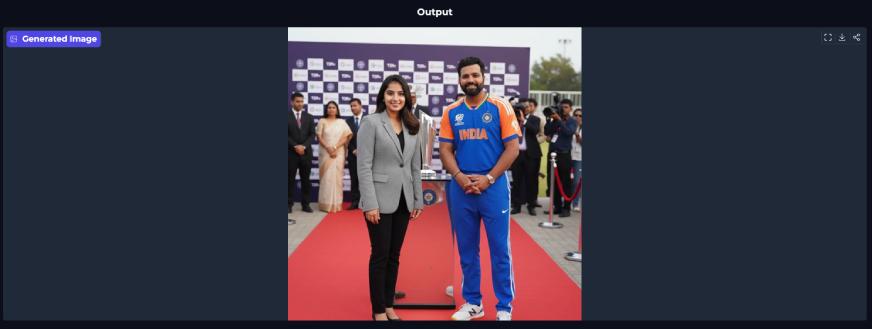
You’ll need to provide your Gemini API key, upload your photo, and add a celebrity image. Once you click Generate, the app will process and deliver your output in a few moments. The results look natural and realistic, with strong consistency between both images.
Try it out with your own photo and your favorite celebrity using your API key!
Conclusion
You now have a complete blueprint to build your own viral AI image app. We explored how Google’s Nano Banana model (Gemini 2.5 Flash Image) can generate highly realistic, consistent outputs and how easy it is to integrate with frameworks like Gradio and Hugging Face Spaces. The best part is that you can customize the prompt, tweak the interface, or even expand the idea into entirely new apps. With just a few steps, you can take this project from concept to reality and create something truly shareable.
Which Nano Banana app are you building? Let me know in the comment section below!
Frequently Asked Questions
Q1. What exactly is the “Nano Banana” model?
A. It is the internal codename for Google’s Gemini 2.5 Flash Image, a powerful AI model that can understand and generate content from both images and text.
Q2. Do I need to pay to use the deployed app?
A. The app itself is free to use, but it requires a Google AI API key. Google provides a free tier with usage limits, after which you may need to set up billing.
Q3. Why does the app require my own API key?
A. This approach allows anyone to use the app without the developer incurring costs for every image generation, making it sustainable to host publicly.
Q4. Is deploying an app on Hugging Face Spaces always free?
A. Yes, Hugging Face Spaces offers a free tier with community hardware (CPU or limited GPU access), which is perfect for most Gradio demos.
Q5. Why does the code resize the images before sending them to the API?
A. This is an optimization step. Smaller images are processed faster and consume fewer resources, which can lower API costs and reduce generation time.
Harsh Mishra is an AI/ML Engineer who spends more time talking to Large Language Models than actual humans. Passionate about GenAI, NLP, and making machines smarter (so they don’t replace him just yet). When not optimizing models, he’s probably optimizing his coffee intake. 🚀☕