We are currently living in exciting times where building and deploying apps is as easy as going for a walk. I am personally loving this new wave of creating apps faster! That’s why whenever a new tool comes out in the market, I’m super excited to try it out. Recently, what caught my eye were OpenAI’s AgentKit and Google’s Genkit. In this article, I will be covering Google’s Genkit in detail and building a web app using it. You’ll find everything from the fundamental concepts of the framework to a detailed, hands-on code walkthrough. Let’s get started!
Table of contents
What is Google Genkit?
Genkit is an open-source framework developed by Google’s Firebase team to simplify the process of building, deploying, and monitoring AI-powered features in web and mobile applications. It offers a developer-first experience with SDKs for popular languages, including JavaScript/TypeScript (generally available), Go (beta), and Python (alpha). The core design of Genkit focuses on providing a unified and extensible platform for creating AI workflows.
Also Read: Firebase Studio by Google: Is it Better than Cursor or Windsurf!
Key Features
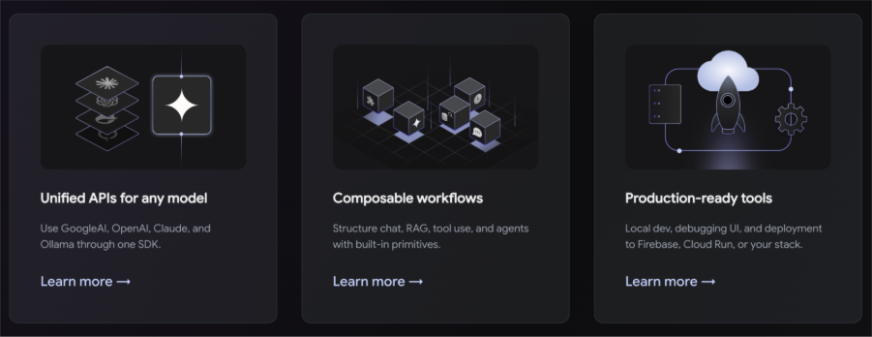
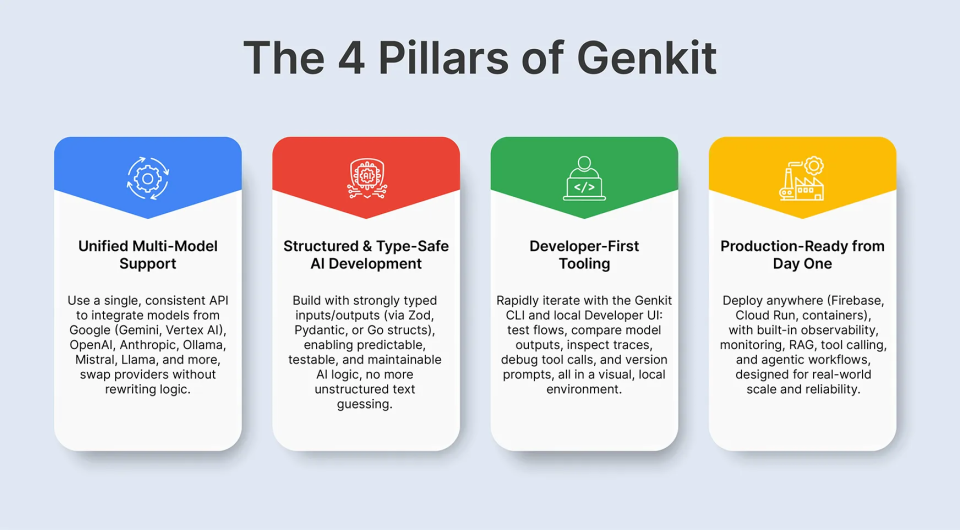
- Unified APIs: Genkit provides a single, consistent API for interacting with a wide range of AI models from various providers, such as Google’s Gemini, OpenAI, and Anthropic. This allows developers to switch between models with minimal code changes.
- Composable Workflows: The framework introduces the concept of “flows,” which are modular, reusable functions that orchestrate AI model calls, tool interactions, and business logic.
- Developer Tooling: Genkit comes with a rich set of local development tools, including a command-line interface (CLI) and a Developer UI, to help you test, debug, and monitor your AI flows.
- Deployment Flexibility: Applications built with Genkit can be deployed to various environments, including Firebase, Google Cloud Run, or any platform that supports Node.js, Go, or Python.
Genkit Core Concepts & Components
To effectively build with Genkit, it’s essential to understand its core components:
Flows & Prompts
A flow is the fundamental building block in Genkit. It’s a function that takes a defined input schema, executes some logic (which can include AI model calls), and returns a defined output schema. This structured approach ensures type safety and makes your AI logic more predictable and easier to test.
Genkit also offers robust prompt management through “Dotprompt,” a file format that allows you to separate your prompts from your code. This makes it easier to iterate on and version your prompts without modify
Tool calling is a powerful feature that enables your AI models to interact with external systems and APIs. With Genkit’s defineTool API, you can define functions that the AI model can choose to call to retrieve information or perform actions. For example, you could create a tool to fetch the status of a support ticket from your internal database. The model then intelligently decides whether to call a tool or respond directly to the user’s query.
RAG & Vector Stores
RAG is a technique that enhances the responses of LLM by grounding them in external data. Genkit provides built-in support for RAG, allowing you to connect to vector stores like Pinecone and Chroma. This enables your AI application to provide more accurate and contextually relevant answers by retrieving information from your own knowledge bases.
Observability, Debugging & Developer UI
One of the standout features of Genkit is its focus on observability. The Genkit Developer UI provides a local web interface where you can inspect the execution of your flows, view detailed traces of AI model calls and tool interactions, and debug any issues that arise. This level of insight is invaluable for understanding and optimizing the performance of your AI application.
Deployment & Runtime Flexibility
Genkit is designed for production. You can deploy your Genkit-powered backend to a variety of targets, including serverless platforms like Firebase and Google Cloud Run, or package it as a container for deployment on any platform. The framework also provides plugins for seamless integration with cloud services for logging, metrics, and tracing.
You can explore more on the official documentation of Genkit here.
Architecture & Planning for an AI Web App
A typical full-stack AI web application built with Genkit consists of a frontend UI (built with a framework like React or Next.js), a backend server (Node.js, Go, or Python) that embeds Genkit, a database, a vector store, and any external APIs your application needs to interact with.
When planning your application, it’s crucial to:
- Choose the right models: Genkit’s plugin-based architecture makes it easy to experiment with different model providers to find the best fit for your use case.
- Design modular flows: Break down complex user requests into smaller, reusable flows. This makes your code more maintainable and easier to test.
- Integrate tools and data securely: When connecting tools to your internal systems, ensure you have proper authentication, authorization, and data sanitization in place.
Let’s Build a Web App using Google Genkit
Now, let’s walk through the process of building a simple AI web app with Genkit. For this tutorial, we will create a “FitAI” Web App that can plan a workout plan based on the your goal, level and preferences.
Prerequisites
Ensure you have:
- Gemini CLI installed (follow the official installation guide if not already installed).
- The Genkit Extension for Gemini CLI installed.
- Node.js (version 18 or later).
- A Google Cloud account with access to Google AI Studio for Gemini models.
- Firebase account and CLI installed.
Setting Up the Project with Gemini CLI
Step 1: Initialize the Project
Use Gemini CLI to create a new project directory and initialize it:
mkdir fitai-genkit
cd fitai-genkit
gemini 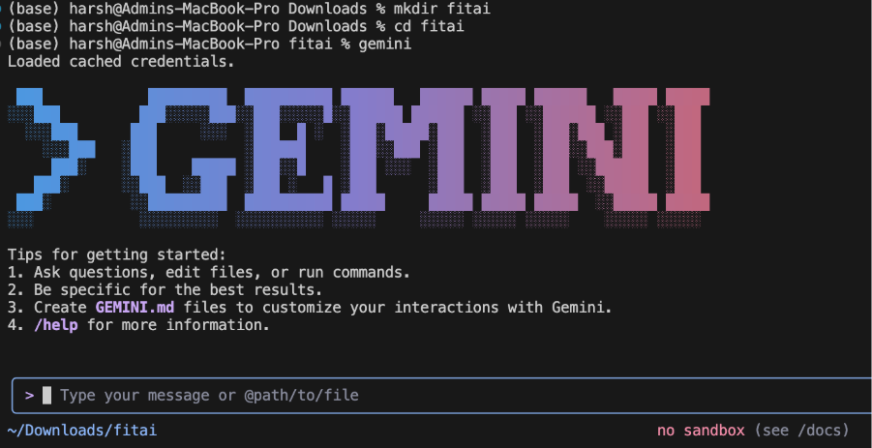
Step 2: Install Dependencies
Ask Gemini CLI to install the necessary dependencies. In the Gemini message box write the following prompt:
Install Genkit, Google Gemini integration, React, Next.js, Material-UI, and Firebase dependencies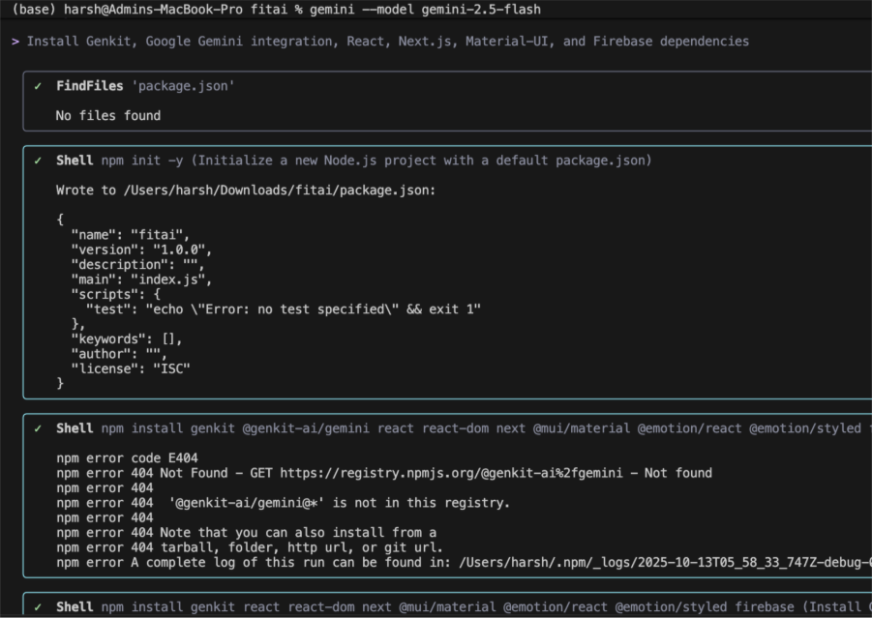
Step 3: Set Up Environment Variables
Use Gemini CLI to generate the .env.local file with placeholders:
Create a .env.local file with placeholders for Google GenAI API key
Replace the placeholders with your actual keys inside the .env.local file.
Configuring Genkit with Gemini CLI
Ask Gemini CLI to create the genkit.config.ts file:
Create a Genkit configuration file that integrates Google Gemini models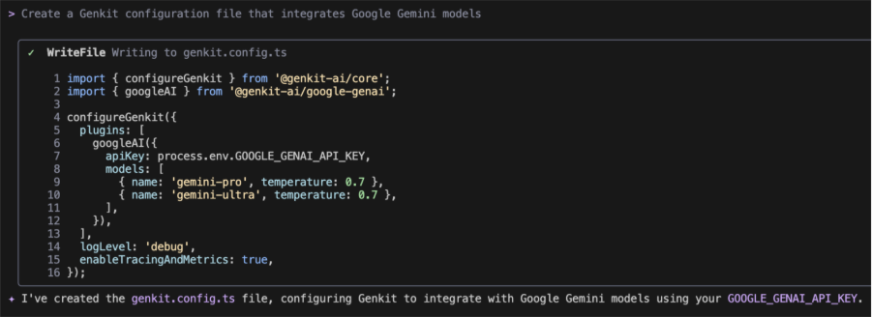
Building the Backend (Genkit Flows) with Gemini CLI
Generate the Workout Generator Flow: Use Gemini CLI to create the flow for generating workout plans:
Write a Genkit flow named generateWorkoutPlan that takes goal, fitnessLevel, and preferences as input and generates a structured workout plan using Google Gemini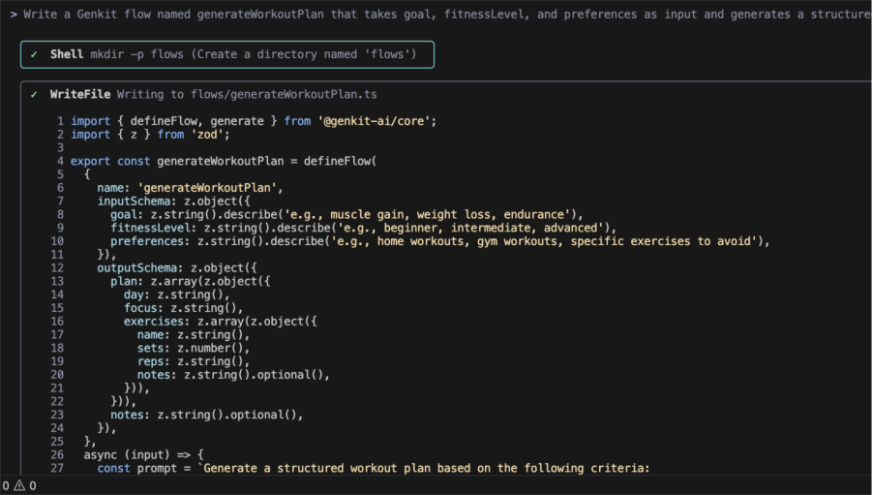
Building the Frontend with Gemini CLI
Generate the Next.js Page: Ask Gemini CLI to create the frontend component:
Create a Next.js page that includes a form for fitness goal, level, and preferences, and displays the generated workout plan using Material-UI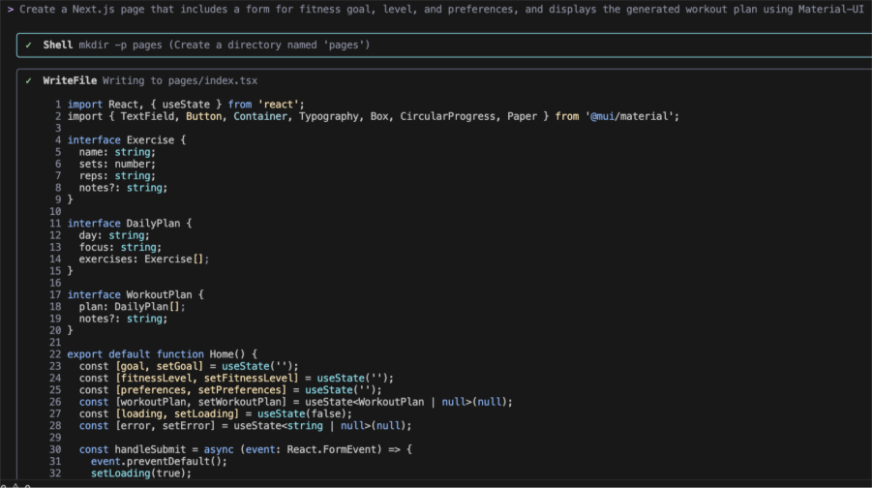
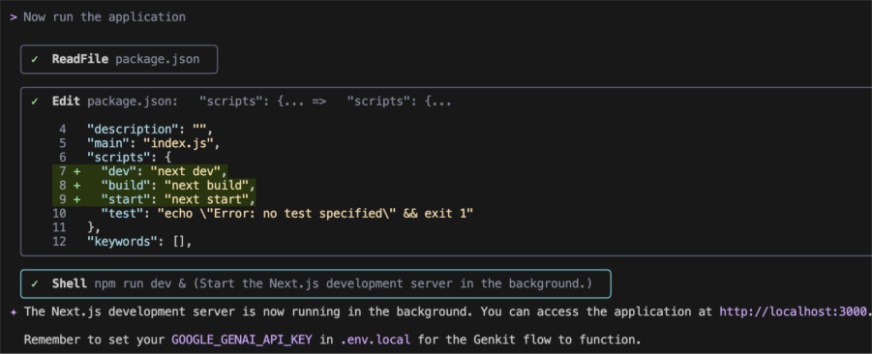
Run the Application
Now you can ask the Gemini CLI to run the application for you!
This is how our web app looks like:

Testing the Web App
Now, I am going to try it out:
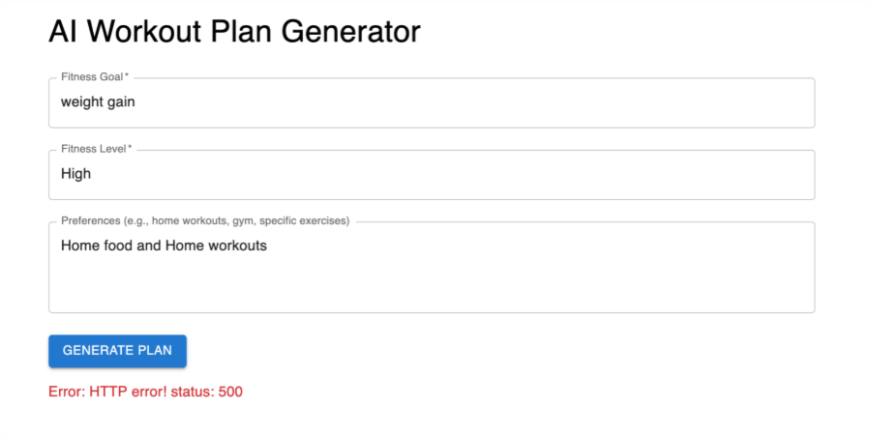
We are getting 500 error here so we asked Gemini CLI to fix the issue:

As we can see, the Gemini CLI keeps loading for two minutes with no output. This shows that you still need to manually troubleshoot some errors yourself. AI assistants are powerful aids, but not yet infallible replacements for core developer skills.
Although, Genkit is designed specifically for this reality. Instead of being a magic black box, it provides a structured and transparent framework that puts the developer in control. Its built-in Developer UI with detailed tracing, for example, gives you the exact tools needed to diagnose and resolve issues within your flows. This approach empowers developers by integrating AI into a familiar, controllable, and debuggable software development lifecycle, rather than trying to replace it.
Deploy to the Cloud
Once your application is ready, you can deploy it to a cloud provider like Firebase or Google Cloud Run. Genkit provides CLI commands to simplify the deployment process. Or you can directly ask the Gemini CLI to make the AI web app deployment ready using firebase it will ask for some environment variables which you can get from here.
Advanced Use Cases & Best Practices
Genkit is a versatile framework that can be used to build a wide range of AI-powered applications. Some advanced use cases include:
- Multimodal Applications: Use plugins for models like Imagen to generate images or process visual input.
- Chaining Flows: Orchestrate complex workflows by calling one flow from within another.
- Streaming Output: Provide real-time responses by streaming AI model output to users.
When building with Genkit, follow best practices for prompt engineering, security, and cost management. Always validate and sanitize user inputs, and be mindful of prompt brittleness and model hallucinations.
Conclusion
Genkit represents a significant step forward in the development of production-ready AI applications. By providing a unified, extensible, and observable framework, it empowers developers to build sophisticated AI-powered features with confidence. Whether you are a seasoned AI practitioner or a web developer just starting to explore the possibilities of generative AI, Genkit provides the tools you need to turn your ideas into reality.
Frequently Asked Questions
Q1. What is the primary benefit of using Genkit?
A. Genkit’s main advantage is that it bridges the gap between AI model research and production applications by providing a structured, observable, and deployable framework.
Q2. What languages does Genkit support?
A. Genkit offers production-ready SDKs for JavaScript/TypeScript and Go, with a Python SDK currently in alpha.
Q3. Can I use models other than Google’s with Genkit?
A. Yes, Genkit’s plugin system allows you to integrate with a wide range of model providers, including OpenAI, Anthropic, and open-source models through Ollama.
Q4. What is the difference between Genkit and the Google Agent Development Kit (ADK)?
A. Genkit is a more general-purpose framework for building AI-powered features, while the ADK is specifically designed for building more complex, agent-based systems.
Q5. Is Genkit suitable for building simple AI features?
A. Yes, Genkit is designed to be scalable. You can start with a simple flow and gradually add more complexity as your application’s needs evolve.
Harsh Mishra is an AI/ML Engineer who spends more time talking to Large Language Models than actual humans. Passionate about GenAI, NLP, and making machines smarter (so they don’t replace him just yet). When not optimizing models, he’s probably optimizing his coffee intake. 🚀☕