Looking to build intelligent agents with real-world capabilities? Use Google ADK for building agents that can reason, delegate, and respond dynamically. This Google ADK tutorial walks you through the steps to build conversational agents with Google ADK across different language models like Gemini and GPT. Whether you’re exploring Google ADK for AI agents or curious about how to create AI agents using Google ADK, this hands-on guide will help you kickstart your journey into agentic development with ease and clarity.
Table of contents
What is the Agent Development Kit?
Agent Development Kit (ADK) is a flexible and modular framework for developing and deploying AI agents. It can be used with popular LLMs and open-source generative AI tools and is designed to integrate tightly with the Google ecosystem and Gemini models. ADK makes it easy to get started with simple agents powered by Gemini models and Google AI tools while providing the control and structure needed for more complex agent architectures and orchestration.
Features of Google’s Agent Development Kit
- Multi-Agent Architecture: Compose agents in parallel, sequential, or hierarchical workflows.
- Flexible Orchestration: Route tasks dynamically using LLM-powered workflows.
- Rich Tool Ecosystem: Use built-in, custom, and third-party tools seamlessly.
- Model-Agnostic: Supports Gemini, GPT-4o, Claude, Mistral, and more.
- Streaming Capabilities: Real-time streaming for text, audio, and video.
- Dev-Friendly Tooling: CLI, web UI, visual debugging, and evaluation tools.
- Memory & State Management: Built-in handling for session and long-term memory.
- Artifact Handling: Manage files, outputs, and binary data effortlessly.
- Smart Execution: Agents can execute code and handle multi-step planning.
- Versatile Deployment: Run locally, on Google Cloud (Vertex AI, Cloud Run), or via Docker.
Problem Statement
As AI systems evolve from single-purpose tools to collaborative, multi-agent ecosystems, developers need practical guidance on building and orchestrating intelligent agents that can communicate, delegate, and adapt. To bridge this gap, we’ll build a Weather Bot Team, a multi-agent system capable of answering weather-related queries while also handling user interactions like greetings, farewells, and safe responses.
This hands-on project aims to demonstrate how to:
- Design a modular multi-agent system using Google’s Agent Development Kit (ADK).
- Integrate multiple language models (e.g., Gemini, GPT, Claude) for task specialization.
- Implement intelligent task delegation across agents.
- Manage session memory for contextual continuity.
- Apply safety mechanisms through structured callbacks.
By solving this problem, you’ll gain practical experience with ADK’s architecture, orchestration, memory management, and safety best practices, laying the groundwork for more complex, real-world agentic applications.
You can refer to the provided Colab notebook to guide you through the hands-on implementation.
Proposed Workflow

Prerequisites
Before diving into the code, make sure you’ve completed the following setup steps:
1. Set-up your Environment & Install ADK
Start by creating and activating a virtual environment to isolate your project dependencies:
# Create a virtual environment

python -m venv .venv
Now that the environment has been created, we can active it using the following commands:
# Activate the environment

# macOS/Linux:

source .venv/bin/activate

# Windows CMD:

.venv\Scripts\activate.bat

# Windows PowerShell:

.venv\Scripts\Activate.ps1
Once your environment is activated, install the Google AI Development Kit (ADK):
pip install google-adk2. Obtain your API Keys
You’ll need API keys to interact with different AI models. Grab them from the following sources:
- Get from Google AI Studio: https://aistudio.google.com/app/apikey
- Get from OpenAI Platform: https://platform.openai.com/api-keys
- Get from Anthropic Console: https://console.anthropic.com/settings/keys
Steps to Build Your Weather App
Step 1: Setup and Installation
Install the required libraries for the project:
# Install Google ADK and LiteLLM
!pip install google-adk -q
!pip install litellm -q
Import libraries:
import os

import asyncio

from google.adk.agents import Agent

from google.adk.models.lite_llm import LiteLlm # For multi-model support

from google.adk.sessions import InMemorySessionService

from google.adk.runners import Runner

from google.genai import types # For creating message Content/Parts

import warnings

# Ignore all warnings

warnings.filterwarnings("ignore")

import logging

logging.basicConfig(level=logging.ERROR)
Set up API Keys:
# Gemini API Key

os.environ["GOOGLE_API_KEY"] = "YOUR_GOOGLE_API_KEY"

# OpenAI API Key

os.environ['OPENAI_API_KEY'] = “YOUR_OPENAI_API_KEY”

# Anthropic API Key

os.environ['ANTHROPIC_API_KEY'] = “YOUR_ANTHROPIC_API_KEY”

print("API Keys Set:")

print(f"Google API Key set: {'Yes' if os.environ.get('GOOGLE_API_KEY') and os.environ['GOOGLE_API_KEY'] != 'YOUR_GOOGLE_API_KEY' else 'No (REPLACE PLACEHOLDER!)'}")

print(f"OpenAI API Key set: {'Yes' if os.environ.get('OPENAI_API_KEY') and os.environ['OPENAI_API_KEY'] != 'YOUR_OPENAI_API_KEY' else 'No (REPLACE PLACEHOLDER!)'}")

print(f"Anthropic API Key set: {'Yes' if os.environ.get('ANTHROPIC_API_KEY') and os.environ['ANTHROPIC_API_KEY'] != 'YOUR_ANTHROPIC_API_KEY' else 'No (REPLACE PLACEHOLDER!)'}")

# Configure ADK to use API keys directly (not Vertex AI for this multi-model setup)

os.environ["GOOGLE_GENAI_USE_VERTEXAI"] = "False"
Define Model Constants for easier use:
MODEL_GEMINI_2_0_FLASH = "gemini-2.0-flash".

MODEL_GPT_4O = "openai/gpt-4o"

MODEL_CLAUDE_SONNET = "anthropic/claude-3-sonnet-20240229"

print("\nEnvironment configured.")
Step 2: Define Tools
In ADK, Tools are the functional building blocks that allow agents to go beyond just generating text. They’re typically simple Python functions that can perform real actions, like fetching weather data, querying a database, or running calculations.
To start, we’ll create a mock weather tool to simulate weather lookups. This helps us focus on the agent’s structure without needing external APIs. Later, we can easily swap it for a real weather service.
Code:
def get_weather(city: str) -> dict:
   """Retrieves the current weather report for a specified city.


   Args:
       city (str): The name of the city (e.g., "Mumbai","Chennai","Delhi").


   Returns:
       dict: A dictionary containing the weather information.
             Includes a 'status' key ('success' or 'error').
             If 'success', includes a 'report' key with weather details.
             If 'error', includes an 'error_message' key.
   """
   # Best Practice: Log tool execution for easier debugging
   print(f"--- Tool: get_weather called for city: {city} ---")


   city_normalized = city.lower().replace(" ", "")  # Basic input normalization


   mock_weather_db = {
       "delhi": {"status": "success", "report": "The weather in Delhi is sunny with a temperature of 35°C."},
       "mumbai": {"status": "success", "report": "It's humid in Mumbai with a temperature of 30°C."},
       "bangalore": {"status": "success", "report": "Bangalore is experiencing light showers and a temperature of 22°C."},
       "kolkata": {"status": "success", "report": "Kolkata is partly cloudy with a temperature of 29°C."},
       "chennai": {"status": "success", "report": "It's hot and humid in Chennai with a temperature of 33°C."},
   }


   if city_normalized in mock_weather_db:
       return mock_weather_db[city_normalized]
   else:
       return {"status": "error", "error_message": f"Sorry, I don't have weather information for '{city}'."}


# Example usage
print(get_weather("Mumbai"))
Step 3: Defining the Agent
In ADK, an Agent is the core component that manages the conversation flow, connecting the user, the LLM, and the tools it can use.
To define an agent, you’ll configure a few essential parameters:
- name: A unique identifier for the agent (e.g., “weather_agent_v1”).
- model: The LLM the agent will use (e.g., MODEL_GEMINI_2_5_PRO).
- description: A short summary of what the agent does – crucial for collaboration and delegation in multi-agent systems.
- instruction: Detailed behavior guidelines for the LLM, defining its persona, goals, how to use tools, and how to handle edge cases.
- tools: A list of tool functions (like [get_weather]) the agent can invoke.
Code:
AGENT_MODEL=model
weather_agent=Agent(
   name="weather_agent_v1",
   model=AGENT_MODEL,
   description="Provides weather information for specific cities.",
   instruction="You are a helpful weather assistant. Your primary goal is to provide current weather reports. "
               "When the user asks for the weather in a specific city, "
               "you MUST use the 'get_weather' tool to find the information. "
               "Analyze the tool's response: if the status is 'error', inform the user politely about the error message. "
               "If the status is 'success', present the weather 'report' clearly and concisely to the user. "
               "Only use the tool when a city is mentioned for a weather request.",
   tools=[get_weather],


)

print(f"Agent '{weather_agent.name}' created using model '{AGENT_MODEL}'.")
Step 4: Set up Runner and Session Service
To handle conversations and run the agent effectively, we need two key components:
SessionService: This component keeps track of each user’s conversation history and session state. A basic version called InMemorySessionService stores all data in memory, making it ideal for testing or lightweight apps. It logs every message exchanged in a session. We’ll dive into saving session data permanently.
Runner: This acts as the brain of the system. It manages the entire interaction flow, taking in user input, passing it to the right agent, calling the LLM and any necessary tools, updating session data through the SessionService, and producing a stream of events that show what’s happening during the interaction.
Code:
# @title Setup Session Service and Runner
# ---Session Management ---
# Key Concept: SessionService stores conversation history & state.
# InMemorySessionService is a simple, non-persistent storage for this tutorial.


session_service=InMemorySessionService()


# Define constants for identifying the interaction context
APP_NAME="weathertutorial_app"
USER_ID="user_1"
SESSION_ID="session_001"


# Create the specific session where the conversation will happen
session=session_service.create_session(
   app_name=APP_NAME,
   user_id=USER_ID,
   session_id=SESSION_ID,
)


print(f"Session created: App='{APP_NAME}', User='{USER_ID}', Session='{SESSION_ID}'")


# ---Runner ---
# Key Concept: Runner orchestrates the agent execution loop.


runner=Runner(
   agent=weather_agent,
   app_name=APP_NAME,
   session_service=session_service
)


print(f"Runner created for agent '{runner.agent.name}'.")
Step 5: Interact with the Agent
We’ll use ADK’s asynchronous Runner to talk to our agent and get its response. Since LLM and tool calls can take time, handling them asynchronously ensures a smooth, non-blocking experience.
We’ll create a helper function called call_agent_async that does the following:
- Accepts a user query as input
- Wraps it in ADK’s required Content format
- Calls runner.run_async() with the session and message
- Iterates through the Event stream ADK returns these events and tracks each step (tool call, response, etc.).
- Detects and prints the final response using event.is_final_response()
Code:
# @title Define Agent Interaction Function
import asyncio
from google.genai import types # For creating message Content/Parts


async def call_agent_async(query: str):
 """Sends a query to the agent and prints the final response."""
 print(f"\n>>> User Query: {query}")


 # Prepare the user's message in ADK format
 content = types.Content(role='user', parts=[types.Part(text=query)])


 final_response_text = "Agent did not produce a final response." # Default


 # Key Concept: run_async executes the agent logic and yields Events.
 # We iterate through events to find the final answer.
 async for event in runner.run_async(user_id=USER_ID, session_id=SESSION_ID, new_message=content):
     # You can uncomment the line below to see *all* events during execution
     # print(f"  [Event] Author: {event.author}, Type: {type(event).__name__}, Final: {event.is_final_response()}, Content: {event.content}")


     # Key Concept: is_final_response() marks the concluding message for the turn.
     if event.is_final_response():
         if event.content and event.content.parts:
            # Assuming text response in the first part
            final_response_text = event.content.parts[0].text
         elif event.actions and event.actions.escalate: # Handle potential errors/escalations
            final_response_text = f"Agent escalated: {event.error_message or 'No specific message.'}"
         # Add more checks here if needed (e.g., specific error codes)
         break # Stop processing events once the final response is found


 print(f"<<< Agent Response: {final_response_text}")
Step 6: Run the Conversation
Now that everything’s set up, it’s time to put our agent to the test by sending a few sample queries.
We’ll:
- Wrap the async calls inside a main() coroutine
- Use await to run the function.
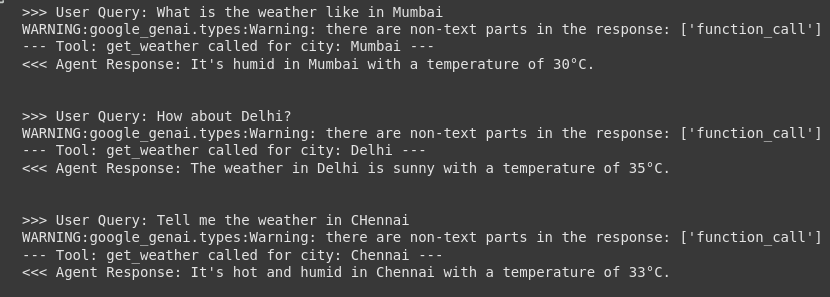
What to Expect:
- The user queries will be printed
- When the agent uses a tool (like get_weather), you’ll see logs like:
— Tool: get_weather called… — - The agent will return a final response, even gracefully handling cases where data isn’t available (e.g., for “Paris”)
Code:
# @title Run the Initial Conversation


# # We need an async function to await our interaction helper
# async def run_conversation():
#     await call_agent_async("What is the weather like in Mumbai")
#     await call_agent_async("How about Delhi?") # Expecting the tool's error message
#     await call_agent_async("Tell me the weather in CHennai")


# Execute the conversation using await in an async context (like Colab/Jupyter)
await run_conversation()
Output:
Also Read: How to Use OpenAI’s Responses API & Agent SDK?
Conclusion
Google’s Agent Development Kit (ADK) allows developers to create intelligent, multi-agent systems that go beyond simple text generation. By building a weather bot, we learned key ADK concepts such as tool integration, agent orchestration, and session management, all while leveraging the power of Google’s Gemini. From defining clear, descriptive docstrings for tools to orchestrating interactions through the Runner and SessionService, ADK provides the flexibility to build production-ready agents that can interact, learn, and adapt. Whether you’re building chatbots, virtual assistants, or multi-agent ecosystems, ADK offers the tools to bring your vision to life.
Frequently Asked Questions
Q1. What is Google’s Agent Development Kit (ADK)?
A. Google ADK is an open-source, modular framework for building, orchestrating, and deploying AI-powered agents, including both simple bots and complex multi-agent systems. It is designed for flexibility, scalability, and integration with major LLMs and Google’s AI ecosystem.
Q2. What makes ADK different from other agent frameworks?
A. ADK is multi-agent by design, allowing you to compose agents in parallel, sequential, or hierarchical workflows. It’s model-agnostic, supports real-time streaming (text, audio, video), and comes with built-in tools for debugging, evaluation, and deployment across environments.
Q3. Which AI models does ADK support?
A. While optimized for Google’s Gemini models, ADK is model-flexible and can work with other popular LLMs such as GPT-4o, Claude, Mistral, and more, via integrations like LiteLLM.
Q4. Can I use ADK for both conversational and non-conversational agents?
A. Yes, ADK is suitable for building both conversational agents (like chatbots) and non-conversational agents that handle complex workflows or automation tasks.
Q5. How do I get started with ADK?
A. You can install ADK using pip (pip install google-adk), set up your Google Cloud project (if needed), and quickly build your first agent using Python. ADK provides a CLI and a web UI for local development, testing, and debugging.
I am a Data Science Trainee at Analytics Vidhya, passionately working on the development of advanced AI solutions such as Generative AI applications, Large Language Models, and cutting-edge AI tools that push the boundaries of technology. My role also involves creating engaging educational content for Analytics Vidhya’s YouTube channels, developing comprehensive courses that cover the full spectrum of machine learning to generative AI, and authoring technical blogs that connect foundational concepts with the latest innovations in AI. Through this, I aim to contribute to building intelligent systems and share knowledge that inspires and empowers the AI community.


