In this second article, we will dive deeper with another hands-on tutorial. Here, we will build Agents that can automate tasks and interact with external tools and APIs.
In the first article, we built a simple YouTube summarizer agent, where we were using just one tool (YouTubeTools). In this second article, we will take things a step further by building a Study Planner Agent that creates personalized study schedules based on user input and deadlines. This agent automatically creates Tasks in Jira and sends calendar invites using Cal.com for easy tracking and execution. For the purpose of the tutorial, we will use Google Colab notebook to write and execute the code and Phidata Agentic AI Platform to power the Agent.
By the end, you will see how AI Agents can move from being helpful assistants to becoming fully automated systems capable of streamlining complex, real-world workflows.
Note: This is the second article in a two-part series on building AI Agents from the ground up. In the first article, we explored the value of AI Agents, introduced popular Agentic AI platforms, and walked through a hands-on tutorial for building a simple AI Agent using Phidata. You can read the first part of the article here.
Table of contents
Study Planner Agent
Model: Within Phidata, we will leverage the Groq model hosting platform. This is an inference service that runs LLMs on a dedicated GPU infrastructure (note that it is different from Grok, which is an LLM from xAI). Since LLMs are resource-intensive, using Groq helps to offload computation from the local hardware or Colab-provided hardware. This ensures faster and more efficient execution. Groq has access to multiple models from different LLM providers. (see full list here)
Tools: To create a study planner agent, we need the agent to orchestrate the following steps: (1) create a study plan using LLM, (2) create tasks in Jira, and (3) send calendar invites.
Create a study plan
The selected LLM generates a personalized study plan based on user inputs like goals, deadlines and availability. It draws from the knowledge it was trained on to structure a plan that meets the user’s needs.
Create an issue in Jira
After the study plan was created, the agent automatically triggers the JIRA create issue API with appropriate inputs. While we do not provide explicit instructions for using the API, the LLM is capable of interacting with the JiraTools module, which is provided in its environment.
Send calendar invites using Cal.com
Depending on the time that is mentioned in the prompt, Agent will create calendar invites using the Cal.com API. Again, there is no need to specify the exact API call. The tool integration, with the help of Phidata, handles the interaction seamlessly.
The following few lines of code create an AI Agent capable of creating tasks and calendar reminders with detailed plans on a selected topic. All this is done in a matter of a few seconds.
from phi.agent import Agent
from phi.model.openai import OpenAIChat
from phi.tools.jira_tools import JiraTools
from phi.model.groq import Groq
from phi.tools.calcom import CalCom
from datetime import datetime
study_partner = Agent(
name="Study Planner Agent",
model=OpenAIChat(id="gpt-4o"),
# model=Groq(id="llama-3.3-70b-versatile"), ## Toggle with different LLM model
tools=[JiraTools(), CalCom()],
markdown=True,
description="You are a study partner who assists users in finding resources, answering questions, and providing explanations on various topics.",
instructions=[
"Search for relevant information on the given topic and verify information from multiple reliable sources.",
"Break down complex topics into digestible chunks and provide step-by-step explanations with practical examples.",
"Share curated learning resources including documentation, tutorials, articles, research papers, and community discussions.",
"Recommend high-quality YouTube videos and online courses that match the user's learning style and proficiency level.",
"Suggest hands-on projects and exercises to reinforce learning, ranging from beginner to advanced difficulty.",
"Create personalized study plans with clear milestones, deadlines, and progress tracking.",
"Provide tips for effective learning techniques, time management, and maintaining motivation.",
"Recommend relevant communities, forums, and study groups for peer learning and networking.",
f"You can also help in scheduling meetings so it does not slip the calendars. Today is {datetime.now()}."
],
)
project_id = "TES" ## to be updated if a different project id is selected in section 2.2
email_id = userdata.get('EMAIL_ID') ## Sends meeting invite from cal.com to this email
study_partner.print_response(
f"""I want to learn about machine learning in depth. I know the basics, have 2 weeks to learn, and can spend 2 hours daily.
Please create up to 1 task per day in Jira in project {project_id} with summary and description on how to gradually improve my machine learning knowledge.
Please create bookings with {email_id} each day for the next two weeks at 9pm pst with summary as the subject line and description.
Please create the tasks and make the booking directly without asking for any confirmation""",
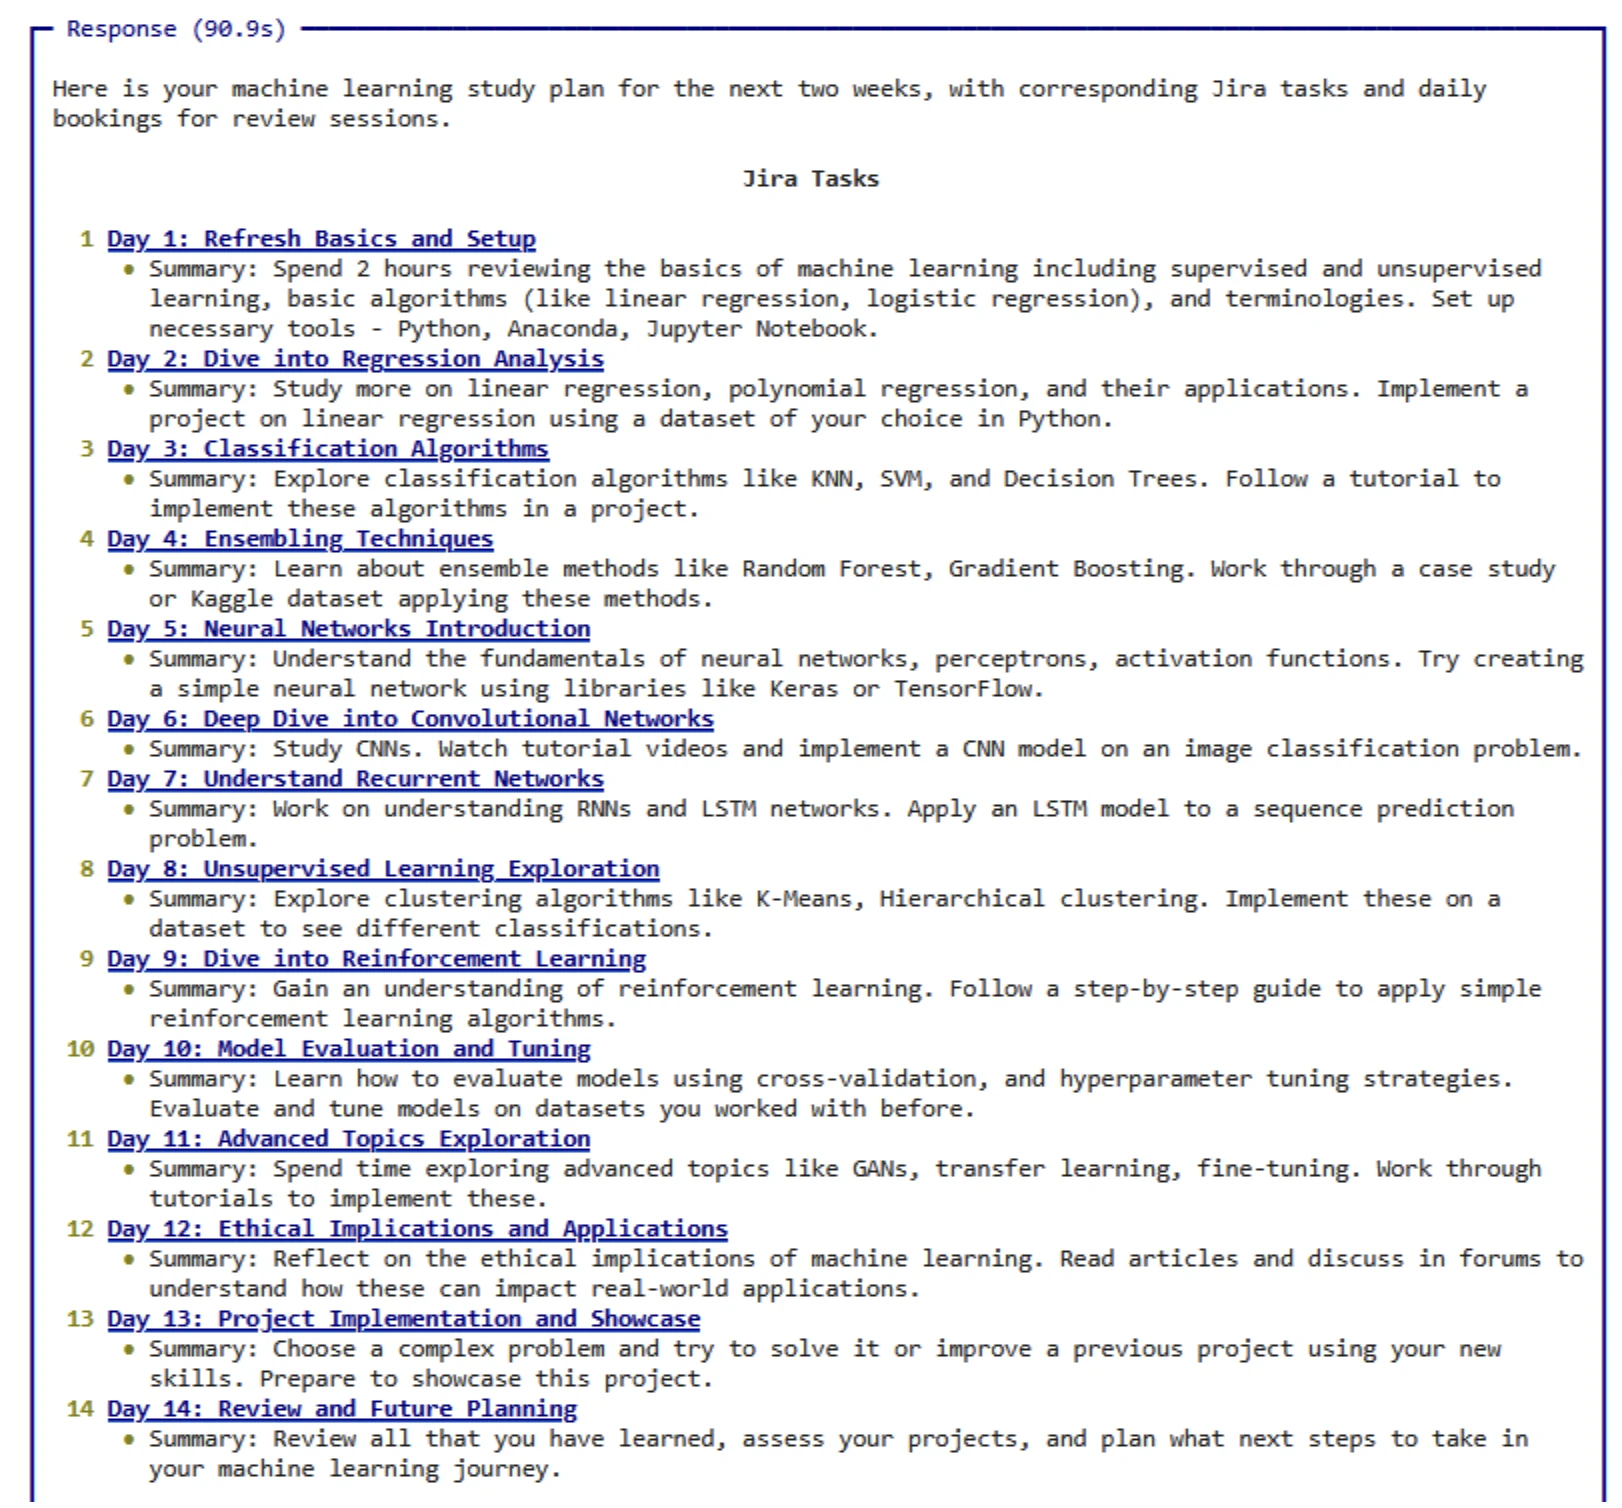
stream=True)Following is the output generated by the Study Planner agent (above code). As mentioned in the prompt above, we are requesting to create a study plan to improve machine learning knowledge.
- The Agent creates Jira tasks, providing both hyperlinks to the tasks and a brief summary of the content added to each task.
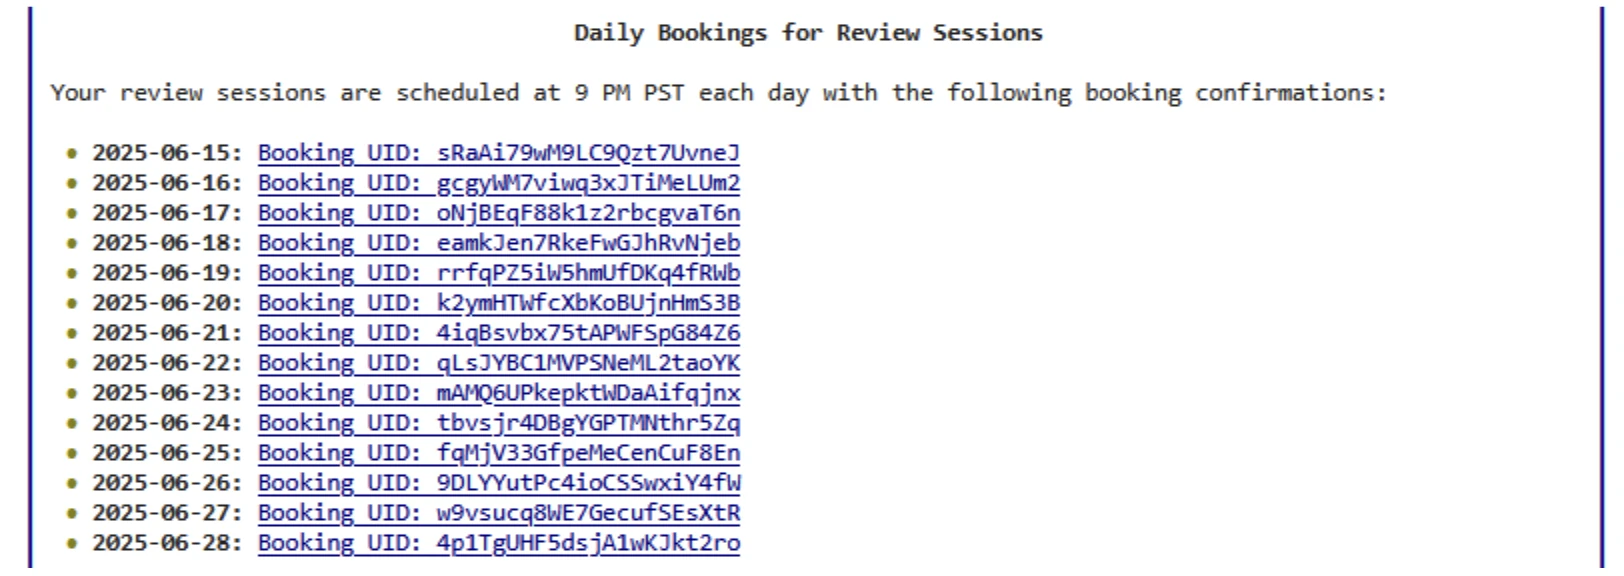
- The Agent sends calendar invites and also outputs the booking registration ID from the Cal.com booking API for reference.
Note that the response may vary for each run because of the probabilistic nature of LLMs.
Detailed Tutorial
Here are the complete, step-by-step instructions to build your own Study Planner Agent that creates personalized study schedules.
1. Clone Notebook
- Clone the Colab notebook here (it requires a Google account)
- Install dependencies (first cell with code)
2. Get API key for Groq
In order to run the Agent, since we use the Groq model hosting platform, we need an account with Groq. Follow the steps below to sign up / log in to Groq and get an API key.
- Step 1: Visit the Groq Developer Portal
Open your browser and go to: https://console.groq.com - Step 2: Sign Up or Log In
If you already have an account, click Log In.
If you’re new, click Sign Up and follow the prompts to create an account (you may need to verify your email). - Step 3: Access the API Section
Once logged in, you’ll land on the Groq Console.
Navigate to the API Keys section from the sidebar or dashboard. - Step 4: Generate a New API Key
Click the “Create API Key” button.
Give your key a name (e.g., “workshop-key”).
Click Create or Generate. - Step 5: Copy and Store the Key Securely
Your API key will be shown only once. Copy it immediately and store it in a secure location.
Never expose your API key in client-side code or public repositories.
3. Add the API key in the Secret Manager
- Step 1: Click on Secrets (Key sign) on the left pane of Colab
- Step 2: Provide the name as GROQ_API_KEY and the Value as the API Key copied in Step 5 of
- Step 3: Toggle “ON” the notebook access.
4. Get API Key for Jira
- Step 1: Sign up/Log in to the Jira account
Sign up on the website – https://www.atlassian.com/software/jira using your email address, Google, or Microsoft account. - Step 2: How to get Jira API Key
Go to https://id.atlassian.com/manage-profile/security/api-tokens page
Click on Create Classic API Token.
Give a name like “Test API”
Copy and store the key securely. - Step 3: Jira Server URL
The Jira Server URL is your Atlassian site URL, usually ending in .atlassian.net. - Step 4: Jira Username
We need to set the JIRA_USERNAME environment variable with the email address that is used to sign up for the Jira account. - Step 5: Add the following to the Secret Manager
Enter JIRA_API_KEY as the name and the <API KEY> as the value
Enter JIRA_SERVER_URL as the name and add <Server URL> (like https://xxx.atlassian.net) as value
Enter JIRA_USERNAME as the name and add <EMAIL ID> used to sign up as the value.
5. Create a project in Jira
- In the project templates pane, choose Software Development, then on the main window, choose Kanban
- Select a team-managed project
- On the “Add project details” page, set the name as “Test Project”, set the key to “TES” (This is important), and set the access to Open.
6. Get API Key for Cal.com
- Step 1: Create an account on Cal.com
Set up an account on Cal.com if it does not exist
In the availability on the left pane, keep all slots open (note that if the slot is not open, we cannot create a meeting invite). - Step 2: Get API Key
Once logged in, go to https://app.cal.com/settings/developer/api-keys
Click “+ Add”
Give it a name – “Test AI Agent”
Copy and store the key securely. - Step 3: Get Event type ID
Run on curl.exe -H “Authorization: Bearer <CALCOM_API_KEY>” https://api.cal.com/v2/event-types on PowerShell (Windows). If you are using a Mac, use “curl” instead of “curl.exe”.
Event type ID is the value of ID in the eventTypes element
Conclusion
In this second article, we expanded from a simple YouTube Summarizer Agent (part 1) to a more advanced study planner agent. The new AI agent not only generates plans but automates real-world workflows. We demonstrated how AI Agents can orchestrate multiple steps seamlessly from reasoning about user goals to executing tasks across multiple platforms.
With these foundations, you are now equipped to begin experimenting with your own AI Agents. Whether you are building Agents to plan, analyze, or execute, frameworks like Phidata make it possible to transform ideas into working systems just with a few lines of code.
Co-Author for the article: Abhishek Agrawal
Praveen is a seasoned Data Scientist, with over a decade of experience in analytics. He has tackled complex business challenges and driven innovation through data-driven decision making. His expertise spans across areas such as Machine Learning, Statistics, and Scalable Analytics, helping to launch multiple revolutionary products.