Building applications with large language models (LLMs) is exciting, as it lets us create smart, interactive systems. However, making these apps more complex brings along challenges, especially when several LLMs work together. So, how do we manage the flow of information between them? How do we make sure they work smoothly and understand the task? LangGraph is the answer to all such questions. This free tutorial is a great way for beginners to understand how LangGraph can solve these problems. With hands-on examples and complete code, this guide will teach you how to manage multiple LLMs effectively, making your applications more powerful and efficient.
Table of Contents
Understanding LangGraph
LangGraph is a powerful library, which is a part of LangChain tools. It helps streamline the integration of LLMs, ensuring they work together seamlessly to understand and execute tasks. It offers a neat way to build and handle LLM apps with many agents.
LangGraph lets developers set up how multiple LLM agents talk to each other. It shows these workflows as graphs with cycles. This helps in keeping the communication smooth and performing complex tasks well. LangGraph is best when using Directed Acyclic Graphs (DAGs) for straight line tasks. But since it is cyclic and adds the ability to loop back, it allows for more complex and flexible systems. It’s like how a smart agent might rethink things and use new information to update responses or change its choices.
Also Read: What is LangGraph?
Key Concepts of LangGraph
Here are some of the key concepts of LangGraph that you need to know:
1. Graph Structures
LangGraph’s core idea is using a graph for the application’s workflow. This graph has two main parts – nodes and edges.
- Nodes: Nodes are the fundamental building blocks representing discrete units of work or computation within the workflow. Each node is a Python function that processes the current state and returns an updated state. Nodes can perform tasks such as calling an LLM and interacting with tools or APIs for manipulating data.
- Edges: Edges connect nodes and define the flow of execution. They can be:
- Simple edges: Direct, unconditional transitions from one node to another.
- Conditional edges: Branching logic that directs flow based on node outputs, similar to if-else statements. This allows dynamic decision-making within the workflow.
2. State Management
Keeping track of what’s happening is vital when you have many agents. All agents need to know the current status of the task. LangGraph handles this by managing the state automatically. The library keeps track of and updates a main state object. It does this as the agents do their jobs. The state object holds important information. It’s available at different points in the workflow. This could include the chat history.
In a chatbot, the state can save the conversation. This helps the bot respond using what was said before. It can also store context data, like user likes, past actions, etc. or external data. Agents can use this for making choices. Internal variables can also be kept here. Agents might use the state to track flags, counts, or other values. These help guide their actions and decisions.
3. Multi-agent Systems
A multi-agent system consists of multiple independent agents that work together or compete to achieve a common goal. These agents use LLMs to make decisions and control the flow of an application. The complexity of a system can grow as more agents and tasks are added. This may lead to challenges like poor decision making, context management, and the need for specialization. A multi-agent system solves these problems by breaking the system into smaller agents, each focusing on a specific task, such as planning or research.
The main benefits of using a multi-agent system is modularity, specialization, and control. Modularity is for easy development, testing and maintenance, while specialization ensures that expert agents improve overall performance. Control ensures that you can clearly tell how the agents should communicate.
Also Read: A Comprehensive Guide to Building Agentic RAG Systems with LangGraph
Architectures in Multi-agent Systems
Here are the various types of architectures followed in multi-agent systems.
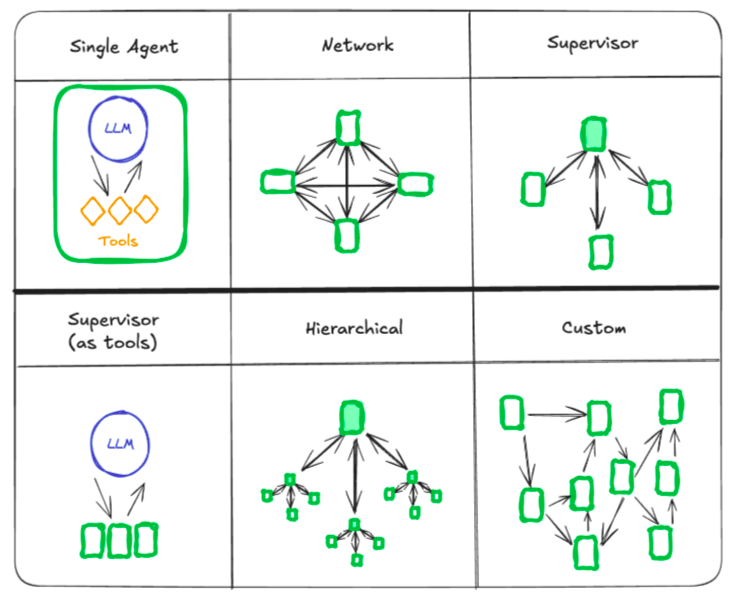
1. Network Architecture: In this architecture, every agent communicates with every other agent, and each can then decide which agent they should call next. This is very helpful when there is no clear sequence of operations. Below is a simple example of how it works using StateGraph.
from langchain_openai import ChatOpenAI
from langgraph.types import Command
from langgraph.graph import StateGraph

model = ChatOpenAI()

def agent_1(state) -> Command:
    response = model.invoke(...)
    return Command(goto=response["next_agent"], update={"messages": [response["content"]]})

builder = StateGraph()
builder.add_node(agent_1)
builder.compile()
2. Supervisor Architecture: A supervisor agent controls the decision making process and routes tasks to the appropriate agents. Here’s a sample of how it’s done:
def supervisor(state) -> Command:
response = model.invoke(...)
return Command(goto=response["next_agent"])
builder = StateGraph()
builder.add_node(supervisor)
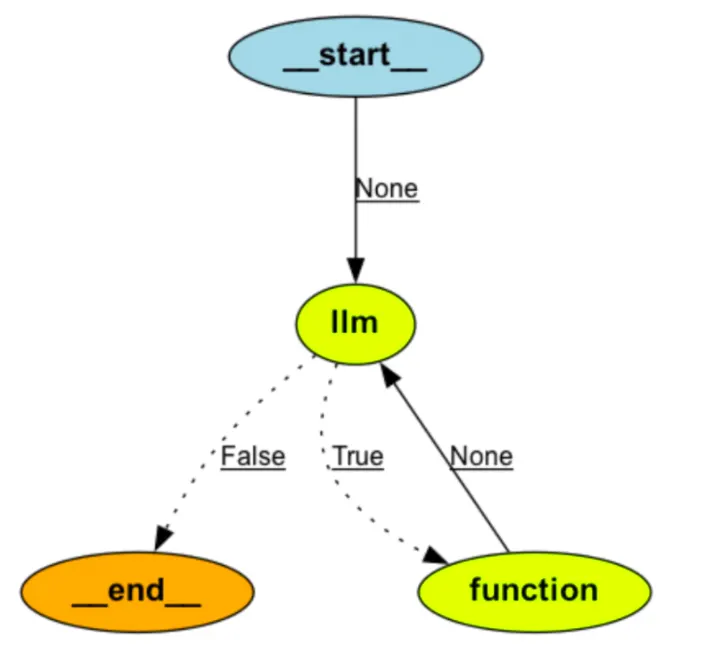
builder.compile()3. Supervisor with Tool-calling: In this architecture, a supervisor agent uses a tool-calling agent to decide which tool (or agent) to use. The tool executes tasks and returns results that guide the next control flow decision.. A common pattern here is to have a tool-wrapped function:
def agent_1(state):
    response = model.invoke(...)
    return response.content
4. Hierarchical Architecture: This approach addresses the complexity of multi-agent systems by organizing agents into teams, each with its own supervisor. The top-level supervisor directs which team to call. For instance:
def top_level_supervisor(state):
    response = model.invoke(...)
    return Command(goto=response["next_team"])

builder = StateGraph()
builder.add_node(top_level_supervisor)
builder.compile()
5. Handoffs in Multi-agent Systems: Handoffs allow one agent to pass control to another, facilitating a flow from one agent to the next. Each agent returns a Command object that specifies the next agent to call and send any updates to the state.
def agent(state) -> Command:
    goto = get_next_agent(...)
    return Command(goto=goto, update={"my_state_key": "my_state_value"})
In complex systems, agents may be nested within subgraphs, where a node in a subgraph can direct control to another agent outside its graph:
def some_node_inside_alice(state):
    return Command(goto="bob", graph=Command.PARENT)
Multi-agent systems enable modular and specialized designs where agents independently handle tasks and communicate for efficient problem-solving. Architectures like network, supervisor, and hierarchical systems each serve specific needs, while handoffs ensure smooth transitions between agents, maintaining flexibility and control.
Do check out this free course to learn more about Building a Collaborative Multi-Agent System with LangGraph.
4. Persistence
Persistence means saving the progress of a process so that you can come back to it later, even after some interruptions. Each step’s state is saved, which helps with error recovery. It supports human feedback during runs. You can also replay steps to debug or try new paths.

In LangGraph, persistence is done using checkpointers. Here, the graph’s state is saved after every major step and each saved state is called a checkpoint. All the checkpoints are grouped inside a thread (the conversation history for a particular run).
Checkpointing is done automatically and you don’t always need to configure it manually. A checkpoint is like a snapshot of the graph’s state that includes:
- config: Configuration info used during that step
- metadata: Step details (e.g., which node is running)
- values: The actual state values at that point
- next: The next node(s) that will be run
- tasks: Info on what’s coming or errors
Each graph, while execution, needs a thread ID to group its checkpoints. You can provide this thread id using config: Below is a sample of how it can be done:
config = {"configurable": {"thread_id": "1"}}
To fetch the most recent state within a thread, use the below code:
graph.get_state({"configurable": {"thread_id": "1"}})
The below code shows how you can get a specific checkpoint:
graph.get_state({
  "configurable": {
    "thread_id": "1",
    "checkpoint_id": "your_checkpoint_id"
  }
})
To get the state history or fetch all previous states, use this code:
history = graph.get_state_history({"configurable": {"thread_id": "1"}})You can also update or edit the state manually at any point, using:
graph.update_state(
    config={"configurable": {"thread_id": "1"}},
    values={"foo": "new_value"}
)
Also Read: How to Build a LangChain Chatbot with Memory?
5. Human-in-the-Loop Integration
Human-in-the-loop lets you add human feedback at key steps of an automated LangGraph workflow. This is crucial in certain tasks since LLMs may generate uncertain or risky outputs such as in tool calls, content generation, or decision-making. LangGraph’s interrupt() function makes this possible by pausing the graph, surfacing data to a human, and resuming with their input using the Command(resume=value) method. This enables review, correction, or data entry.
Human-in-the-loop supports patterns like Approve/Reject, Edit State, Provide Input, or Multi-turn Conversations. To use it, define a checkpointer and add an interrupt() inside a node. You can resume the graph using Command after human input.

Below is a sample of how you can use Human-in-the-loop in LangGraph.
from langgraph.types import interrupt, Command

def human_node(state):
    value = interrupt({"text_to_revise": state["some_text"]})
    return {"some_text": value}

graph = graph_builder.compile(checkpointer=checkpointer)
graph.invoke(some_input, config={"configurable": {"thread_id": "some_id"}})
graph.invoke(Command(resume="Edited text"), config={"configurable": {"thread_id": "some_id"}})
This keeps workflows interactive, auditable, and accurate perfect for high-stakes or collaborative AI use cases.
6. Streaming
LangGraph streams outputs as they are created which lets users see results faster. This improves their experience with LLMs. Streaming helps you build responsive apps by showing you real-time progress. There are 3 main data types to stream: workflow progress, LLM tokens, and custom updates.
Use .stream() (sync) or .astream() (async) to stream outputs. You can set stream_mode to control what you get:
- “values”: full state after each graph step
- “updates”: changes only after each node
- “custom”: any custom data you log in a node
- “messages”: LLM token stream with metadata
- “debug”: all info throughout the run
You can pass multiple modes like this:
for stream_type, data in graph.stream(inputs, stream_mode=["updates", "messages"]):
    if stream_type == "messages":
        print(data[0].content)  # AIMessageChunk
    elif stream_type == "updates":
        print(data)  # State update
Use .astream_events() if you want a full event stream. This is perfect when migrating big apps.
Pro tip: For real-time UI feedback, use “messages” for token-wise streaming and “updates” for backend state.
Why Use LangGraph?
LangGraph is ideal for developers building smart and flexible AI agents. Here’s why:
- Reliable and controllable: Add moderation checks and human approvals. It keeps context alive for long tasks.
- Custom and extensible: Use low-level tools to build agents your way. Design systems with agents that each play a specific role.
- Great streaming: See each token and step live, tracking agent thinking as it happens.
You can also take this course from the Langchain academy to learn more.
Building the Simplest Graph
Now that we have seen the key components of LangGraph, let’s try to build a basic graph with three nodes and one conditional edge. This simple example shows how to invoke a graph involving the key concepts of State, Nodes, and Edges.

Step 1: Define the Graph State
The State defines the data structure which is shared between nodes. It acts like a shared memory that flows through the graph.
from typing_extensions import TypedDict
class State(TypedDict):
    graph_state: str
Here, we have used python’s TypeDict to declare that our state will have a single key called the graph_state, which stores a string.
Step 2: Create the Nodes
Nodes are just simple Python functions. Each one takes in the current state, modifies it, and returns the updated state.
def node_1(state):
    print("---Node 1---")
    return {"graph_state": state['graph_state'] + " I am"}
This function appends “I am” to whatever string is in graph_state.
def node_2(state):
    print("---Node 2---")
    return {"graph_state": state['graph_state'] + " extremely happy!"}

def node_3(state):
    print("---Node 3---")
    return {"graph_state": state['graph_state'] + " extremely sad!"}
Here, these two nodes add an emotional tone of “happy!” or “sad!” to the sentence.
Step 3: Add Conditional Logic
Sometimes you want dynamic behavior, where the next step depends on logic or randomness. That’s what conditional edges enable.
import random
from typing import Literal

def decide_mood(state) -> Literal["node_2", "node_3"]:
    if random.random() < 0.5:
        return "node_2"
    return "node_3"
This function randomly picks between node_2 and node_3 with equal probability, simulating a simple mood selector.
Step 4: Construct the Graph
Let’s bring it all together using LangGraph’s StateGraph class. This is where we define the full graph structure.
from IPython.display import Image, display
from langgraph.graph import StateGraph, START, END

# Initialize the graph with the state schema
builder = StateGraph(State)

# Add nodes to the graph
builder.add_node("node_1", node_1)
builder.add_node("node_2", node_2)
builder.add_node("node_3", node_3)
We start with the START node and route to node_1. Then, we add a conditional edge from node_1 using decide_mood. After that, the graph continues to either node_2 or node_3 and ends at the END node.
# Add edges to define flow
builder.add_edge(START, "node_1")
builder.add_conditional_edges("node_1", decide_mood)
builder.add_edge("node_2", END)
builder.add_edge("node_3", END)

# Compile and visualize the graph
graph = builder.compile()
display(Image(graph.get_graph().draw_mermaid_png()))
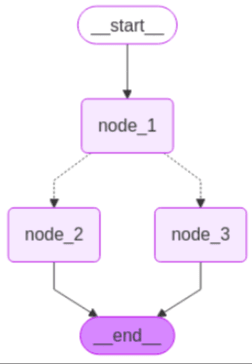
The compile() method performs basic validation, and draw_mermaid_png() lets you visualize the graph as a Mermaid diagram.
Step 5: Invoke the Graph
Finally, we can run the graph using the invoke() method.
graph.invoke({"graph_state" : "Hi, this is Janvi."})
This starts the graph at the START node and initializes graph_state with the sentence “Hi, this is Janvi.”.
- node_1 appends ” I am” → “Hi, this is Janvi.”
- decide_mood randomly chooses the path
- node_2 or node_3 appends either ” extremely happy!” or ” extremely sad!”
Output:

This output shows how state flows and updates through each step of the graph.
Building a Support Chatbot with LangGraph Using OpenAI
Now that we have built the simplest graph in the above section, in this section, I will show you how to use LangGraph to build a support chatbot, starting with basic functionality and progressively adding features like web search, memory, and human-in-loop. Along the way, we will see the core LangGraph concepts as well.
Our goal here is to create a chatbot that can answer questions using web search, remember past conversations, ask a human for help when needed, use a custom state for behavior, and rewind conversation paths (enabled by checkpointing).
Also Read: Build an AI Coding Agent with LangGraph by LangChain
Setup
Before building the chatbot, let’s install the necessary packages.
!pip install -U langgraph langchain openaiThis command installs:
- LangGraph: For building the graph structure.
- LangChain: For interacting with OpenAI’s language models.
- OpenAI: For using OpenAI’s models (like GPT-4).
We need to securely provide the OpenAI API key so the application can authenticate and use the GPT models. This function prompts for the key if it’s not already set in the environment.
import getpass
import os

def _set_env(var: str):
    if not os.environ.get(var):
        os.environ[var] = getpass.getpass(f"{var}: ")

_set_env("OPENAI_API_KEY")
Part 1: Build a Basic Chatbot
We’ll start by creating the simplest form of the chatbot.
1. Define State
The state defines the data structure that gets passed between nodes in the graph. Here, we define a state with a single key, messages, which will hold the list of conversation messages.
from typing import Annotated
from typing_extensions import TypedDict
from langgraph.graph import StateGraph, START, END
from langgraph.graph.messae import add_messages

class State(TypedDict):
    # 'messages' holds the list of chat messages.
    # 'add_messages' ensures new messages are added, not replaced.
    messages: Annotated[list, add_messages]
2. Create Graph Builder
The StateGraph object is the entry point for defining the graph structure. It’s initialized with the State definition we just created.
graph_builder = StateGraph(State)
3. Add Chatbot Node
We define a Python function chatbot that takes the current state, invokes OpenAI’s GPT model with the messages from the state, and returns the LLM’s response as an update to the messages key in the state.
import openai

# Initialize OpenAI GPT model
openai.api_key = os.environ["OPENAI_API_KEY"]

def chatbot(state: State):
    response = openai.Completion.create(
        model="gpt-4",  # You can also use "gpt-3.5-turbo" or any other OpenAI model
        prompt=state["messages"],
        max_tokens=150
    )
    return {"messages": [response.choices[0].text.strip()]}

graph_builder.add_node("chatbot", chatbot)
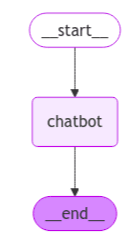
4. Set Entry and Exit Points
Define the entry point (START) and exit point (END) for the graph execution.
graph_builder.add_edge(START, "chatbot")
graph_builder.add_edge("chatbot", END)
5. Compile the Graph
Once all nodes and edges are defined, compile the graph structure.
graph = graph_builder.compile()
6. Visualize (Optional)
LangGraph allows visualizing the compiled graph structure. This helps understand the flow of execution. We can visualize the graph using tools like pygraphviz or mermaid.
from IPython.display import Image, display

try:
    display(Image(graph.get_graph().draw_mermaid_png()))
except Exception:
    pass # Optional visualization
7. Run the Chatbot
Set up a loop to interact with the chatbot. It takes user input, packages it into the expected State format ({“messages”: […]}), and uses graph.stream to execute the graph. The stream method returns events as the graph progresses, and we print the assistant’s final message.
def stream_graph_updates(user_input: str):
    for event in graph.stream({"messages": [{"role": "user", "content": user_input}]}):
        for value in event.values():
            print("Assistant:", value["messages"][-1].content)

# Loop to chat with the bot
while True:
    try:
        user_input = input("User: ")
        if user_input.lower() in ["quit", "exit", "q"]:
            print("Goodbye!")
            break
        stream_graph_updates(user_input)
    except: # Fallback for environments without input()
        user_input = "What do you know about LangGraph?"
        print("User: " + user_input)
        stream_graph_updates(user_input)
        break

Part 2: Enhancing the Chatbot with Tools
To make the chatbot more knowledgeable, especially about recent information, we’ll integrate a web search tool (Tavily). This involves enabling the LLM to request tool usage and adding graph components to handle the execution of these tools.
1. Install Tool Requirements
Install the necessary library for the Tavily search tool.
%pip install -U tavily-python langchain_community
2. Set Tool API Key
Configure the API key for the Tavily service.
_set_env("TAVILY_API_KEY") # Uses the function defined earlier
3. Define the Tool
Instantiate the TavilySearchResults tool, which will return 2 results. This tool will be used by both the LLM and the graph.
from langchain_community.tools.tavily_search import TavilySearchResults
# Create a Tavily search tool instance, limiting to 2 results
tool = TavilySearchResults(max_results=2)
tools = [tool]  # List of tools the bot can use
Part 3: Add Memory to the Chatbot
To enable multi-turn conversations where the bot remembers previous messages, we introduce LangGraph’s checkpointing feature.
Add Checkpointer
Use the MemorySaver checkpointer to store the conversation state in memory. For production, you might use a persistent backend like SQLite or Postgres.
from langgraph.checkpoint.memory import MemorySaver
memory = MemorySaver()
Part 4: Human-in-the-loop
Sometimes, the AI agent might need human input before proceeding. We achieve this by creating a tool that pauses the graph’s flow.
Define Human Assistance Tool
from langchain_core.tools import tool
from langgraph.types import interrupt
@tool
def human_assistance(query: str) -> str:
    print(f"Pausing for human assistance regarding: {query}")
    # interrupt pauses graph execution and waits for input
    human_response = interrupt({"query": query})
    return human_response["data"]
This tool pauses the graph and waits for human input before proceeding.
Deploying Your LangGraph Applications
Once you have built your LangGraph application, the next thing which you need to do is running the app either on your local machine or cloud platforms for further development and testing. LangGraph provides us with several deployment options which can have different workflows and infrastructure.
For deployment, LangGraph supports several options. The Cloud SaaS model handles everything for you. The Self-Hosted Data Plane lets you run apps in your own cloud while using LangChain’s control plane. With the Self-Hosted Control Plane, you manage everything yourself. Or go with Standalone Containers for full flexibility using Docker.
Use Cases of LangGraph
LangGraph is used to build interactive and intelligent AI Agents. Let’s explore and see some of its use cases.
1. Improved Customer Service: LangGraph is capable of developing advanced chatbots for customer support. These chatbots are able to recall past purchases and customer preferences.With the recalled past they can respond to the queries about the order and can link to humans when necessary. With this the customer’s problem can be solved faster.
2. Research Assistant for AI: A research assistant can also be created using LangGraph. It can look for scholarly articles and then highlight important information. The assistant can then extract the information and this information then can be used by researchers and students to gain more insights from various fields.
3. Personalized Learning: With LangGraph we can also build personalized or customized learning systems which will adjust the content based on the learner. This will help the learner understand the weaker area and then recommend resources based on that. This creates a personalized learning experience, improving engagement and outcomes.
4. Streamlining Business Tasks: LangGraph can also help us in automating business processes. With this document approval and project management can be automated and also the agent can also be used to analyze data. Automation helps in increasing productivity and reduces human error, allowing teams to focus on higher-level tasks.
Learn More: Dynamic AI Workflows Through LangGraph ReAct Function Calling
Conclusion
In this LangGraph tutorial for beginners, you learned how to build interactive AI systems. These systems go beyond simple Q&A bots. Through LangGraph examples, we saw how LangGraph manages state, integrates multiple agents, and allows human input. The guide showed how to build a support chatbot that can handle web searches, remember past interactions, and even involve human intervention.
The LangGraph tutorial for beginners is very good for developers. It helps create powerful, AI-driven applications. By using LangGraph, we can build flexible, adaptive systems that can handle complex tasks. Whether you’re building a chatbot, research assistant, or personalized learning tool, LangGraph has the structure and tools you need for efficient development.
Frequently Asked Questions
Q1. What is LangGraph?
A. LangGraph is a powerful library that allows developers to make complex and advanced AI agents which can interact with large language models. It also helps in managing workflow using graph structure. With the help of this graph structure multiple agents can be built to handle complex tasks.
Q2. How does LangGraph work?
A. LangGraph works by defining workflows as graphs. The graph consists of nodes (tasks or computations) and edges (connections between tasks). It handles state management, making sure each agent has the information it needs to perform its task and interact with other agents.
Q3. What are some key features of LangGraph?
A. LangGraph offers:
– State management which keeps track of data as the agent performs tasks.
– Multi-agent support which allows multiple agents to work together within a graph.
– Persistence with checkpointers as it saves the state at each step which enable error recovery and debudding.
– Human-in-the-loop which helps in pausing the workflow for human review and approval.
Q4. Can I integrate LangGraph with OpenAI’s GPT models?
A. Yes, LangGraph can be very easily integrated with OpenAI’s GPT models. It allows us to build applications that use the power of LLMs, such as chatbots and AI assistants, while managing complex workflows and state across multiple agents.
Q5. Is LangGraph beginner-friendly?
A. Yes, this LangGraph tutorial for beginners is designed to help you get started. It walks through key concepts with LangGraph examples and explains how to build systems step by step. Additionally, the LangGraph tutorial for beginners free provides resources for learning the framework at no cost.
Hi, I am Janvi, a passionate data science enthusiast currently working at Analytics Vidhya. My journey into the world of data began with a deep curiosity about how we can extract meaningful insights from complex datasets.


