This article was published as a part of the Data Science Blogathon.
Introduction on Django
The GCP Console is a tool that allows you to manage your Google Cloud Platform, and it addresses your Google Cloud projects and provides a web-based graphical UI.
Popular services of Google Cloud:
1. Compute Engine
2. Cloud Storage
3. BigQuery
4. Vision AI
5. Google Kubernetes Engine
What is Vision AI?
Vision AI APIs are the pre-trained machine learning models used for Face Recognition, Object Detection, OCR, Natural Language Processing, etc. Developers can easily integrate these APIs into their web applications.
What is Django?
Django is a Python-based Web Framework, and it is responsible for server-side rendering. It has extensive community support and provides faster development due to its many libraries.
This tutorial will use Vision AI to integrate various AI services into a Django app. We will start with basics like Enabling Vision APIs, Downloading the API Key, Creating Django App, integrating these APIs in that app, and also testing them using Postman. I will use Windows 10 machine in this tutorial.
Let’s get started, 😉
Enabling Vision APIs
1. Firstly, log in to your Google Account and open Google Developer’s Console.
Note: Vision APIs is a paid service, so you have to pay for it. You may use a trial version and refer to the Google Cloud website for more information.
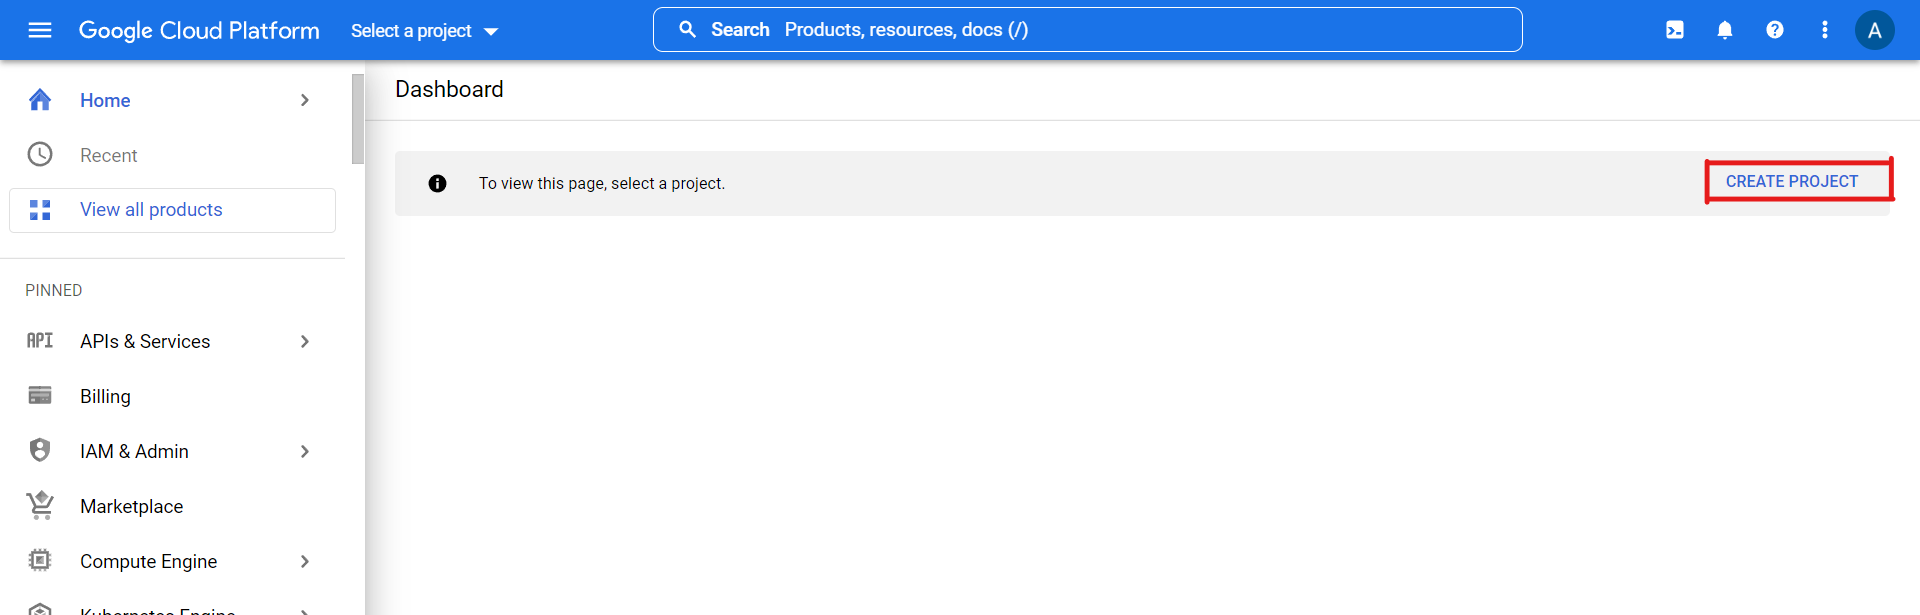
2. After logging in, you have to create a project first. To create a project, click on Create Project.
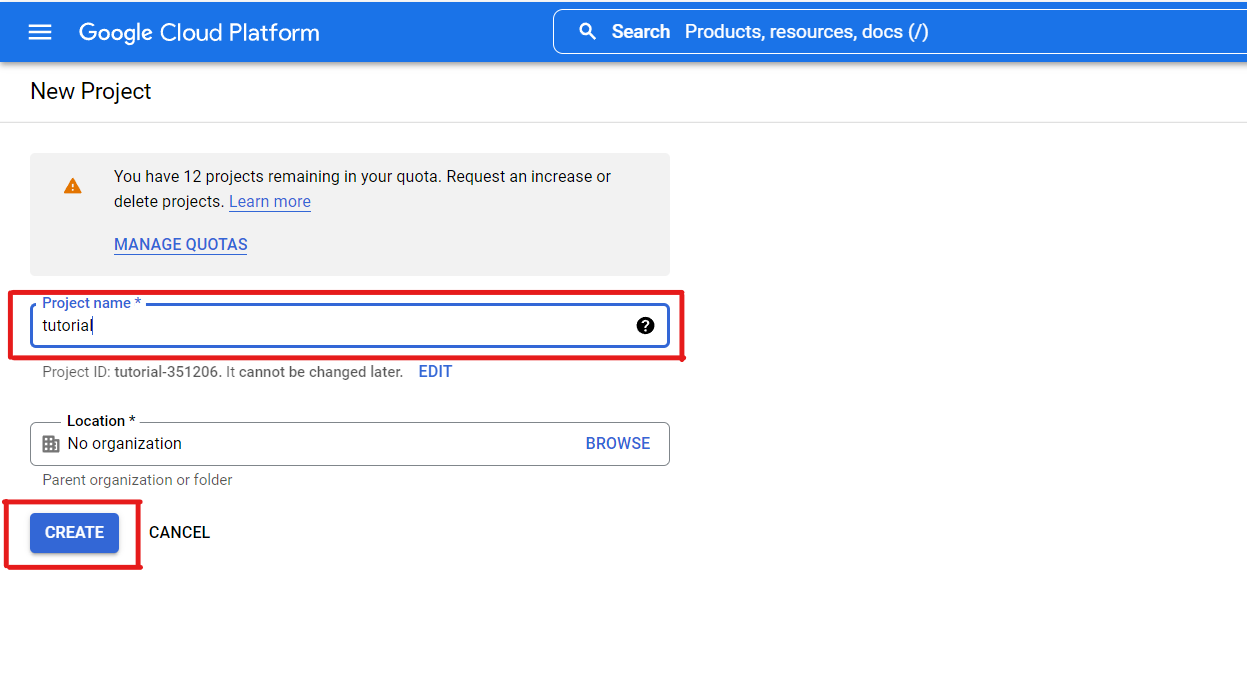
Now, enter the name of your project and click on Create button.
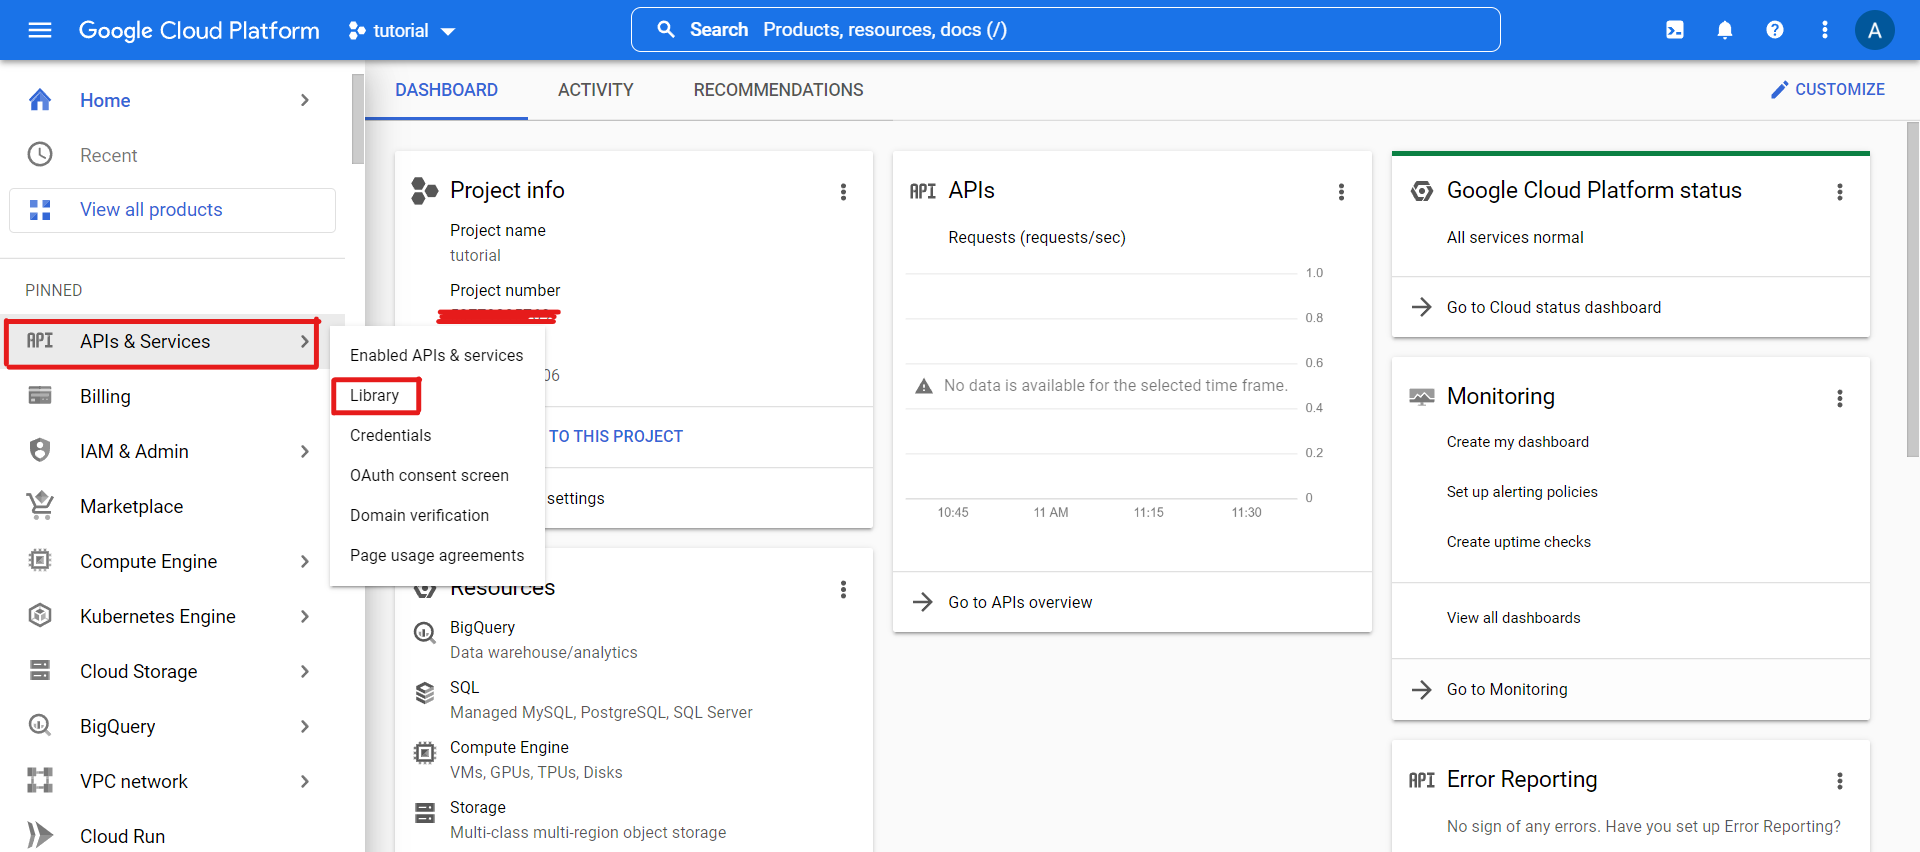
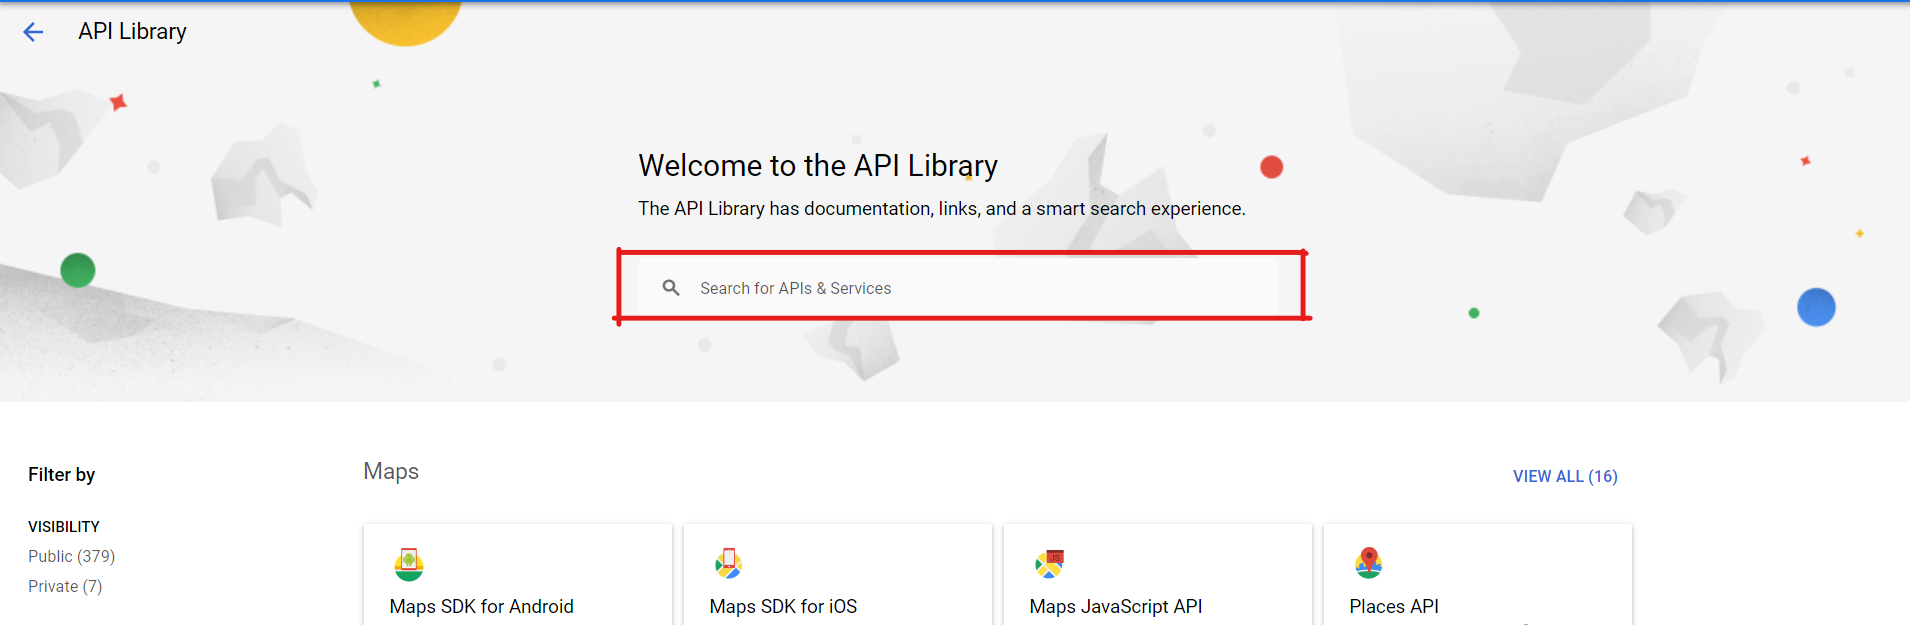
Navigate to APIs & Services >> Library.
A search bar opens, in which you can search your desired libraries.
We use these two APIs for this tutorial-
1. Cloud Natural Language API.
2. Cloud Translation API.
Note: To enable the APIs, you need to activate your billing account.


Finally, we need to click the Enable button for the APIs you want to enable.

Getting the Vision API Key
Further, we need to create a Service Account in GCP to use these services.
Navigate to APIs & Services >> Credentials.
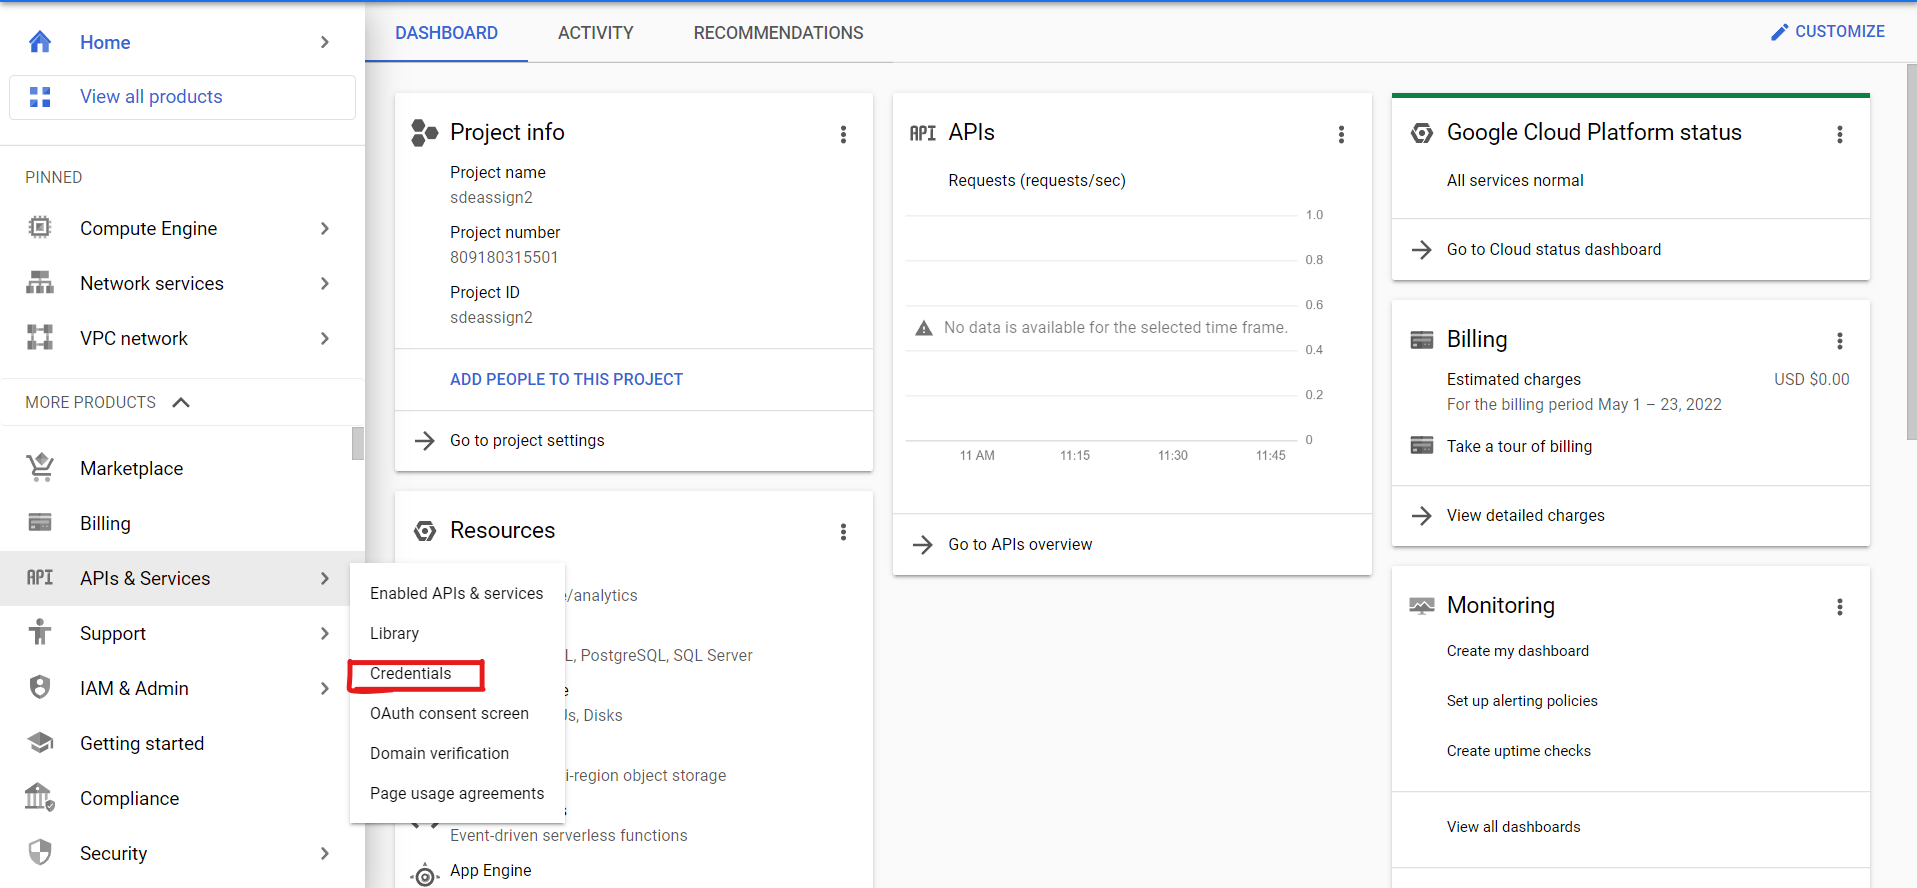
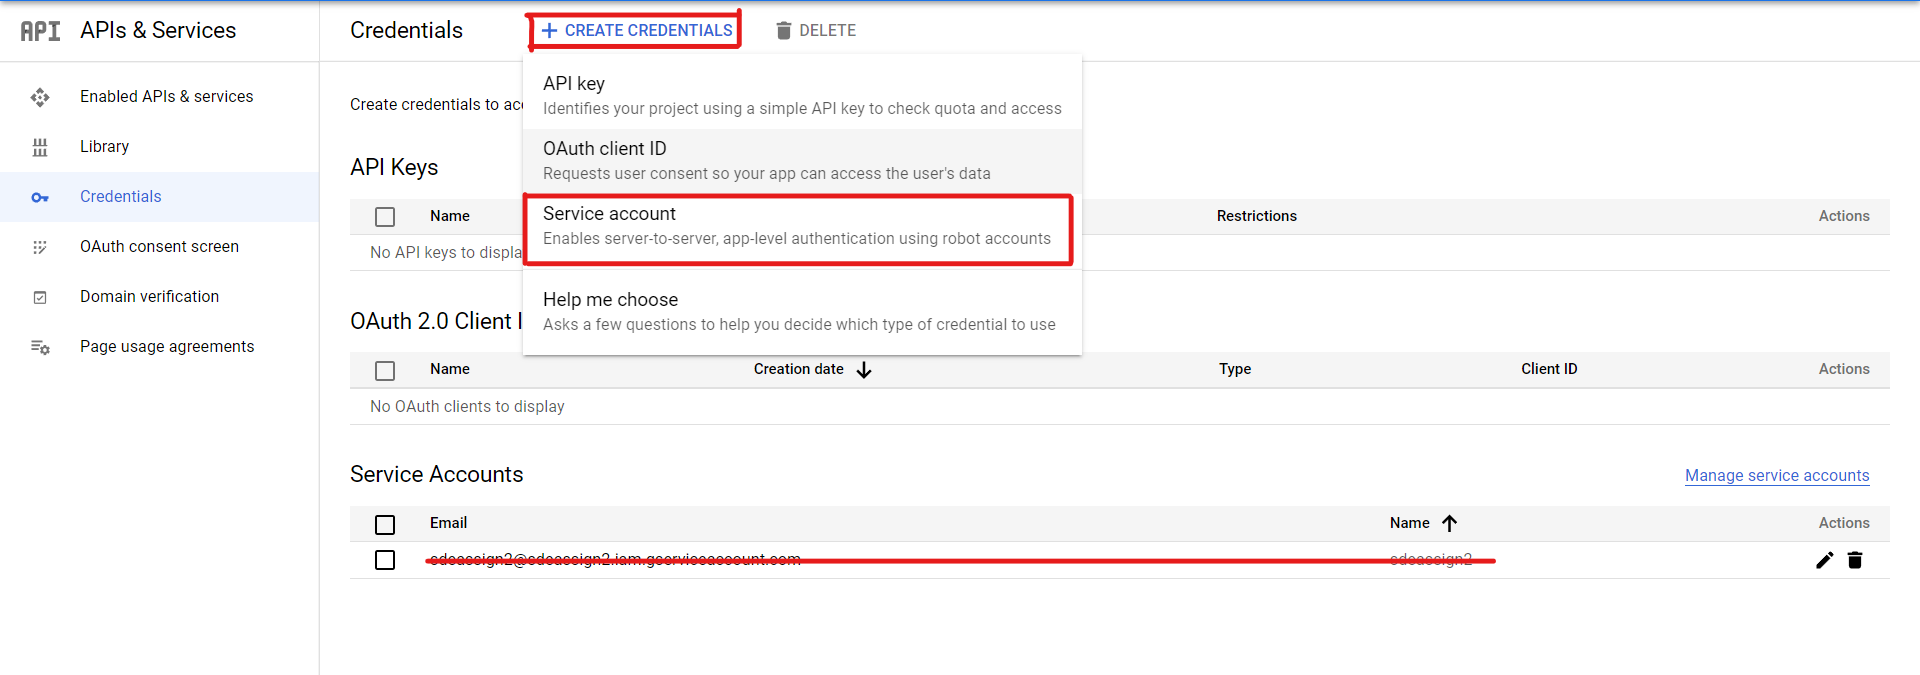
Now click on Create Credentials and click on Service Account to create your service account, as shown below.
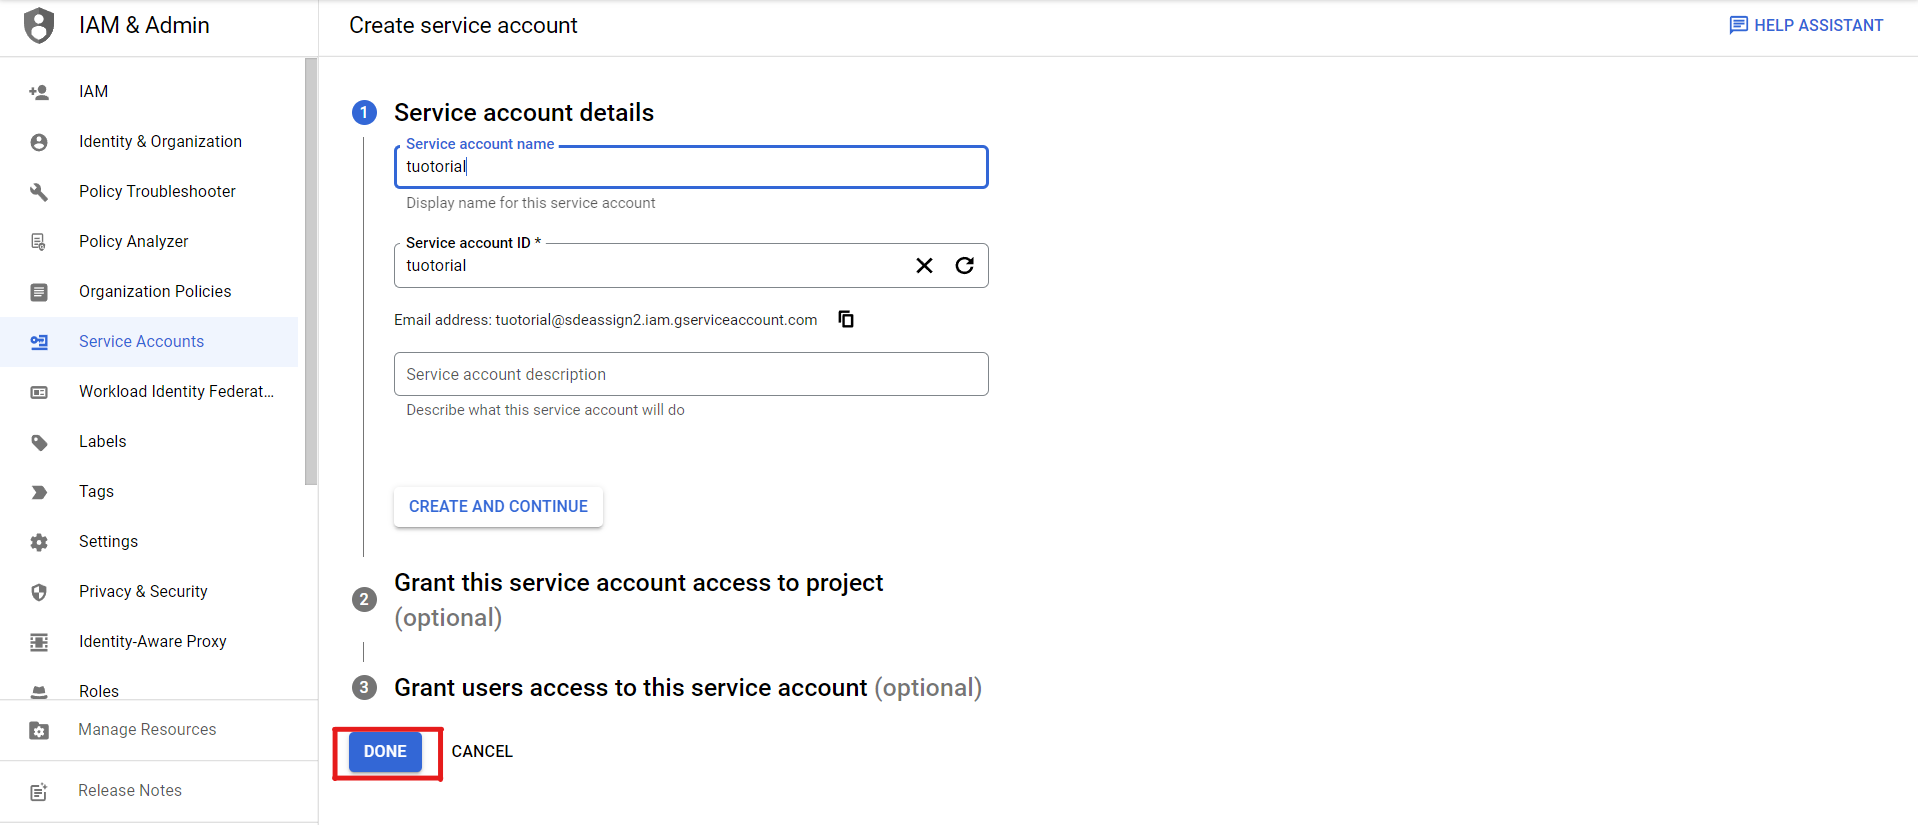
Further, enter a name for your service account and click on the Done button.
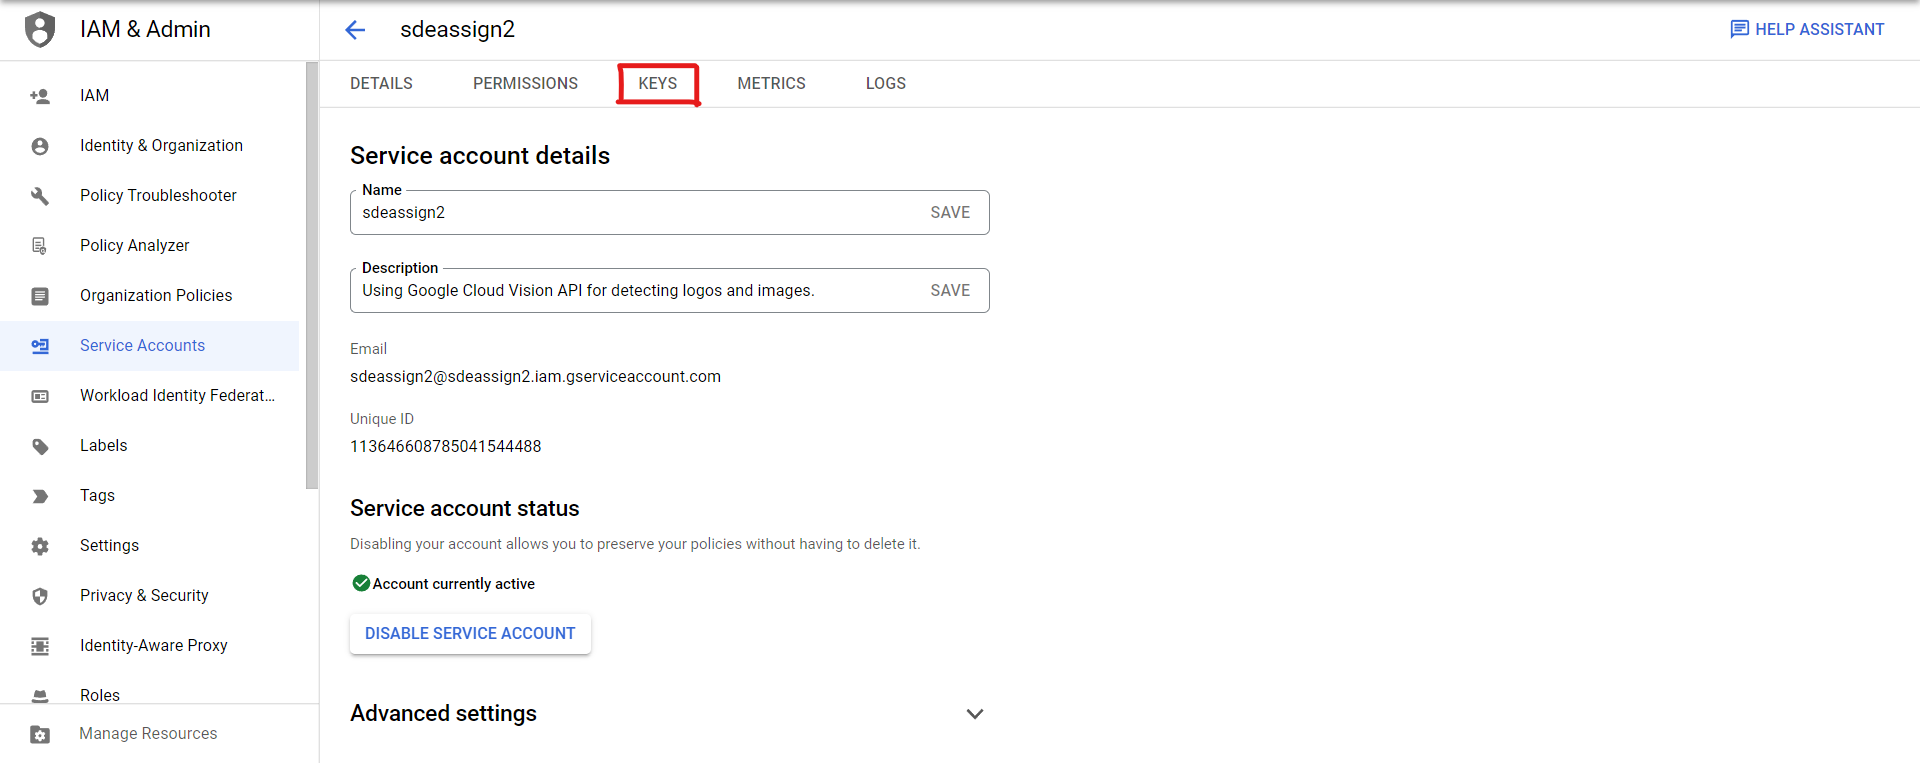
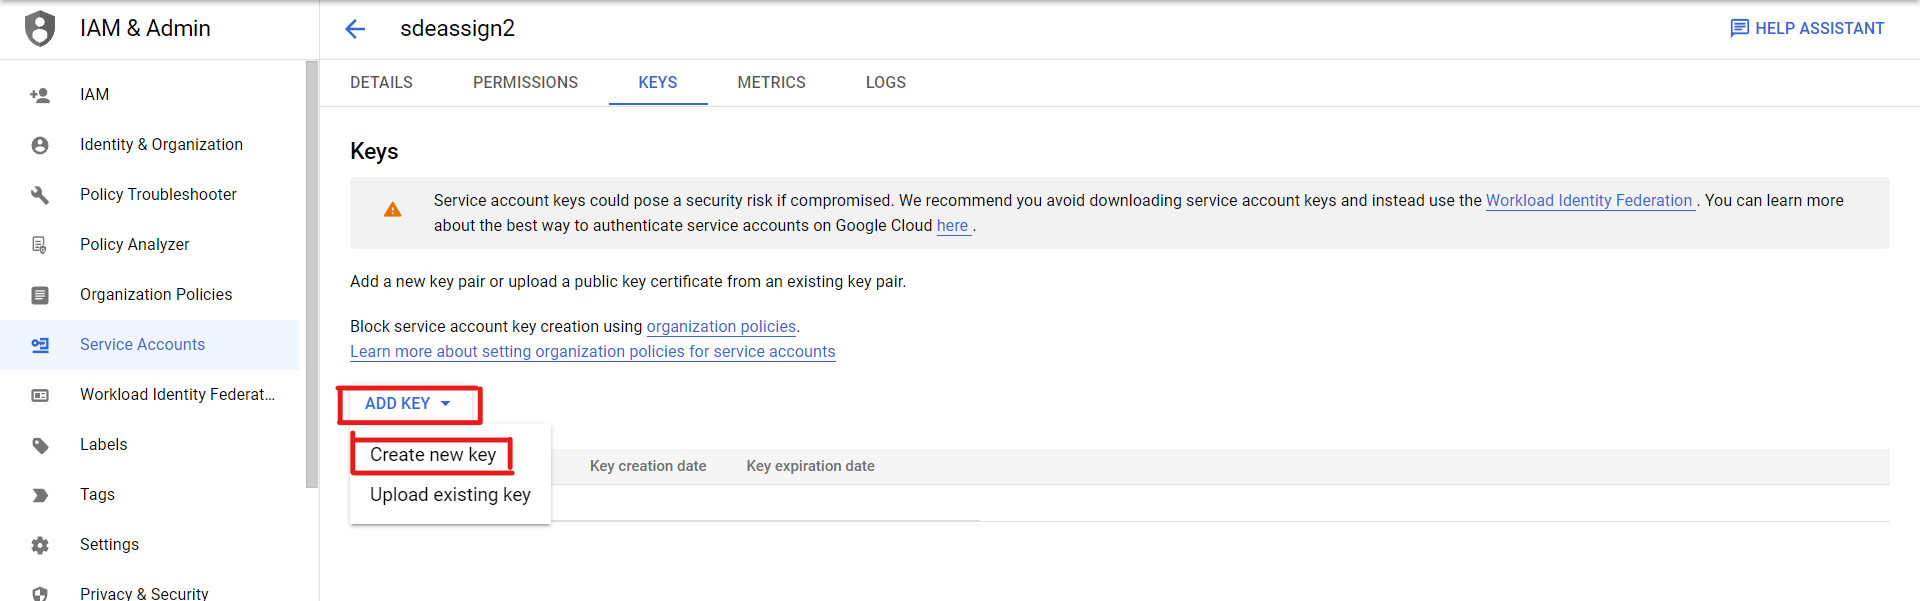
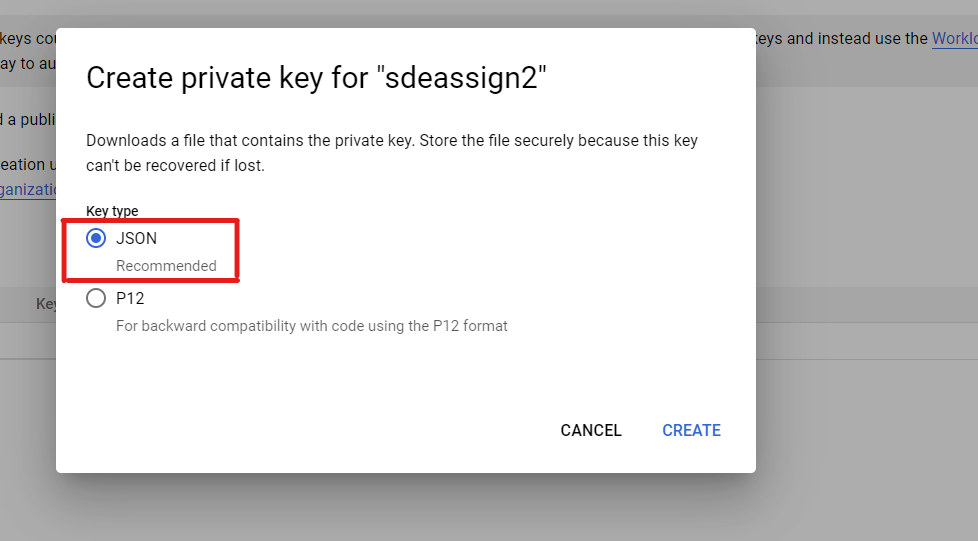
Now go to your newly created service account, and then go to the Keys section to generate an API Key to access your APIs.
Please create a new key in JSON format and save it on your local machine. We will use that key later.
Your Vision API Key looks like this.
Creating Virtual Environment
This section will set up a virtual environment on Windows 10 machine and then install all the required libraries.
1. Install Virtualenv
$ pip install virtualenv
2. Creating an environment
$ py -m venv venv
3. Activate it using that command
$ venvScriptsactivate
4. You can also deactivate it using that command
$ deactivate
Creating Django App
Now, we will set up our Django application.
1. Firstly, activate your previously created virtual environment.
$ venvScriptsactivate
2. Install Django in the virtual environment
$ py -m pip install django
3. Create a new Django project, and choose any name you want for your project.
$ django-admin startproject GCPTutorial (Or choose any other name)
4. Now, move inside the GCPTutorial directory, and this type of directory structure appears to you:
GCPTutorial/
    manage.py
    GCPTutorial/
        __init__.py
        settings.py
        urls.py
        asgi.py
        wsgi.py
Run the development server by typing that command.
$ python manage.py run server
If everything is working fine, the output looks like this.
Watching for file changes with StatReloader
Performing system checks...
System check identified no issues (0 silenced).
May 24, 2022 - 17:40:19
Django version 4.0.4, using settings 'GCPTutorial.settings'
Starting development server at http://127.0.0.1:8000/
Quit the server with CTRL-BREAK.
Creating a Separate App for APIs
Inside our Django Project, we can create a separate app for our APIs.
Inside your leading working directory (GCPTutorial), run the following command.
$ python manage.py startapp APIApp
It will create a separate app named as APIApp. The directory structure of which looks like as.
    __init__.py
    admin.py
    apps.py
    migrations/
        __init__.py
    models.py
    tests.py
    views.py
Our app is now ready to use. In this app, we can create our APIs and URLs to access that APIs.
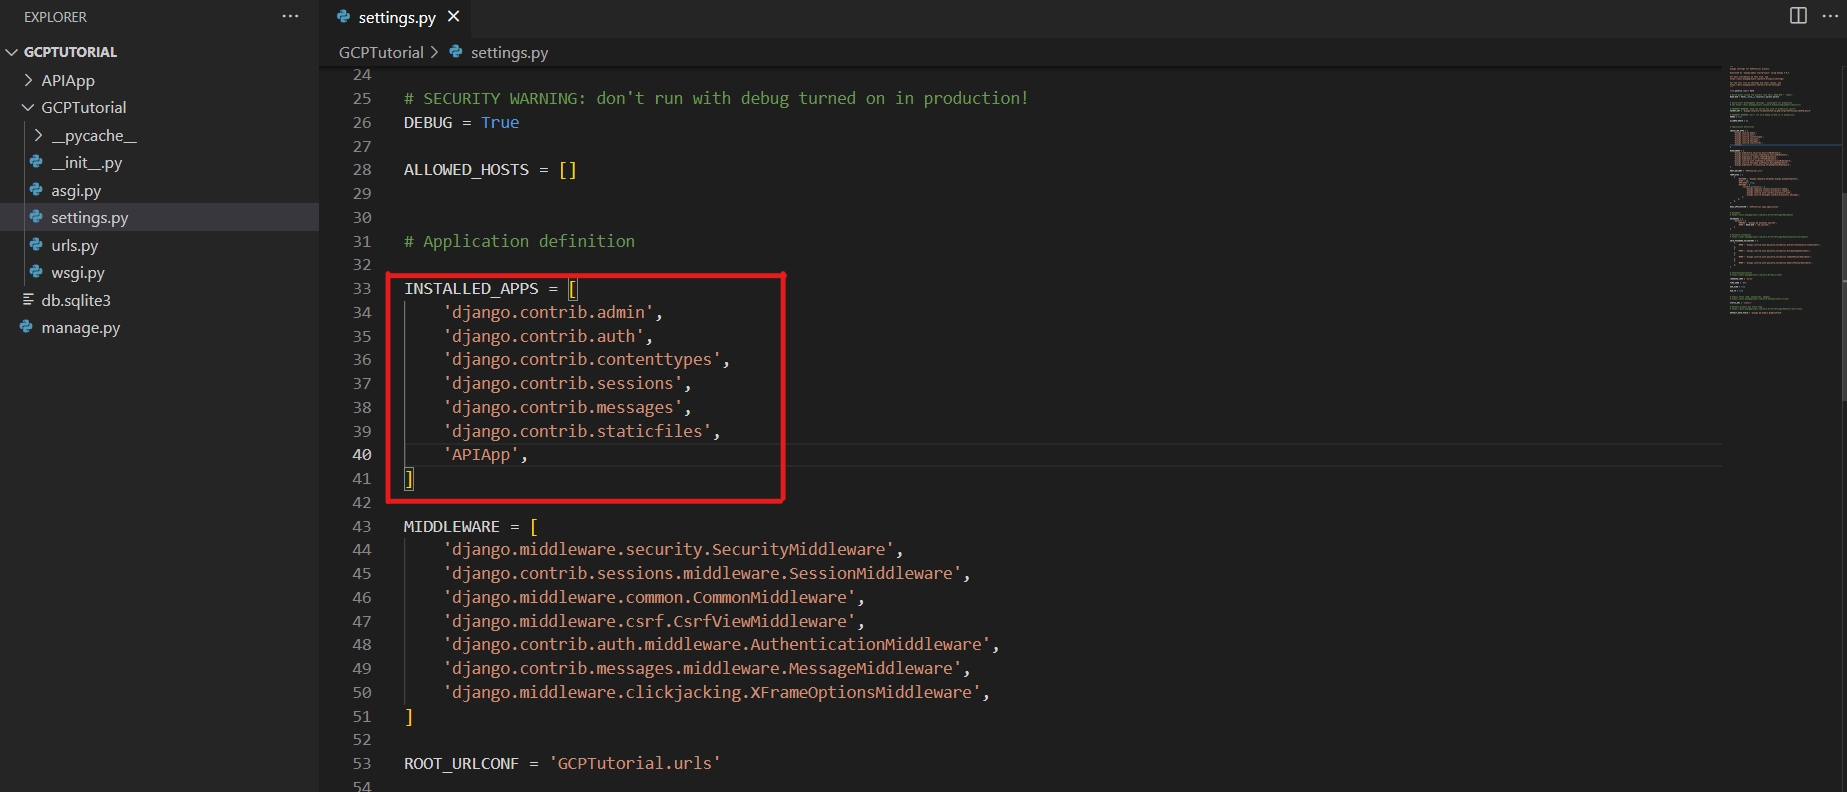
But before using this app, we need to register it in the settings.py file of Django.
Go to the GCPTutorial/settings.py file and make the following changes.
In the settings.py file, go to the list of Installed Apps and then append the name of the newly created app in it.
Now our app is ready to create APIs.
Creating URLs
We will create URLs for the APIs.
In the previous section, we created a separate app in Django named APIApp. So we have to generate a URL for this app in the main URLs.
Go to GCPTutorial/urls.py, and include the path of the app in it, as shown below. This will redirect all the requests to our app.
from django.contrib import admin
from django.urls import path, include
urlpatterns = [
    path('admin/', admin.site.urls),
    path('', include("APIApp.urls")),
]
Go to the APIApp folder and create a new python file named urls.py. This file is used to create URLs for the particular app and can only be used within this app.
Paste the following code in the newly created urls.py file.
from django.urls import path
from .views import sentimentAnalysis, engToHin
urlpatterns = [
    path('sentimentAnalysis', sentimentAnalysis, name="sentimentAnalysis"),
    path('englishToFrench', englishToFrench, name="englishToFrench"),
]
We have created two URLs.
“/sentimentAnalysis” – This is the part of Cloud Natural Language API, and it is used to get the sentiment of a given text (whether the data is negative, positive or neutral).
“/englishToFrench” – This is the part of Cloud Translation API, and it is used to convert a given text from the English language to the French Language.
Installing Libraries
We have to install the cloud vision libraries. You can install them via pip command.
$ pip install google-cloud-language
$ pip install google-cloud-translate
Creating APIs
Our URLs for the APIs are created. Now we will create function based views for that URLs.
Go to the /APIApp folder and open the views.py file. In this file, we will create our functions for the APIs.
Firstly, we have imported all the necessary libraries.
from django.http import HttpResponse
import JSON
import os
from google.cloud import translate_v2
from google.cloud import language
from Django.views.decorators.csrf import csrf_exempt
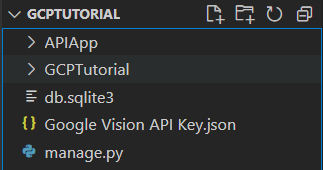
We downloaded a JSON file the above, a secret key to accessing the Cloud Vision APIs.
Put that JSON file in the main working directory. Now your main working directory will look like this.
Again that views.py file, and import the Secret Key
os.environ["GOOGLE_APPLICATION_CREDENTIALS"] = r"Google_Vision_API_Key.json"
We will now create a function to translate the text from English to French. Code is commented so that you can understand the meaning of commands.
# We have to exempt the csrf token so those requests can also be considered which do not contain the csrf token.
@csrf_exempt
def englishToFrench(request):
    if request.method == "POST":
        # Initializes the translate model
        translate_model = translate_v2.Client()
        # Received the text from the POST Request
        text = request.POST["engText"]
        # Target language is choosen as French
        target = "fr"
        output = translate_model.translate(text, target_language=target)
        # Return the output in JSON Format
        return HttpResponse(json.dumps(output["translatedText"]))
Function to perform the Sentiment Analysis
# Exempting the csrf token
@csrf_exempt
def sentimentAnalysis(request):
    if request.method == "POST":
        text = request.POST["text"]
        client = language.LanguageServiceClient()
        document = language.Document(content=text, type_=language.Document.Type.PLAIN_TEXT)
        response = client.analyze_sentiment(document=document)
        sentiment = response.document_sentiment
        results = dict(
            text=text,
            score=f"{sentiment.score:.1%}",
            magnitude=f"{sentiment.magnitude:.1%}",
        )
        if "-" in results["score"]:
            return HttpResponse(json.dumps(f"Negative Sentiment with Score: {results['score']}"))
        return HttpResponse(json.dumps(f"Positive Sentiment with Score: {results['score']}"))
Complete Code looks of views.py file like this
from django.http import HttpResponse
import json
import os
from google.cloud import translate_v2
from google.cloud import language
from django.views.decorators.csrf import csrf_exempt
os.environ["GOOGLE_APPLICATION_CREDENTIALS"] = r"Google_Vision_API_Key.json"
# We have to exempt the csrf token, so that those requests can also be considered, which do not contain the csrf token.
@csrf_exempt
def englishToFrench(request):
    if request.method == "POST":
        # Initializes the translate model
        translate_model = translate_v2.Client()
        # Received the text from the POST Request
        text = request.POST["engText"]
        # Target language is choosen as French
        target = "fr"
        output = translate_model.translate(text, target_language=target)
        # Return the output in JSON Format
        return HttpResponse(json.dumps(output["translatedText"]))
# Exempting the csrf token
@csrf_exempt
def sentimentAnalysis(request):
    if request.method == "POST":
        text = request.POST["text"]
        client = language.LanguageServiceClient()
        document = language.Document(content=text, type_=language.Document.Type.PLAIN_TEXT)
        response = client.analyze_sentiment(document=document)
        sentiment = response.document_sentiment
        results = dict(
            text=text,
            score=f"{sentiment.score:.1%}",
            magnitude=f"{sentiment.magnitude:.1%}",
        )
        if "-" in results["score"]:
            return HttpResponse(json.dumps(f"Negative Sentiment with Score: {results['score']}"))
        return HttpResponse(json.dumps(f"Positive Sentiment with Score: {results['score']}"))
Our APIs are now ready to use. We will test these APIs in the upcoming section.
But before this, we need to run the migrations to create tables in the database and run the server to check everything is working fine.
To make the migrations, type that command in the cmd.
$ python manage.py makemigrations
$ python manage.py migrate
Now, we finally run the server.
$ python manage.py runserver
Testing APIs using Postman
1. Introduction
In this section, we will test our newly created APIs of the Django Application.
To send requests to our server, we will use Postman.
Postman is an application which is used for APIs. It uses client HTTP to send HTTP requests to the server. It also provides a graphical user interface, making it more accessible and convenient. You can download it from that link.
After installing the application, its interface looks like this.
Note: Your development server must be running while testing the APIs.
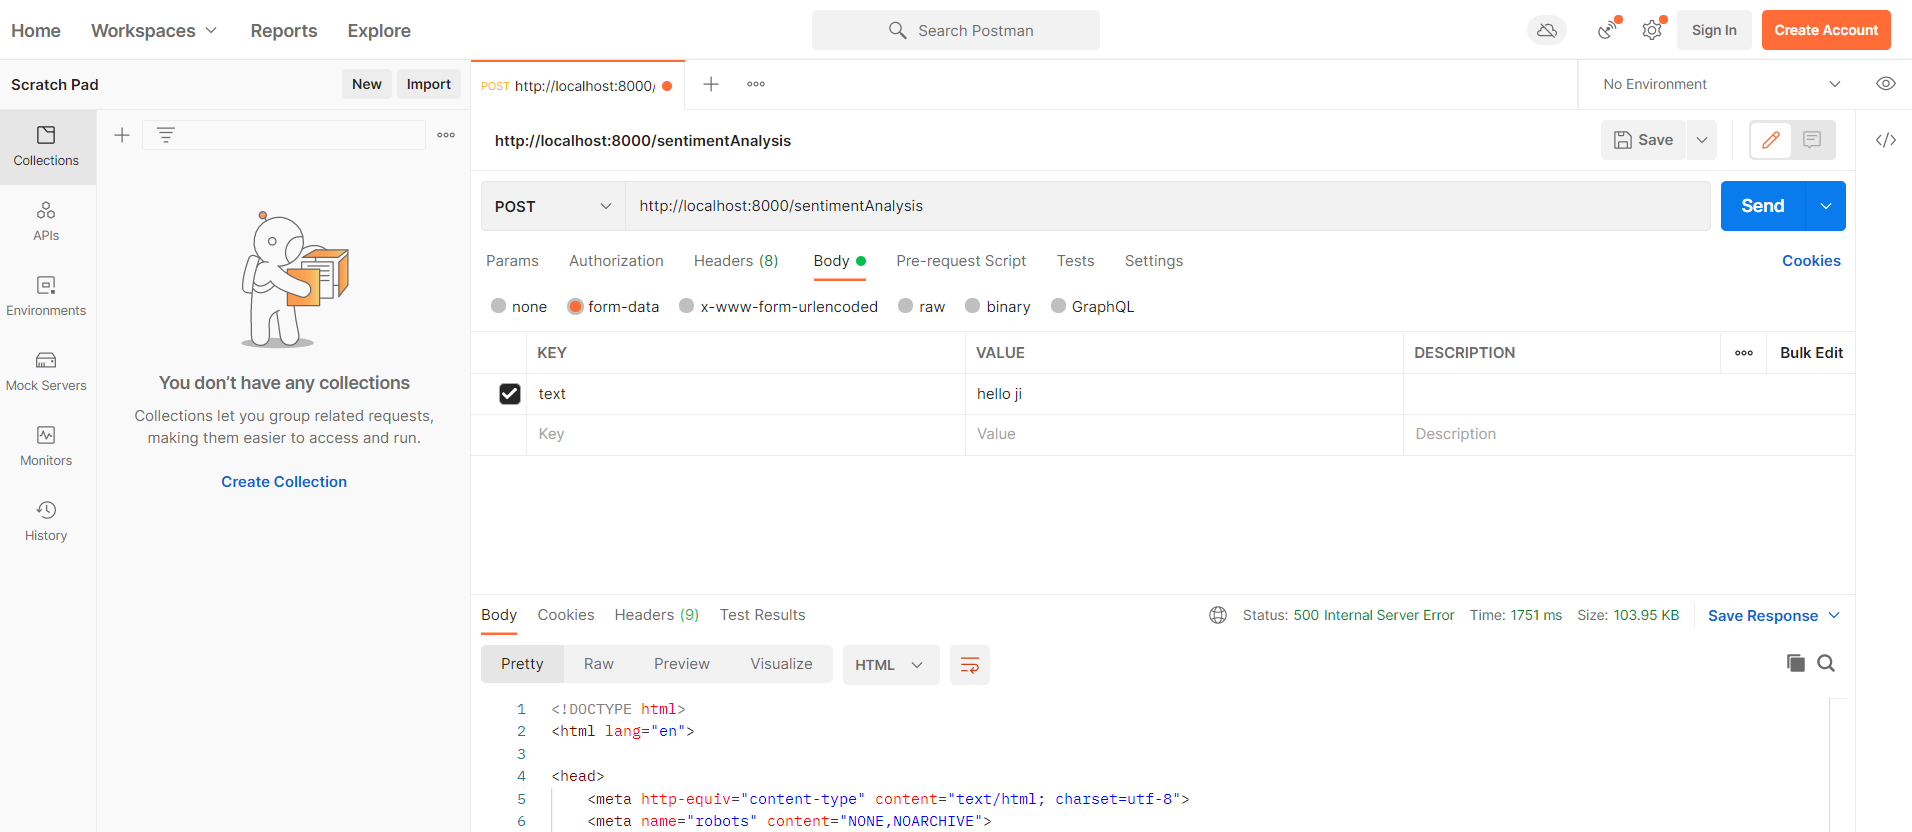
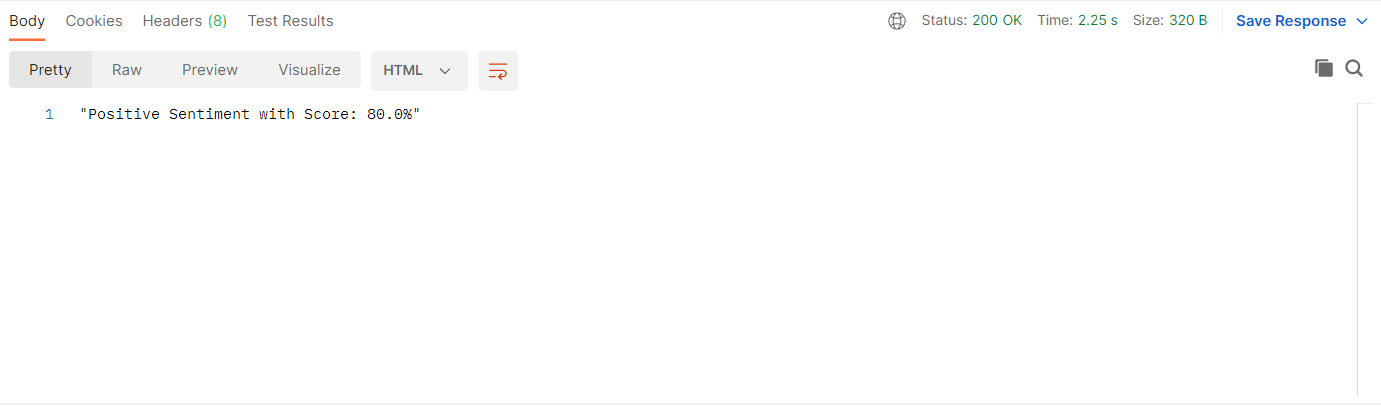
2. Testing Sentiment Analysis API
The URL to access that API – http://localhost:8000/sentimentAnalysis
Make the below changes at Postman, shown in the image.
1. Change the GET Request to POST Request, as we need to send the text to the server.
2. Enter the URL
3. In the Authorization Panel, choose No Auth as we are not using any user authentication here.
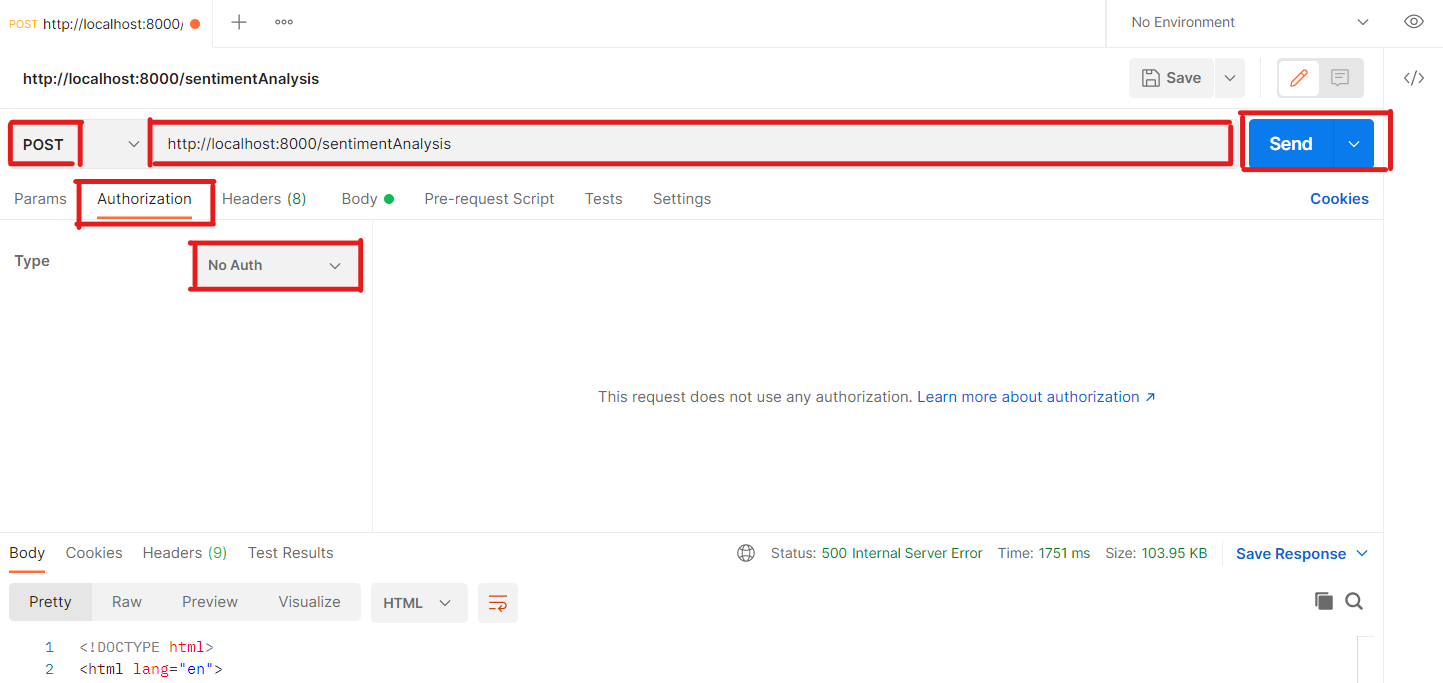
Further, in the Body section, write the text you want to analyze, then click the Send button. Refer to the below image for a clear understanding.
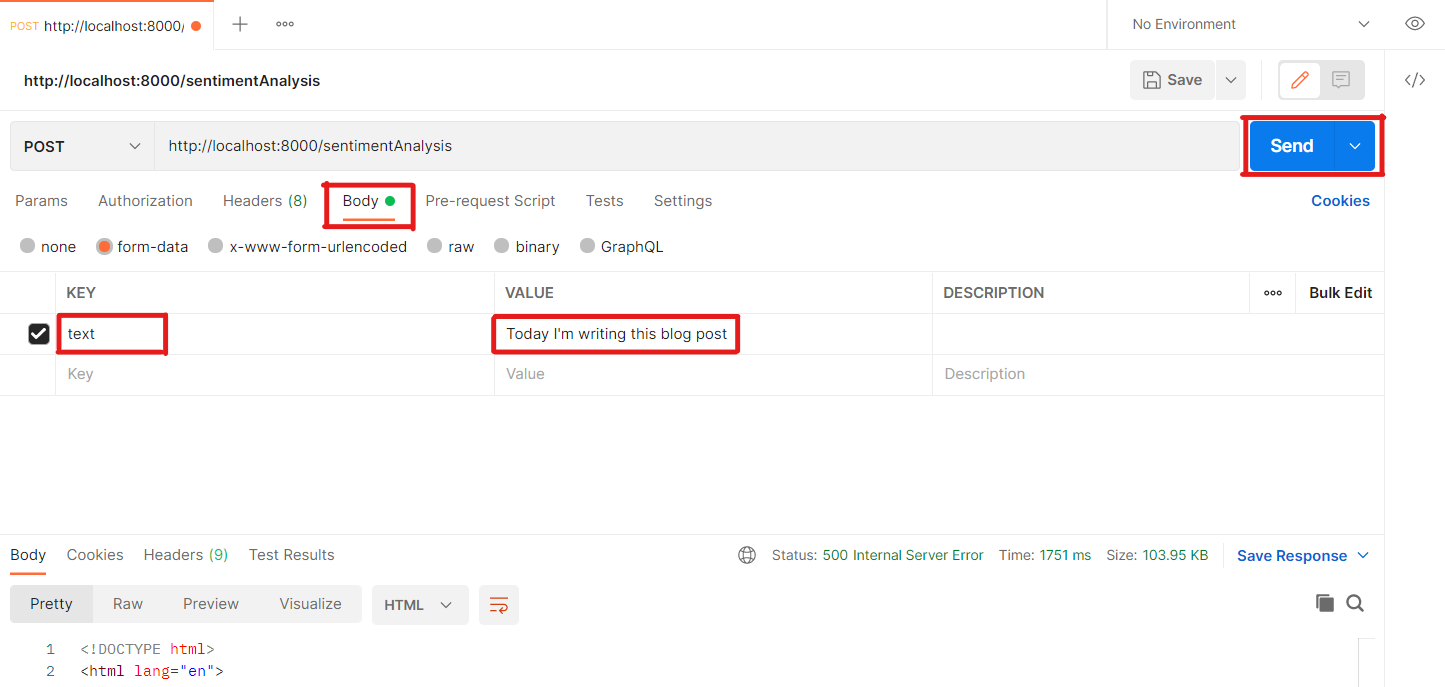
The Output of the API is shown below.
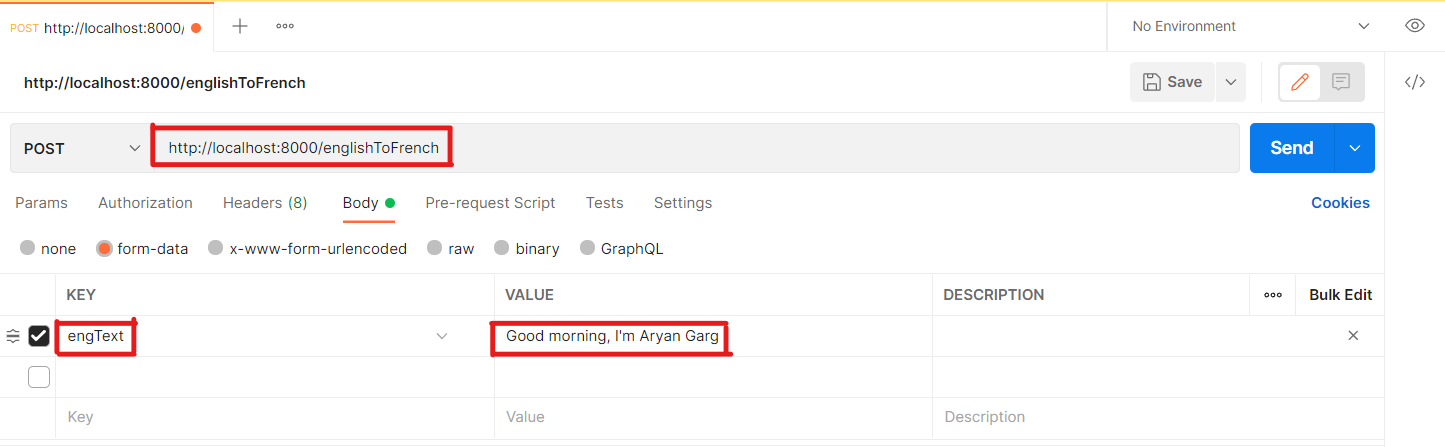
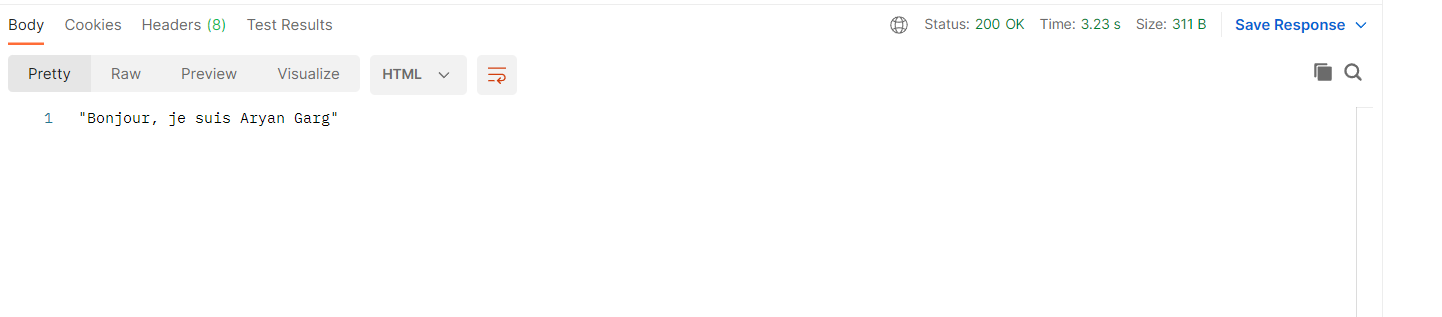
3. Testing English to French conversion API
The URL to access that API – http://localhost:8000/englishToFrench
Make the below changes at Postman, shown in the image.
1. Change the URL
2. Change the data in the Body section
The Output of the API is shown below.
Conclusion
The complete code for the article can be found here.
The key takeaways of this tutorial are:
1. Firstly, we have created a new project on the Google Cloud Platform.
2. Then, we used Cloud Natural Language API and Cloud Translate API. But you can use any API that you want.
3. To use these services, we have created a service account.
4. Further, we have downloaded the secret key.
5. We set up our Django project and created a separate app for the APIs.
6. Then, we have created APIs in this app.
7. Finally, we have tested these APIs using Postman.
I hope you have enjoyed the article. It is all for today. If you have any questions, please feel free to ask. Also, connect with me on LinkedIn, and I will be happy to get associated with you.
The media shown in this article is not owned by Analytics Vidhya and is used at the Author’s discretion.
I am currently pursuing my Bachelor of Technology (B.Tech.) in Electrical Engineering and Engineering from the Indian Institute of Technology Jodhpur(IITJ). I am very enthusiastic about Machine learning, and Software Development. Feel free to connect with me on Linkedin.


Hello Aryan, I am searching a tutorial in GA API integration on django app. How to view user's google analytics report on django website, can you make a tutorial? Thanks