Since the rise of AI chatbots, Google’s Gemini has emerged as one of the most powerful players driving the evolution of intelligent systems. Beyond its conversational strength, Gemini also unlocks practical possibilities in computer vision, enabling machines to see, interpret, and describe the world around them.
This guide walks you through the steps to leverage Google Gemini for computer vision, including how to set up your environment, send images with instructions, and interpret the model’s outputs for object detection, caption generation, and OCR. We’ll also touch on data annotation tools (like those used with YOLO) to give context for custom training scenarios.
Table of Contents
What is Google Gemini?
Google Gemini is a family of AI models built to handle multiple data types, such as text, images, audio, and code together. This means they can process tasks that involve understanding both pictures and words.
Gemini 2.5 Pro Features
- Multimodal Input: It accepts combinations of text and images in a single request.
- Reasoning: The model can analyze information from the inputs to perform tasks like identifying objects or describing scenes.
- Instruction Following: It responds to text instructions (prompts) that guide its analysis of the image.
These features allow developers to use Gemini for vision-related tasks through an API without training a separate model for each job.
The Role of Data Annotation: The YOLO Annotator
While Gemini models provide powerful zero-shot or few-shot capabilities for these computer vision tasks, building highly specialized computer vision models requires training on a dataset tailored to the specific problem. This is where data annotation becomes essential, particularly for supervised learning tasks like training a custom object detector.
The YOLO Annotator (often referring to tools compatible with the YOLO format, like Labeling, CVAT, or Roboflow) is designed to create labeled datasets.
What is Data Annotation?

For object detection, annotation involves drawing bounding boxes around each object of interest in an image and assigning a class label (e.g., ‘car’, ‘person’, ‘dog’). This annotated data tells the model what to look for and where during training.
Key Features of Annotation Tools (like YOLO Annotator)
- User Interface: They provide graphical interfaces allowing users to load images, draw boxes (or polygons, keypoints, etc.), and assign labels efficiently.
- Format Compatibility: Tools designed for YOLO models save annotations in a specific text file format that YOLO training scripts expect (typically one .txt file per image, containing class index and normalized bounding box coordinates).
- Efficiency Features: Many tools include features like hotkeys, automatic saving, and sometimes model-assisted labeling to speed up the often time-consuming annotation process. Batch processing allows for more effective handling of large image sets.
- Integration: Using standard formats like YOLO ensures that the annotated data can be easily used with popular training frameworks, including Ultralytics YOLO.
While Google Gemini for Computer Vision, can detect general objects without prior annotation, if you needed a model to detect very specific, custom objects (e.g., unique types of industrial equipment, specific product defects), you would likely need to collect images and annotate them using a tool like a YOLO annotator to train a dedicated YOLO model.
Code Implementation – Google Gemini for Computer Vision
First, you need to install the necessary software libraries.
Step 1: Install the Prerequisites
1. Install Libraries
Run this command in your terminal:
!uv pip install -U -q google-genai ultralyticsThis command installs the google-genai library to communicate with the Gemini API and the ultralytics library, which contains helpful functions for handling images and drawing on them.
2. Import Modules
Add these lines to your Python Notebook:
import json

import cv2

import ultralytics

from google import genai

from google.genai import types

from PIL import Image

from ultralytics.utils.downloads import safe_download

from ultralytics.utils.plotting import Annotator, colors

ultralytics.checks()
This code imports libraries for tasks like reading images (cv2, PIL), handling JSON data (json), interacting with the API (google.generativeai), and utility functions (ultralytics).
3. Configure API Key
Initialize the client using your Google AI API key.
# Replace "your_api_key" with your actual key

# Use GenerativeModel for newer versions of the library

# Initialize the Gemini client with your API key

client = genai.Client(api_key=”your_api_key”)
This step prepares your script to send authenticated requests.
Step 2: Function to Interact with Gemini
Create a function to send requests to the model. This function takes an image and a text prompt and returns the model’s text output.
def inference(image, prompt, temp=0.5):

   """

   Performs inference using Google Gemini 2.5 Pro Experimental model.

   Args:

       image (str or genai.types.Blob): The image input, either as a base64-encoded string or Blob object.

       prompt (str): A text prompt to guide the model's response.

       temp (float, optional): Sampling temperature for response randomness. Default is 0.5.

   Returns:

       str: The text response generated by the Gemini model based on the prompt and image.

   """

   response = client.models.generate_content(

       model="gemini-2.5-pro-exp-03-25",

       contents=[prompt, image],  # Provide both the text prompt and image as input

       config=types.GenerateContentConfig(

           temperature=temp,  # Controls creativity vs. determinism in output

       ),

   )

   return response.text  # Return the generated textual response
Explanation
- This function sends the image and your text instruction (prompt) to the Gemini model specified in the model_client.
- The temperature setting (temp) influences output randomness; lower values give more predictable results.
Step 3: Preparing Image Data
You need to load images correctly before sending them to the model. This function downloads an image if needed, reads it, converts the color format, and returns a PIL Image object and its dimensions.
def read_image(filename):

   image_name = safe_download(filename)

   # Read image with opencv

   image = cv2.cvtColor(cv2.imread(f"/content/{image_name}"), cv2.COLOR_BGR2RGB)

   # Extract width and height

   h, w = image.shape[:2]

   # # Read the image using OpenCV and convert it into the PIL format

   return Image.fromarray(image), w, h
Explanation
- This function uses OpenCV (cv2) to read the image file.
- It converts the image color order to RGB, which is standard.
- It returns the image as a PIL object, suitable for the inference function, and its width and height.
Step 4: Result formatting
def clean_results(results):

   """Clean the results for visualization."""

   return results.strip().removeprefix("```json").removesuffix("```").strip()
This function formats the result into JSON format.
Task 1: Object Detection
Gemini can find objects in an image and report their locations (bounding boxes) based on your text instructions.
# Define the text prompt

prompt = """

Detect the 2d bounding boxes of objects in image.

"""

# Fixed, plotting function depends on this.

output_prompt = "Return just box_2d and labels, no additional text."

image, w, h = read_image("https://media-cldnry.s-nbcnews.com/image/upload/t_fit-1000w,f_auto,q_auto:best/newscms/2019_02/2706861/190107-messy-desk-stock-cs-910a.jpg")  # Read img, extract width, height

results = inference(image, prompt + output_prompt)  # Perform inference

cln_results = json.loads(clean_results(results))  # Clean results, list convert

annotator = Annotator(image)  # initialize Ultralytics annotator

for idx, item in enumerate(cln_results):

   # By default, gemini model return output with y coordinates first.

   # Scale normalized box coordinates (0–1000) to image dimensions

   y1, x1, y2, x2 = item["box_2d"]  # bbox post processing,

   y1 = y1 / 1000 * h

   x1 = x1 / 1000 * w

   y2 = y2 / 1000 * h

   x2 = x2 / 1000 * w

   if x1 > x2:

       x1, x2 = x2, x1  # Swap x-coordinates if needed

   if y1 > y2:

       y1, y2 = y2, y1  # Swap y-coordinates if needed

   annotator.box_label([x1, y1, x2, y2], label=item["label"], color=colors(idx, True))

Image.fromarray(annotator.result())  # display the output
Source Image: Link
Output
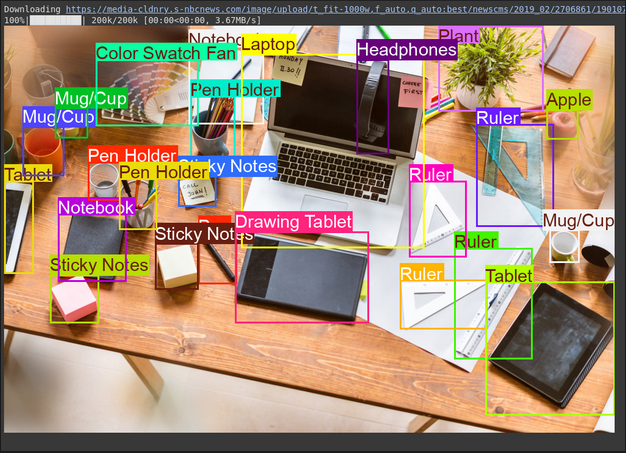
Explanation
- The prompt tells the model what to find and how to format the output (JSON)
- It converts the normalized box coordinates (0-1000) to pixel coordinates using the image width (w) and height (h).
- The Annotator tool draws the boxes and labels on a copy of the image
Task 2: Testing Reasoning Capabilities
With Gemini models, you can tackle complex tasks using advanced reasoning that understands context and delivers more precise results.
# Define the text prompt

prompt = """

Detect the 2d bounding box around:

highlight the area of morning light +

PC on table

potted plant

coffee cup on table

"""

# Fixed, plotting function depends on this.

output_prompt = "Return just box_2d and labels, no additional text."

image, w, h = read_image("https://thumbs.dreamstime.com/b/modern-office-workspace-laptop-coffee-cup-cityscape-sunrise-sleek-desk-featuring-stationery-organized-neatly-city-345762953.jpg")  # Read image and extract width, height

results = inference(image, prompt + output_prompt)

# Clean the results and load results in list format

cln_results = json.loads(clean_results(results))

annotator = Annotator(image)  # initialize Ultralytics annotator

for idx, item in enumerate(cln_results):

   # By default, gemini model return output with y coordinates first.

   # Scale normalized box coordinates (0–1000) to image dimensions

   y1, x1, y2, x2 = item["box_2d"]  # bbox post processing,

   y1 = y1 / 1000 * h

   x1 = x1 / 1000 * w

   y2 = y2 / 1000 * h

   x2 = x2 / 1000 * w

   if x1 > x2:

       x1, x2 = x2, x1  # Swap x-coordinates if needed

   if y1 > y2:

       y1, y2 = y2, y1  # Swap y-coordinates if needed

   annotator.box_label([x1, y1, x2, y2], label=item["label"], color=colors(idx, True))

Image.fromarray(annotator.result())  # display the output
Source Image: Link
Output
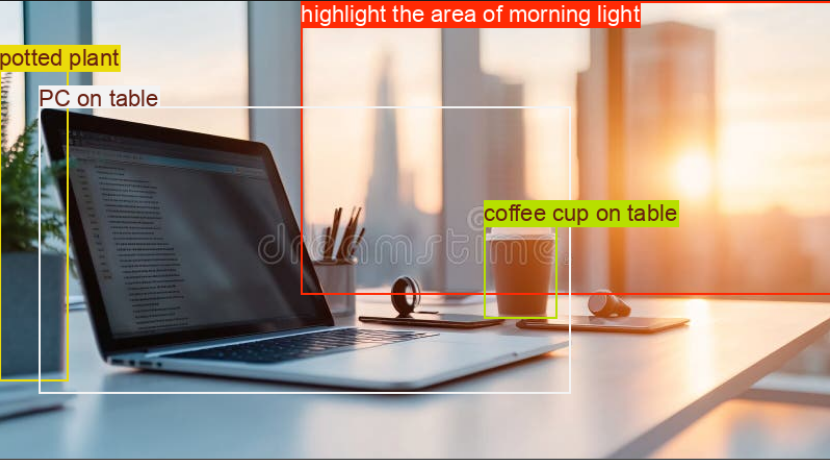
Explanation
- This code block contains a complex prompt to test the model’s reasoning capabilities.
- It converts the normalized box coordinates (0-1000) to pixel coordinates using the image width (w) and height (h).
- The Annotator tool draws the boxes and labels on a copy of the image.
Task 3: Image Captioning
Gemini can create text descriptions for an image.
# Define the text prompt

prompt = """

What's inside the image, generate a detailed captioning in the form of short

story, Make 4-5 lines and start each sentence on a new line.

"""

image, _, _ = read_image("https://cdn.britannica.com/61/93061-050-99147DCE/Statue-of-Liberty-Island-New-York-Bay.jpg")  # Read image and extract width, height

plt.imshow(image)

plt.axis('off')  # Hide axes

plt.show()

print(inference(image, prompt))  # Display the results
Source Image: Link
Output
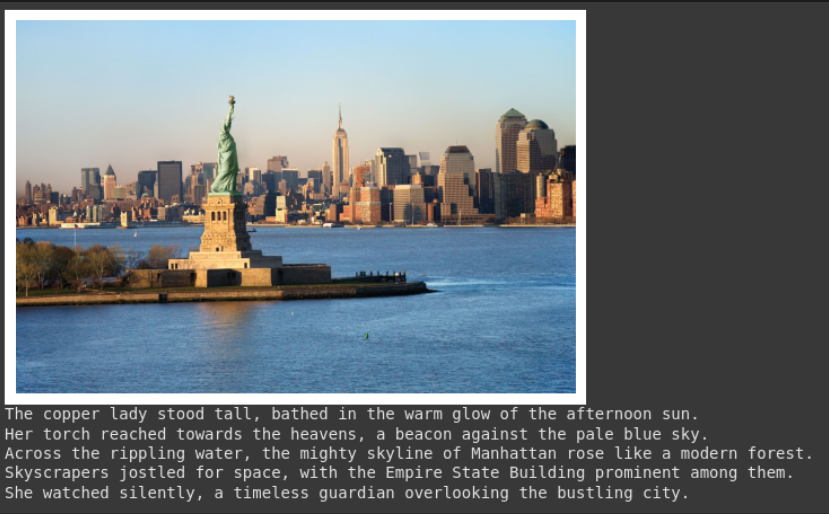
Explanation
- This prompt asks for a specific style of description (narrative, 4 lines, new lines).
- The provided image is shown in the output.
- The function returns the generated text. This is useful for creating alt text or summaries.
Task 4: Optical Character Recognition (OCR)
Gemini can read text within an image and tell you where it found the text.
# Define the text prompt

prompt = """

Extract the text from the image

"""

# Fixed, plotting function depends on this.

output_prompt = """

Return just box_2d which will be location of detected text areas + label"""

image, w, h = read_image("https://cdn.mos.cms.futurecdn.net/4sUeciYBZHaLoMa5KiYw7h-1200-80.jpg")  # Read image and extract width, height

results = inference(image, prompt + output_prompt)

# Clean the results and load results in list format

cln_results = json.loads(clean_results(results))

print()

annotator = Annotator(image)  # initialize Ultralytics annotator

for idx, item in enumerate(cln_results):

   # By default, gemini model return output with y coordinates first.

   # Scale normalized box coordinates (0–1000) to image dimensions

   y1, x1, y2, x2 = item["box_2d"]  # bbox post processing,

   y1 = y1 / 1000 * h

   x1 = x1 / 1000 * w

   y2 = y2 / 1000 * h

   x2 = x2 / 1000 * w

   if x1 > x2:

       x1, x2 = x2, x1  # Swap x-coordinates if needed

   if y1 > y2:

       y1, y2 = y2, y1  # Swap y-coordinates if needed

   annotator.box_label([x1, y1, x2, y2], label=item["label"], color=colors(idx, True))

Image.fromarray(annotator.result())  # display the output
Source Image: Link
Output
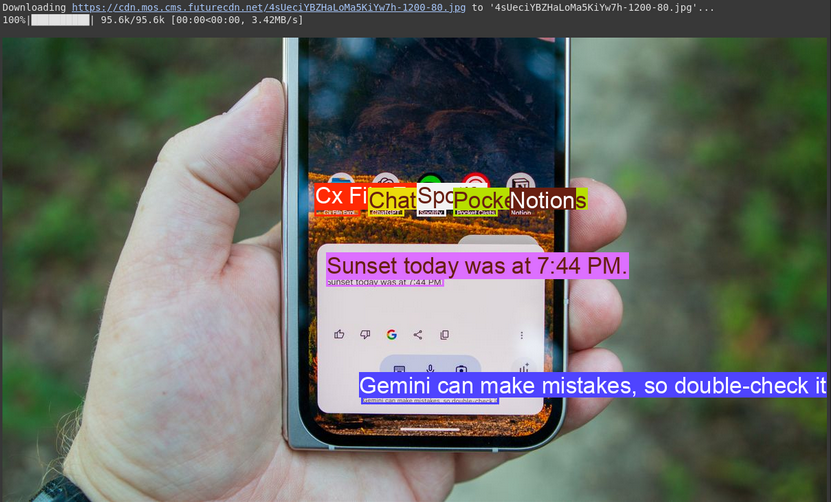
Explanation
- This uses a prompt similar to object detection but asks for text (label) instead of object names.
- The code extracts the text and its location, printing the text and drawing boxes on the image.
- This is useful for digitizing documents or reading text from signs or labels in photos.
Conclusion
Google Gemini for Computer Vision makes it easy to tackle tasks like object detection, image captioning, and OCR through simple API calls. By sending images along with clear text instructions, you can guide the model’s understanding and get usable, real-time results.
That said, while Gemini is great for general-purpose tasks or quick experiments, it’s not always the best fit for highly specialized use cases. Suppose you’re working with niche objects or need tighter control over accuracy. In that case, the traditional route still holds strong: collect your dataset, annotate it with tools like YOLO labelers, and train a custom model tuned for your needs.
Harsh Mishra is an AI/ML Engineer who spends more time talking to Large Language Models than actual humans. Passionate about GenAI, NLP, and making machines smarter (so they don’t replace him just yet). When not optimizing models, he’s probably optimizing his coffee intake. 🚀☕


