Introduction
The UNet is the first model that comes to mind these days whenever we want to use image segmentation in machine learning. In comparison to earlier state-of-the-art techniques, it has been revolutionary in terms of performance improvement. Extensive medical imaging, autonomous driving, and satellite imaging applications are all supported by the encoder-decoder convolutional neural network UNet.
We’ll be exploring UNet’s image segmentation process in depth. We will also use the UNet for the task of segmenting Xray images in order to improve our understanding. We’ll talk about the driving force behind UNet, an encoder decoder structure with skip connections that aims to address the difficulties of semantic segmentation.
Learning Objectives
1. What is segmentation? How to use UNet in segmentation tasks?
2. To understand the architecture of UNet.
3. To build the UNet model from scratch.
4. Implement an image segmentation task on a dataset.
This article was published as a part of the Data Science Blogathon.
Table of contents
Use-case of UNet: Segmentation Task
Image segmentation is the primary use case of the UNet architecture. specific object or region of interest is represented by each segment of an image when it is segmented into distinct regions or segments. UNet has been particularly successful in tasks such as biomedical image segmentation, where precise delineation of structures is crucial.
You must give each pixel in the image a class in order to know the shape of the object, or which pixel corresponds to which object, in this case. Segmentation is the process of doing this. A segmentation model returns a great deal more specific data about the image.
U-Net which was first coined for biomedical image segmentation uses deep-learning architecture for segmenting tasks.
How UNet Works?
In this next portion, we aim to give you an in-depth understanding of how the UNet architecture operates. We will explore each element comprising both encoder and decoder segments along with their respective tasks and interrelationships. Gaining a firm footing in these building blocks is critical for effectively implementing or personalizing your own version of UNet.
To create its comprehensive features, UNet employs both a “contracting” and an “expansive” pathway. The contracting pathway adheres to conventional convolutional network architecture, it iteratively applies two unpadded 3×3 convolutions followed by rectified linear unit (ReLU) activation and a downscaling operation using 2×2 max pooling with a stride of 2.
Every time this happens, a double amount of feature channels are generated.
Conversely, in every step within the expansive pathway, there’s an upscaling process done on existing features followed by 2×2 convolution (“up-convolution”) halving existing channels out by performing at once both crop-based concatenation and another round of two consecutive 3×3 convolutions, both also finished off with ReLU activation.

- Encoder captures the context i.e. What does the image contain?
- Decoder enables precise localization i.e. Where is the object?
- Skip connections add fine details to reconstruct the accurate shape of the segmentation map.
Delve Deeper into the Architecture
The UNet architecture consists of an encoder block, a decoder block, and a convolution block.
Convolution Block
In UNet, the encoder and decoder are both on convolutional layers. These layers convolve the input data with a set of learnable filters and perform convolution operations on it. By computing a dot product between the input patch and the filter weights, each filter extracts particular features from its input. Convolutional layers are used in a series, along with activation and batch normalization layers. Extracting features from the input data is the goal of the convolution block.
Encoder Block
The UNet architecture’s first component is the encoder. Multiple convolutional layers are connected by the pooling layers. The encoder’s goal is to extract high-level features while gradually reducing the spatial dimensions of the input image. The encoder’s convolutional layers utilize filters to identify and represent local patterns in the input image, as well as features at various abstraction levels.
Decoder Block
The second component of the UNet architecture is the decoder. It upsamples the low-resolution feature maps back to the original input image size from the encoder. The decoder combines the corresponding feature maps from the encoder with a series of upsampling layers and concatenation operations. The upsampling layers increase the spatial dimensions of the feature maps while preserving their channel-wise information. By combining high-resolution data from the encoder, the concatenated feature maps aid in recovering fine-grained details.
In order to reconstruct the original input data, the decoder block increases the spatial resolution of the feature maps and combines them with the features from corresponding encoder blocks.
What Happens without Skip Connection?
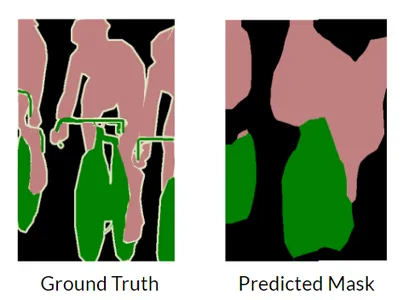
Without skip connections in UNet, the model would lack direct connections between the encoder and decoder layers. Skip connections play a crucial role in preserving fine- grained details and enabling the efficient flow of information across different levels of the network. The decoder struggles to produce fine-grained segmentation.
As seen in the above figure, the model tries to predict the segmentation masks but the fine-grained deep features are difficult to obtain and thus result in loss of information.
Building the UNet Model from Scratch
Load the Necessary Libraries
from tensorflow.keras.layers import Conv2D
from tensorflow.keras.layers import BatchNormalization, Activation, MaxPool2D
from tensorflow.keras.layers import  Conv2DTranspose, Concatenate, Input
from tensorflow.keras.models import Model
Building the Convolutional Block
The convolutional block It applies a 2D convolutional layer to the input tensor, followed by batch normalization and ReLU activation. Another convolutional layer, batch normalization, and ReLU activation are applied, and the output tensor is returned. This block helps capture patterns and structures in the data, enhancing the model’s ability to learn complex representations.
def conv_block(input, num_filters):
    x = Conv2D(num_filters, 3, padding="same")(input)
    x = BatchNormalization()(x)
    x = Activation("relu")(x)
    x = Conv2D(num_filters, 3, padding="same")(x)
    x = BatchNormalization()(x)
    x = Activation("relu")(x)
    return x
Building the Encoder Block
The encoder block in the UNet architecture performs downsampling and feature extraction. It applies convolutional operations to the input tensor, followed by max pooling to reduce spatial dimensions. The block produces the processed tensor and the downsampled tensor, which subsequent layers utilize for further processing and feature extraction.
def encoder_block(input, num_filters):
    x = conv_block(input, num_filters)
    p = MaxPool2D((2, 2))(x)
    return x, p
Building the Decoder Block
The decoder block in the UNet architecture performs upsampling and merges skip connections. It applies transposed convolution to upsample the input tensor by a factor of 2. The upsampled tensor is then concatenated with the skip connection tensor from the corresponding encoder block. The block further applies a convolutional block to refine the merged features. The output tensor from the decoder block is used in subsequent layers for further processing.
def decoder_block(input, skip_features, num_filters):
    x = Conv2DTranspose(num_filters, (2, 2), strides=2, padding="same")(input)
    x = Concatenate()([x, skip_features])
    x = conv_block(x, num_filters)
    return x
In binary segmentation tasks with one foreground class and one background class, the output consists of a single channel.
The sigmoid activation function is used to squash the output values between 0 and 1. This allows the network to represent the probability of each pixel belonging to the foreground class. Values closer to 0 indicate a higher probability of being the background class, while values closer to 1 indicate a higher probability of being the foreground class.
With a single channel and sigmoid activation, the network produces clear binary segmentation outputs, assigning each pixel a distinct label (0 or 1) based on its probability of belonging to the foreground class.
Building the UNET Model
The build_unet function constructs a UNet model for image segmentation. It applies encoder blocks to downsample and capture features, followed by a convolutional block for high-level representations. Decoder blocks are used to upsample and merge skip connections. The model generates an output tensor with sigmoid activation representing pixel probabilities for the foreground class.
def build_unet(input_shape):
    inputs = Input(input_shape)

    s1, p1 = encoder_block(inputs, 64)
    s2, p2 = encoder_block(p1, 128)
    s3, p3 = encoder_block(p2, 256)
    s4, p4 = encoder_block(p3, 512)

    b1 = conv_block(p4, 1024)

    d1 = decoder_block(b1, s4, 512)
    d2 = decoder_block(d1, s3, 256)
    d3 = decoder_block(d2, s2, 128)
    d4 = decoder_block(d3, s1, 64)

    outputs = Conv2D(1, 1, padding="same", activation="sigmoid")(d4)

    model = Model(inputs, outputs, name="U-Net")
    return model
input_shape = (512, 512, 3)
model = build_unet(input_shape) Now that we have built the UNet model from scratch, we will implement this model on an image segmentation task.
Image Segmentation on Chest Xray
In computer-aided diagnostic systems for identifying and analyzing various abnormalities and structures within the chest region, image segmentation on chest X-rays is an essential component. The chest X-ray images can be precisely segmented to spot specific regions like the lungs, heart, ribs, and potential anomalies like tumors and nodules, as well as pneumothorax, using cutting-edge deep learning techniques like U-Net.
Here we will be implementing UNet to perform image segmentation on the chest Xray dataset to segment the lungs part of the x-ray.
Import Necessary Libraries
import numpy as np
import pandas as pd
import cv2
from glob import glob
from sklearn.model_selection import train_test_split
import tensorflow as tf
from tensorflow.keras.callbacks import ModelCheckpoint, CSVLogger, ReduceLROnPlateau
from tensorflow.keras.optimizers import Adam
from tensorflow.keras.metrics import Recall, Precision
from tensorflow.keras.callbacks import ModelCheckpoint, CSVLogger, ReduceLROnPlateau
Loading and Splitting the Dataset
dataset_path = '/content/drive/MyDrive/Datasets/MontgomerySet/'

def load_data(dataset_path, split=0.1):
    images=sorted(glob(os.path.join(dataset_path, "CXR_png", "*.png")))
    mask1=sorted(glob(os.path.join(dataset_path,"ManualMask","leftMask","*.png")))
    mask2=sorted(glob(os.path.join(dataset_path,"ManualMask","rightMask","*.png")))
    split_size = int(len(images) * split)
    train_x,valid_x=train_test_split(images,test_size=split_size,random_state=42)
    train_y1,valid_y1=train_test_split(mask1,test_size=split_size,random_state=42)
    train_y2,valid_y2=train_test_split(mask2,test_size=split_size,random_state=42)

    train_x,test_x=train_test_split(train_x,test_size=split_size,random_state=42)
    train_y1,test_y1=train_test_split(train_y1,test_size=split_size,random_state=42)
    train_y2,test_y2=train_test_split(train_y2,test_size=split_size,random_state=42)

    return(train_x,train_y1,train_y2),(valid_x,valid_y1,valid_y2),
    (test_x,test_y1,test_y2)

(train_x,train_y1, train_y2),
(valid_x, valid_y1, valid_y2),
(test_x, test_y1, test_y2) = load_data(dataset_path)
Reading Images
- Reading every images in the dataset.
- Normalize the value to 0 to 1 by dividing with 255.
def read_image(dataset_path):
    x = cv2.imread(dataset_path, cv2.IMREAD_COLOR)
    x = cv2.resize(x, (W, H))
    x = x/255.0
    x = x.astype(np.float32)
    return x
Reading Masks
- Reading every masks in the dataset, both left and right and adding both the masks.
- Use the threshhold of 0.5 such that the value of mask becomes either 0 or 1.
def read_mask(path1, path2):
    x1 = cv2.imread(path1, cv2.IMREAD_GRAYSCALE)
    x2 = cv2.imread(path2, cv2.IMREAD_GRAYSCALE)
    x = x1 + x2
    x = cv2.resize(x, (W, H))
    x = x/np.max(x)
    x = x > 0.5
    x = x.astype(np.float32)
    x = np.expand_dims(x, axis=-1)
    return x
Fitting the Model
The optimizer used is the Adam optimizer, which helps improve the model’s performance by adjusting the learning rate based on parameter gradients.
The loss function is binary cross entropy which measures the dissimilarity between predicted probabilities and actual labels which is appropriate for binary classification problems.
The metrics used are:
- Dice coefficient measures the similarity of the predicted and ground truth segmentation masks
- IOU evaluates their overlap.
- Precision measures the model’s capacity to prevent false positives
- Recall determines how well it can identify positive instances.
These evaluation metrics give useful information about the model’s performance and allow for accurate and effective segmentation evaluation.
H = 512
W = 512
model = build_unet((H, W, 3))
metrics = [dice_coef, iou, Recall(), Precision()]
model.compile(loss=dice_loss, optimizer=Adam(lr), metrics=metrics)

model_path = os.path.join("files", "model.h5")

callbacks = [
        ModelCheckpoint(model_path, verbose=1, save_best_only=True),
        ReduceLROnPlateau(monitor='val_loss', factor=0.1, patience=5, min_lr=1e-7, verbose=1)

    ]
model_history = model.fit(train_dataset, epochs=num_epochs,
validation_data=valid_dataset,
callbacks=callbacks)Results
def display(display_list):
  plt.figure(figsize=(15, 15))

  title = ['Input Image', 'True Mask', 'Predicted Mask']

  for i in range(len(display_list)):
    plt.subplot(1, len(display_list), i+1)
    plt.title(title[i])
    plt.imshow(tf.keras.utils.array_to_img(display_list[i]))
    plt.axis('off')
  plt.show()


pred_mask = model.predict(x)[0] > 0.5
pred_mask = pred_mask.astype(np.int32)

pred_mask = np.concatenate([pred_mask, pred_mask, pred_mask], axis=-1)

for x, y1, y2 in tqdm(zip(test_x, test_y1, test_y2), total=len(test_x)):
  display([ori_x, ori_y, pred_mask])
Conclusion
In conclusion, this comprehensive guide delved into the UNet architecture, providing a clear understanding of its key components and implementation process by explaining the encoder, decoder, and skip connections that helped gain insights into how UNet achieves accurate image segmentation.
The article emphasized the significance of data preprocessing and augmentation techniques to improve model performance. Additionally, it highlighted the relevance of selecting appropriate loss functions and evaluation metrics for image segmentation tasks.
Equipped with this understanding, researchers and practitioners can harness the power of UNet to drive advancements in computer vision and unlock new possibilities in their respective fields.
The media shown in this article is not owned by Analytics Vidhya and is used at the Author’s discretion.
Frequently Asked Questions
Q1. What is U-Net used for?
A. U-Net is primarily used for semantic segmentation tasks in computer vision, particularly for segmenting images and identifying specific objects or regions of interest.
Q2. What is the advantage of U-Net?
A. The advantage of U-Net lies in its architecture, which incorporates a contracting path for capturing context and a symmetric expanding path for precise localization. This design enables accurate segmentation results even with limited training data.
Q3. Why U-Net is better for image segmentation?
A. U-Net is well-suited for image segmentation because of its ability to capture fine-grained details while maintaining contextual understanding. The skip connections between the contracting and expanding paths facilitate the flow of information, aiding in accurate boundary delineation and overcoming challenges in segmentation tasks.
Q4. How many layers are there in U-Net?
A. The original U-Net architecture typically consists of 23 convolutional layers. However, the number of layers can be modified based on the specific requirements of the task or variations in the U-Net architecture used.
Technology can impact lives at a level that has never been realized in mankind's history. The idea that something I create can impact someone worldwide now or in the future drives my passion for Technology.
A dedicated ML Engineer and Tech enthusiast, proficient in training ML models. My current interests are advancing machine learning techniques, particularly in natural language processing, LLMs, and multimodal AI.


