This article was published as a part of the Data Science Blogathon.
Introduction
If you are determined to make a CNN model that gives you an accuracy of more than 95 %, then this is perhaps the right blog for you. Let’s get right into it.
We’ll tackle this problem in 3 parts
- Transfer Learning
- Data Augmentation
- Handling Overfitting and Underfitting problem
Transfer Learning
Transfer learning is the improvement of learning in a new task through the transfer of knowledge from a related task that has already been learned.
In simpler words, the Idea of Transfer Learning is that, instead of training a new model from scratch, we use a model that has been pre-trained on image classification tasks.
Why use Transfer Learning?
Transfer learning is an optimization, a shortcut to saving time or getting better performance.
In general, it is not obvious that there will be a benefit to using transfer learning in the domain until after the model has been developed and evaluated. But in most cases, transfer learning would give you better results than a model trained from scratch
The major benefits of transfer learning are :
- Higher start: The
initial skill (before refining the model) on the source model is higher
than it otherwise would be. - Higher slope: The
rate of improvement of skill during the training of the source model is
steeper than it otherwise would be. - Higher asymptote: The converged skill of the trained model is better than it otherwise would be.
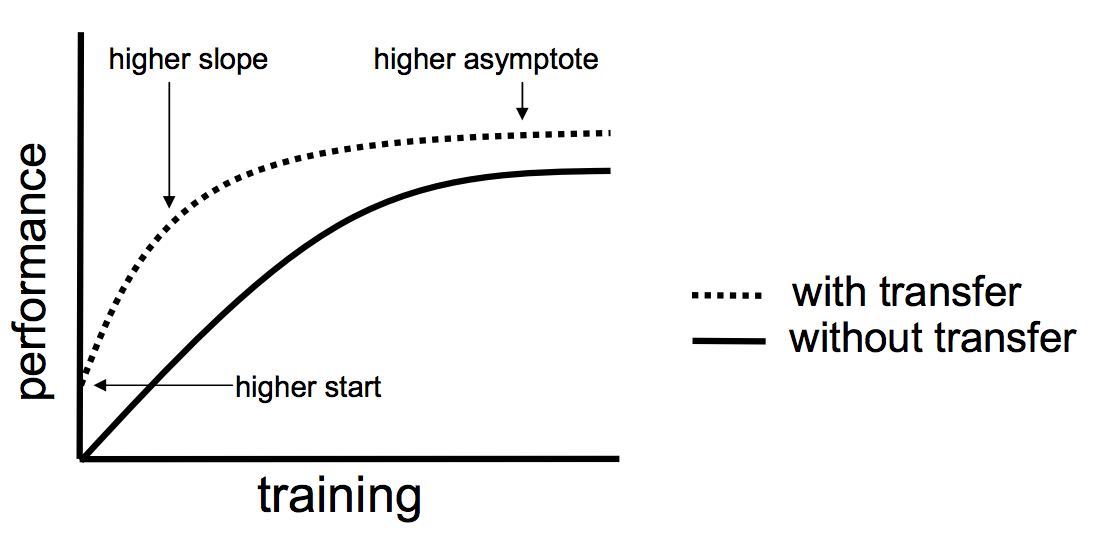
This graph summarized all the 3 points, you can see the training starts from a higher point when transfer learning is applied to the model reaches higher accuracy levels faster.
Transfer Learning in Tensorflow
In this tutorial, we’ll be discussing how to use transfer learning in Tensorflow models using the Tensorflow Hub. Tensorflow hub is a place of collection of a wide variety of pre-trained models like ResNet, MobileNet, VGG-16, etc. They also have different models for image classification, speech recognition, etc. In the transfer learning models available in tf hub the final output layer will be removed so that we can insert our output layer with our customized number of classes.
URL = "https://tfhub.dev/google/tf2-preview/mobilenet_v2/feature_vector/2"
feature_extractor = hub.KerasLayer(URL,
                                   input_shape=(IMG_SHAPE, IMG_SHAPE,3))
Here we have used the MobileNet Model, you can find different models on the TensorFlow Hub website. Each model has a specific input image size which will be mentioned on the website.
Here in our MobileNet model, the image size mentioned is 224×224, so when you use the transfer model make sure that you resize all your images to that specific size.
feature_extractor.trainable = False
Make sure that you include the above code after declaring your transfer learning model, this ensures that the model doesn’t re-train from scratch again
Now we can define our custom model :
no_of_output_classes=4
from tensorflow.keras import layers
model = tf.keras.Sequential([
  feature_extractor,
  layers.Dense(No_of_output_classes)   # make sure this number is the same number as output classes
])
model.summary()
Now we can run model.compile and model.fit like any normal model.
Data Augmentation
Having a large dataset is crucial for the performance of the deep learning model. However, we can improve the performance of the model by augmenting the data we already have. It also helps the model to generalize on different types of images. In data augmentation, we add different filters or slightly change the images we already have for example add a random zoom in, zoom out, rotate the image by a random angle, blur the image, etc.
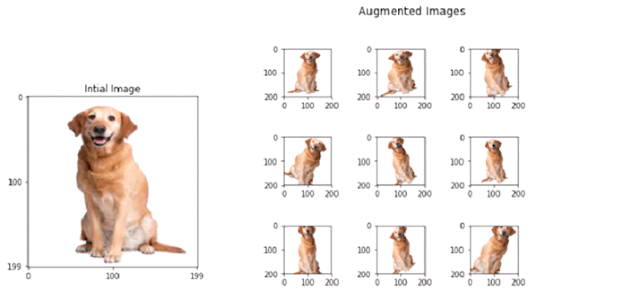
Data Augmentation (source: Wikipedia)
This shows the rotation data augmentation
Data Augmentation in Tensorflow
Data Augmentation can be easily applied if you are using ImageDataGenerator in Tensorflow
image_gen_train = ImageDataGenerator(     # here we use the ImageDataGenerator
      rescale=1./255,
      rotation_range=40,
      width_shift_range=0.2,                # Applaying these all Data Augmentations
      height_shift_range=0.2,
      shear_range=0.2,
      zoom_range=0.2,
      horizontal_flip=True,
      fill_mode='nearest')
These are examples of different data augmentation available, more are available in the TensorFlow documentation.
Then we can apply these augmentations to our images
train_data_gen = image_gen_train.flow_from_directory(batch_size=BATCH_SIZE,     # Batch siz emeans at a time it takes 100
                                                     directory=train_dir,    # Here we put shuffle= True so tat model doesnt memorise order
                                                     shuffle=True,
                                                     target_size=(IMG_SHAPE,IMG_SHAPE),
                                                     class_mode='binary')
Here train_dir is the directory path to where our training images are.
Handling Overfitting and Underfitting problem
What is overfitting?
Overfitting happens when a model learns the detail and noise in the training data to the extent that it negatively impacts the performance of the model on new data.
In another word an overfitted model performs well on the training set but poorly on the test set, this means that the model can’t seem to generalize when it comes to new data
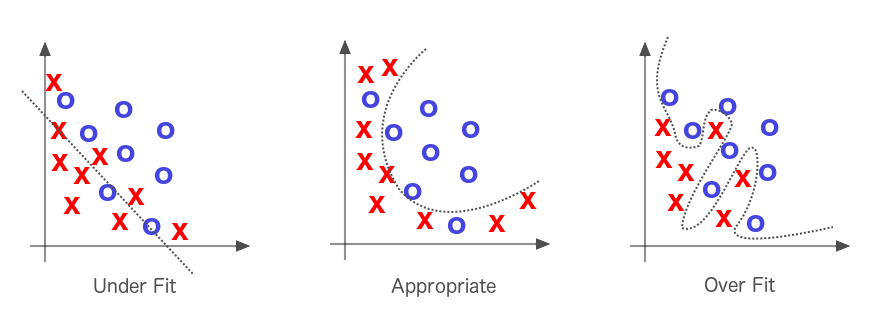
(source: kaggle)
As you can see in over-fitting it’s learning the training dataset too specifically, and this affects the model negatively when given a new dataset.
Under-fitting
Underfitting is the opposite scenario where the model does not learn enough from the training data that it does poorly on both training and test dataset. This usually happens when there is not enough data to train on.
Methods to overcome Over-fitting:
There a couple of ways to overcome over-fitting:
1) Use more training data
This is the simplest way to overcome over-fitting
2 ) Use Data Augmentation
Data Augmentation can help you overcome the problem of overfitting. Data augmentation is discussed in-depth above.
3) Knowing when to stop training
In other words, knowing the number of epochs you want to train your models has a significant role in deciding if the model over-fits or not
The exact number you want to train the model can be got by plotting loss or accuracy vs epochs graph for both training set and validation set.
As you can see after the early stopping state the validation-set loss increases, but the training set value keeps on decreasing. In an accurate model both training and validation, accuracy must be decreasing
So here whatever the epoch value that corresponds to the early stopping value is our exact epoch number
.png)
This is an example of a model that is not over-fitted or under-fitted.
Conclusion
By following these ways you can make a CNN model that has a validation set accuracy of more than 95 %. If you have any other suggestion or questions feel free to let me know 🙂
The complete code for this project is available on my GitHub.
The media shown in this article are not owned by Analytics Vidhya and is used at the Author’s discretion.


Where is the code that actually exists to support the 95% accuracy claim? The link sends me on a wild goose chase.