With Multimodal LLMs taking up the forefront of the Language Models race, it is important to learn how we can leverage the capabilities of these Multimodal models to tackle everyday problems. We are witnessing the transition from traditional text-based chatbots to voice based AI-powered chatbots. These voice chatbots have the capacity to act as our personal assistants, are available at a moment’s notice, and can tend to our needs immediately. In this blog, we’ll build an Emergency Operator using a voice-based chatbot.
Planning
Before we proceed with the technicalities, let’s get go over the blueprint for our voice operator. The idea is pretty straightforward:
- We speak to the chatbot
- It listens to understand, what we’ve said
- It responds with a voice note
Table of contents
Tools We’ll Use
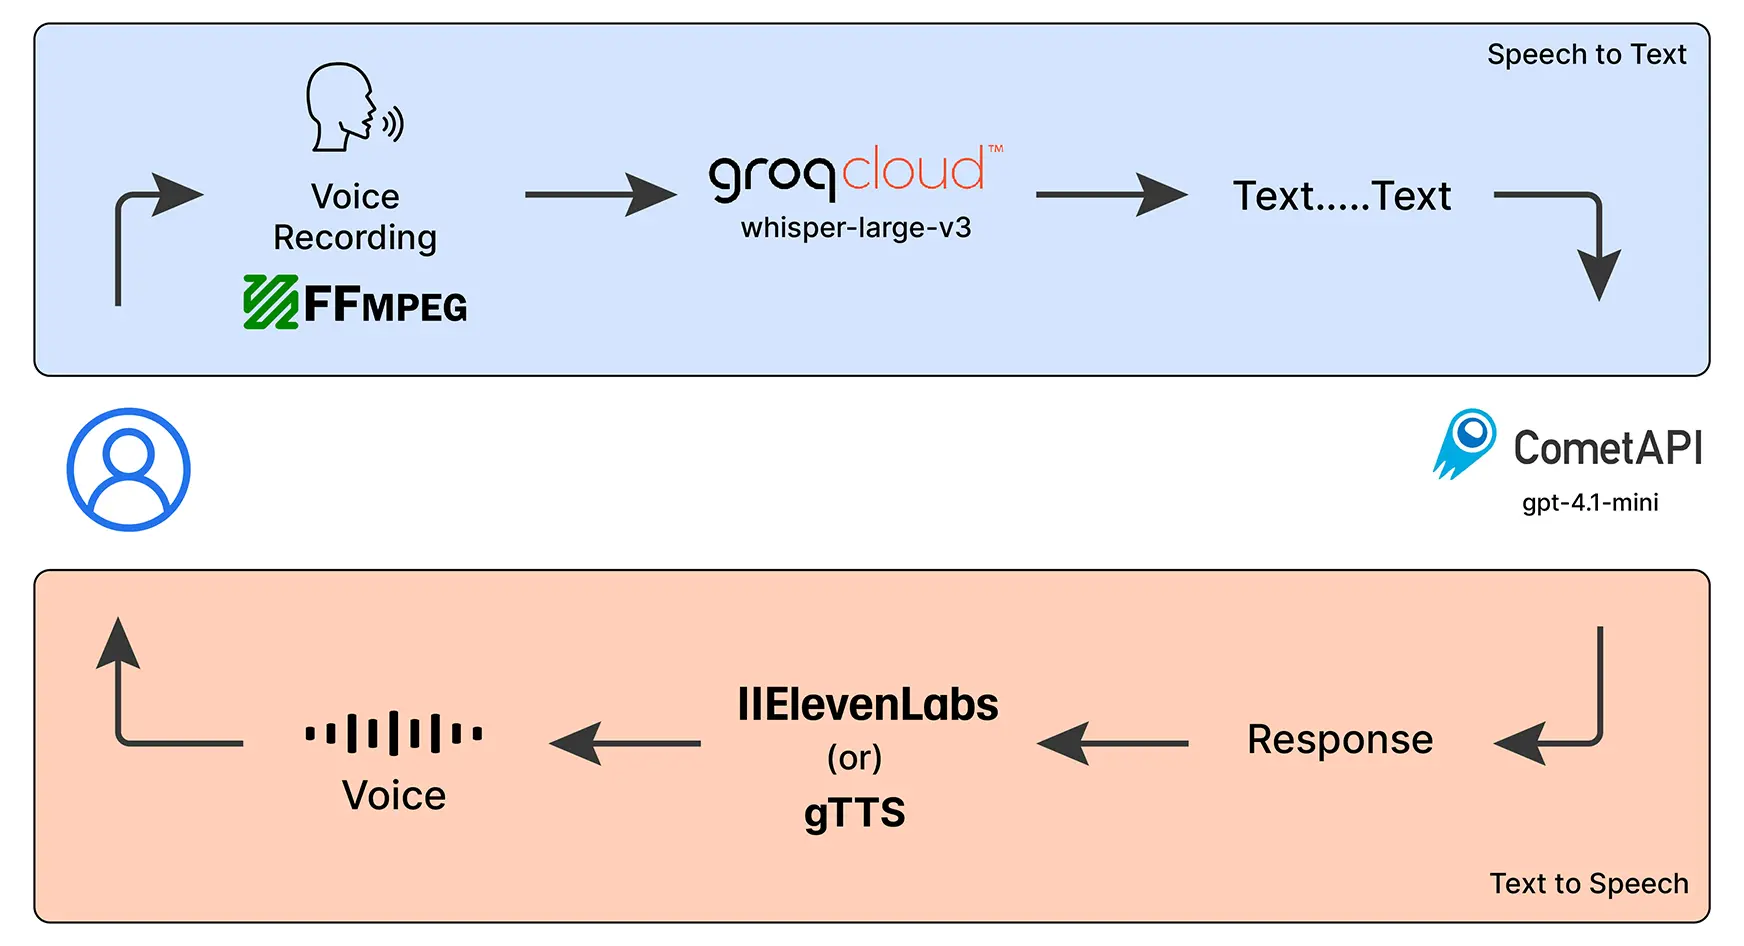
To implement our voice chatbot, we will be using the follow AI models:
- Whisper (Large) – OpenAI’s speech-to-text model, running via GroqCloud, to convert voice into text.
- GPT-4.1-mini – Powered by CometAPI (Free LLM Provider), this is the brain of our chatbot that will understand our queries and will generate meaningful responses.
- gTTS or IIElevenLabs – Converts the chatbot’s responses back into voice so it can talk to us.
- FFmpeg – A handy library that helps us record and manage audio easily.
Requirements
Before we start coding, we need to set up some things. We would be requiring 3 API keys for voice-to-text conversion, understanding queries and text-to-voice conversion, respectively. Here’s how to get the API keys:
- GroqCloud API Key: Get it from here: https://console.groq.com/keys
- CometAPI Key: Register and store your API key from: https://api.cometapi.com/
- ElevenLabs API Key: Register and store your API key from: https://elevenlabs.io/app/home
- FFmpeg Installation: If you don’t already have it, follow this guide to install FFmpeg on your system: https://itsfoss.com/ffmpeg/
Once you have these keys and have installed FFmpeg, you’re ready to dive into building your very own voice-enabled chatbot!
Project Structure
The Project Structure will be rather simple and most of our working will be happening in the app.py and utils.py Python scripts.
VOICE-CHATBOT/

├── venv/                  # Virtual environment for dependencies
├── .env                   # Environment variables (API keys, etc.)
├── app.py                 # Main application script
├── emergency.png          # Emergency-related image asset
├── README.md              # Project documentation (optional)
├── requirements.txt       # Python dependencies
├── utils.py               # Utility/helper functions
There are some necessary files to be modified to ensure that all our dependencies are satisfied:
In the env file, we store our API keys. This is how the content of our .env file would look like:
GROQ_API_KEY = "<your-groq-api-key"

COMET_API_KEY = "<your-comet-api-key>"

ELEVENLABS_API_KEY = "<your-elevenlabs-api–key>"
In the requirements.txt file we mention all the required python packages for our project. Following is the list of the Python packages:
ffmpeg-python

pydub

pyttsx3

langchain

langchain-community

langchain-core

langchain-groq

langchain_openai

python-dotenv

streamlit==1.37.0

audio-recorder-streamlit

dotenv

elevenlabs

gtts
Setting Up the Virtual Environment
We will also have to set up a virtual environment (a good practice). We will be doing this in terminal.
- Creation of our virtual environment
~/Desktop/Emergency-Voice-Chatbot$ conda create -p venv python==3.12 -y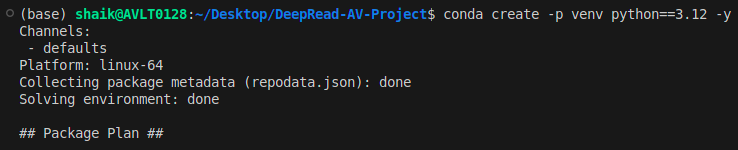
- Activating our Virtual Environment
~/Desktop/Emergency-Voice-Chatbot$ conda activate venv/
- After you finish running the application, you can deactivate the Virtual Environment too
~/Desktop/Emergency-Voice-Chatbot$ conda deactivate
Main Python Scripts
In the utils.py file we define the functions that will serve as utilities, which will be used in our streamlit application. The functions which have bee mentioned in the utils.py are imported into our streamlit application. Let’s first explore the utils.py script:
Step 1. Main Imports
Here are all the libraries required, along with their functionalities:
time, tempfile, os, re, BytesIO – Handle timing, temporary files, environment variables, regex, and in-memory data.
requests – Makes HTTP requests (e.g., calling APIs).
gTTS, elevenlabs, pydub – Convert text to speech, speech to text and play/manipulate audio.
groq, langchain_* – Use Groq/OpenAI LLMs with LangChain to process and generate text.
streamlit – Build interactive web apps.dotenv – Load environment variables (like API keys) from a .env file.
import time

import requests

import tempfile

import re

from io import BytesIO

from gtts import gTTS

from elevenlabs.client import ElevenLabs

from elevenlabs import play

from pydub import AudioSegment

from groq import Groq

from langchain_groq import ChatGroq

from langchain_openai import ChatOpenAI

from langchain_core.messages import AIMessage, HumanMessage

from langchain_core.output_parsers import StrOutputParser

from langchain_core.prompts import ChatPromptTemplate

import streamlit as st

import os

from dotenv import load_dotenv

load_dotenv()
Step 2. Load your API Keys and initialize your models
Here, we’re initializing the Groq client and OpenAI model for LLM responses:
# Initialize the Groq client

client = Groq(api_key=os.getenv('GROQ_API_KEY'))

# Initialize the ChatOpenAI model for LLM responses

llm = ChatOpenAI(

    model_name="gpt-4.1-mini",

    openai_api_key=os.getenv("COMET_API_KEY"),

    openai_api_base="https://api.cometapi.com/v1"

)

# Set the path to ffmpeg executable

AudioSegment.converter = "/bin/ffmpeg"
Step 3. Converting the Audio file (our voice recording) into .wav format
Here, we will be converting our audio into bytes, which is done by AudioSegment and BytesIO, and then converting it into a wav format:
def audio_bytes_to_wav(audio_bytes):
   try:
       with tempfile.NamedTemporaryFile(delete=False, suffix=".wav") as temp_wav:
           audio = AudioSegment.from_file(BytesIO(audio_bytes))
           # Downsample to reduce file size if needed
           audio = audio.set_frame_rate(16000).set_channels(1)
           audio.export(temp_wav.name, format="wav")
           return temp_wav.name
   except Exception as e:
       st.error(f"Error during WAV file conversion: {e}")
       return None
Step 4. Splitting Audio
We will make a function to split our audio as per our input parameter (check_length_ms). We will also make a function to get rid of any punctuation with the help of regex.
def split_audio(file_path, chunk_length_ms):
   audio = AudioSegment.from_wav(file_path)
   return [audio[i:i + chunk_length_ms] for i in range(0, len(audio), chunk_length_ms)]


def remove_punctuation(text):
   return re.sub(r'[^\w\s]', '', text)
Step 5. LLM Response Generation
Now, to do the main responder functionality, the LLM will generate an apt response to our queries. In the prompt template, we will provide the instructions to our LLM on how they should respond to the queries. We will be implementing Langchain Expression Language to do this task.
def get_llm_response(query, chat_history):
   try:
       template = template = """
                   You are an experienced Emergency Response Phone Operator trained to handle critical situations in India.
                   Your role is to guide users calmly and clearly during emergencies involving:


                   - Medical crises (injuries, heart attacks, etc.)
                   - Fire incidents
                   - Police/law enforcement assistance
                   - Suicide prevention or mental health crises


                   You must:


                   1. **Remain calm and assertive**, as if speaking on a phone call.
                   2. **Ask for and confirm key details** like location, condition of the person, number of people involved, etc.
                   3. **Provide immediate and practical steps** the user can take before help arrives.
                   4. **Share accurate, India-based emergency helpline numbers** (e.g., 112, 102, 108, 1091, 1098, 9152987821, etc.).
                   5. **Prioritize user safety**, and clearly instruct them what *not* to do as well.
                   6. If the situation involves **suicidal thoughts or mental distress**, respond with compassion and direct them to appropriate mental health helplines and safety actions.


                   If the user's query is not related to an emergency, respond with:
                   "I can only assist with urgent emergency-related issues. Please contact a general support line for non-emergency questions."


                   Use an authoritative, supportive tone, short and direct sentences, and tailor your guidance to **urban and rural Indian contexts**.


                   **Chat History:** {chat_history}


                   **User:** {user_query}
                   """


       prompt = ChatPromptTemplate.from_template(template)
       chain = prompt | llm | StrOutputParser()


       response_gen = chain.stream({
           "chat_history": chat_history,
           "user_query": query
       })


       response_text = ''.join(list(response_gen))
       response_text = remove_punctuation(response_text)


       # Remove repeated text
       response_lines = response_text.split('\n')
       unique_lines = list(dict.fromkeys(response_lines))  # Removing duplicates
       cleaned_response = '\n'.join(unique_lines)
       return cleaned_responseChatbot
   except Exception as e:
       st.error(f"Error during LLM response generation: {e}")
       return "Error"
Step 6. Text to Speech
We will build a function to convert our text-to-speech with the help of ElevenLabs TTS Client which will return us the audio in the AudioSegment format. We can also use other TTS models like Nari Lab’s Dia or Google’s gTTS too. Eleven Labs provides us some free credits at start and then we have to pay for more credits, gTTS on the other side is absolutely free to use.
def text_to_speech(text: str, retries: int = 3, delay: int = 5):
   attempt = 0
   while attempt < retries:
       try:
           # Request speech synthesis (streaming generator)
           response_stream = tts_client.text_to_speech.convert(
               text=text,
               voice_id="JBFqnCBsd6RMkjVDRZzb",
               model_id="eleven_multilingual_v2",
               output_format="mp3_44100_128",
           )
           # Write streamed bytes to a temporary file
           with tempfile.NamedTemporaryFile(delete=False, suffix='.mp3') as f:
               for chunk in response_stream:
                   f.write(chunk)
               temp_path = f.name
           # Load and return the audio
           audio = AudioSegment.from_mp3(temp_path)
           return audio
           else:
               st.error(f"Failed to connect after {retries} attempts. Please check your internet connection.")
               return AudioSegment.silent(duration=1000)
       except Exception as e:
           st.error(f"Error during text-to-speech conversion: {e}")
           return AudioSegment.silent(duration=1000)
   return AudioSegment.silent(duration=1000)
Step 7. Create Introductory Message
We will also create an introductory text and pass it to our TTS model since a respondent would normally introduce themselves and seek what assistance the user might need. Here we will be returning the path of the mp3 file.
lang=” en” -> English
tld= ”co.in” -> can produce different localized ‘accents’ for a given language. The default is “com”
def create_welcome_message():
   welcome_text = (
       "Hello, you’ve reached the Emergency Help Desk. "
       "Please let me know if it's a medical, fire, police, or mental health emergency—"
       "I'm here to guide you right away."
   )
   try:
       # Request speech synthesis (streaming generator)
       response_stream = tts_client.text_to_speech.convert(
           text=welcome_text,
           voice_id="JBFqnCBsd6RMkjVDRZzb",
           model_id="eleven_multilingual_v2",
           output_format="mp3_44100_128",
       )
       # Save streamed bytes to temp file
       with tempfile.NamedTemporaryFile(delete=False, suffix='.mp3') as f:
           for chunk in response_stream:
               f.write(chunk)
           return f.name
   except requests.ConnectionError:
       st.error("Failed to generate welcome message due to connection error.")
   except Exception as e:
       st.error(f"Error creating welcome message: {e}")
   return None
Streamlit App
Now, let’s jump into the app.py script, where we will be using Streamlit to visualize our voicebot.
Import Libraries and Functions
Importing the libraries and the functions we had built in our utils.py file and importing relevant libraries.
import tempfile

import re

from io import BytesIO

from pydub import AudioSegment

from langchain_core.messages import AIMessage, HumanMessage

from langchain_core.output_parsers import StrOutputParser

from langchain_core.prompts import ChatPromptTemplate

import streamlit as st

from audio_recorder_streamlit import audio_recorder

from utils import *
Streamlit Setup
Now, we will set our title name and a nice “Emergency” visual photo.
st.title(":blue[Emergency Help Bot] 🚨🚑🆘")
st.sidebar.image('./emergency.jpg', use_column_width=True)
Then, we will set our Session States to keep track of our chats and audio.
if "chat_history" not in st.session_state:
   st.session_state.chat_history = []
if "chat_histories" not in st.session_state:
   st.session_state.chat_histories = []
if "played_audios" not in st.session_state:
   st.session_state.played_audios = {}
Invoking our utils functions
We will create our welcome message from the respondent’s side. This will be the start of our conversation.
if len(st.session_state.chat_history) == 0:
   welcome_audio_path = create_welcome_message()
   st.session_state.chat_history = [
       AIMessage(content="Hello, you’ve reached the Emergency Help Desk. Please let me know if it's a medical, fire, police, or mental health emergency—I'm here to guide you right away.", audio_file=welcome_audio_path)
   ]
   st.session_state.played_audios[welcome_audio_path] = False
Sidebar Setup
Now, in the sidebar, we will be setting up our voice recorder and the speech-to-text, llm_response and the text-to-speech logi,c which is the main part of this project
with st.sidebar:
   audio_bytes = audio_recorder(
       energy_threshold=0.01,
       pause_threshold=0.8,
       text="Speak on clicking the ICON (Max 5 min) \n",
       recording_color="#e9b61d",   # yellow
       neutral_color="#2abf37",    # green
       icon_name="microphone",
       icon_size="2x"
   )
   if audio_bytes:
       temp_audio_path = audio_bytes_to_wav(audio_bytes)
       if temp_audio_path:
           try:
               user_input = speech_to_text(audio_bytes)
               if user_input:
                   st.session_state.chat_history.append(HumanMessage(content=user_input, audio_file=temp_audio_path))
                   response = get_llm_response(user_input, st.session_state.chat_history)
                   audio_response = text_to_speech(response)
We will also setup a button on the sidebar which will allow us to restart our session.
if st.button("Start New Chat"):
       st.session_state.chat_histories.append(st.session_state.chat_history)
       welcome_audio_path = create_welcome_message()
       st.session_state.chat_history = [
           AIMessage(content="Hello, you’ve reached the Emergency Help Desk. Please let me know if it's a medical, fire, police, or mental health emergency—I'm here to guide you right away.", audio_file=welcome_audio_path)
       ]
And in the main page of our app, we will be visualizing our chat history in the form of a Click to Play audio file.
for msg in st.session_state.chat_history:
   if isinstance(msg, AIMessage):
       with st.chat_message("AI"):
           st.audio(msg.audio_file, format="audio/mp3")
   else:  # HumanMessage
       with st.chat_message("user"):
           st.audio(msg.audio_file, format="audio/wav")
Now, we are done with all of the Python scripts needed to run our app. Finally, we will run the Streamlit App using the following command:
streamlit run app.py This is what our Project Workflow looks like:
[User speaks] → audio_recorder → audio_bytes_to_wav → speech_to_text → get_llm_response → text_to_speech → st.audio
For the full code, visit this GitHub repository.
Final Output
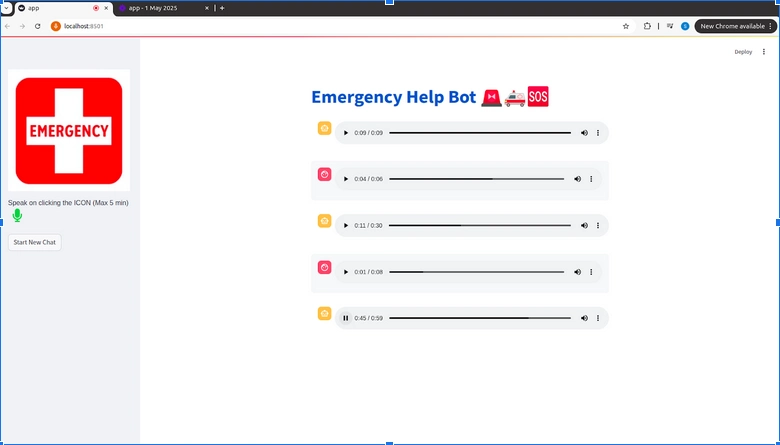
The Streamlit App looks pretty clean and is functioning appropriately!
Let’s see some of its responses:-
- User: Hi, someone is having a heart attack right now, what should I do?
We had a conversation on the location and state of the person and then the voicebot provided this
- User: Hello, there has been a huge fire breakout in Delhi. Please send help quick
Respondent enquires about the situation and then proceeds to provide preventive measures accordingly
- User: Hey there, there is a person standing alone across the edge of the bridge, how should i proceed?
The Respondent enquires about the location where I am and the mental state of the person I’ve mentioned
Overall, our voicebot is able to respond to our queries in accordance with the situation and asks the relevant questions to provide preventive measures.
Read More: How to build a chatbot in Python?
What Improvements Can Be Made?
- Multilingual Support: Can integrate LLMs with strong multilingual capabilities which can allow the chatbot to interact seamlessly with users from different regions and dialects.
- Real-Time Transcription and Translation: Adding speech-to-text and real-time translation can help bridge communication gaps.
- Location-Based Services: By integrating GPS or other real-time location-based APIs, the system can detect a user’s location and guide the nearest emergency facilities.
- Speech-to-Speech Interaction: We can also use speech-to-speech models which can make conversations feel more natural since they are built for such functionalities.
- Fine-tuning the LLM: Custom fine-tuning of the LLM based on emergency-specific data can improve its understanding and provide more accurate responses.
To learn more about AI-powered voice agents, follow these resources:
- Building Customer Support Voice Agent
- Paper to voice assistant
- Multilingual Voice Agent
- Top 10 Open Source Python Libraries for Building Voice Agents
Conclusion
In this article, we built a voice-based emergency response chatbot using a combination of AI models and some relevant tools. This voicebot replicates the role of a trained emergency operator which is capable of handling high-stress situations from medical crises to mental health support using a calm, assertive tone. The behavior of our LLM can be altered to suit the diverse real-world emergencies, making the experience more realistic for both urban and rural emergency scenarios.
Podcast: Play in new window | Download
Data Scientist @ Analytics Vidhya | CSE AI and ML @ VIT Chennai
Passionate about AI and machine learning, I'm eager to dive into roles as an AI/ML Engineer or Data Scientist where I can make a real impact. With a knack for quick learning and a love for teamwork, I'm excited to bring innovative solutions and cutting-edge advancements to the table. My curiosity drives me to explore AI across various fields and take the initiative to delve into data engineering, ensuring I stay ahead and deliver impactful projects.