The pace at which apps are being built today demands speed, collaboration, and flexibility in software development. GitHub Codespaces enables this by solving an age-old problem of setting up your environment. Instead of spending hours searching for tools and dependencies, you can directly launch a full dev setup in the cloud in just a few clicks. Since it works right with GitHub repositories, Codespaces makes it easier to get started and get going. It also supports remote work and maintains consistency across different setups, making it a powerful tool for individuals, teams, and open-source contributors. In this article, we will learn all about GitHub Code spaces, including its features, applications, pricing, and how to use it for free.
Table of Contents
What are GitHub Codespaces?
GitHub Codespaces is a cloud-based development environment that runs inside Docker containers on virtual machines. This allows you to write code directly on your browser or through Visual Studio Code, without the need to install anything locally. Each codespace runs on a Linux environment and can be set up using configuration files defined in your repository. This practice is known as Configuration-as-Code.

On GitHub Code spaces, you can start a codespace from a template or any branch of a repository, making it easy to keep work organised and consistent. It lets you customise tools and runtimes using dev containers, and set personal preferences using Dotfiles. Setting Sync can further make the experience just like your local VS Code. Moreover, it makes your dev setup easy and repeatable, helping you start coding fast and from anywhere.
Also Read: Introduction for Git and Github for Beginners
Features of GitHub Codespaces
Here are some of the key features offered by GitHub Codespaces:

- Preconfigured Development Environments: GitHub Codespaces provides a ready-to-use, consistent development environment customised to each repository. It eliminates setup issues and ensures uniformity across contributors without affecting local machines.
- Access the Resources You Need: It lets you work on cloud-based machines with sufficient resources, taking the computational load off of your local machine. This enables you to handle large, resource-heavy projects without hardware limitations.
- Work Anywhere: With GitHub Codespaces, you are not limited to just one device. Since it works on a web browser, you can access your codespace from any device, anywhere.
- Choose Your Editor: This platform supports multiple editors, giving you the option to choose what works for you. You can use VS Code web client, JupyterLab, or connect via the desktop version of Visual Studio Code.
- Work on Multiple Projects: You can create and manage multiple codespaces for different projects, or even for different branches of the same project. This helps in keeping the work isolated and organised, reducing the risk of unintended changes that can affect other work.
- Pair Program with a Teammate: With Visual Studio Code’s Live Share extension, you can collaborate in real-time with team members inside a codespace. And this feature is ideal for pair programming, debugging sessions, and mentoring.
- Publish Your Web App from a Codespace: Codespaces let you forward the ports and share URLS. This means that you can create a demo application directly from the cloud, and your teammates can access and test the changes before finalising them in a pull request.
Understanding the Codespace Lifecycle
Understanding the lifecycle of Codespaces on GitHub is essential to be able to manage your work from creation to deletion. The lifecycle starts when you create a codespace and ends when you delete it. During its lifetime, you can disconnect or reconnect anytime without losing your running processes. To make it clearer, stopping and restarting a codespace won’t remove your saved changes.
1. Creating a Codespace
On GitHub, you can choose to start a fresh codespace or open an existing one. Some developers prefer creating a new one for every session, while others keep a long-running codespace for continuous work. The platform also gives you the option to create a codespace from a template.
However, there are limits to how many codespaces you can create or run at once. If you hit the limit, you’ll need to delete or stop an existing one to make space to start a new codespace. If you’re using new codespaces often, I advise you to push your commits to GitHub frequently, to ensure there’s always room for new codespaces. And for long-running ones, always pull the latest code before you begin working.
2. Saving Changes in a Codespace
The web-based version of GitHub Code spaces has auto-save on by default, so saving your changes is never a problem. But if you’re using it on VS Code on your desktop, you’ll need to manually enable auto-save. All the work is saved on a cloud VM, which lets you stop at any point and return to it later. The platform even prompts you to save any unsaved changes before exiting. But if you delete the codespace, all the work done in it is lost unless committed and pushed.
Inactive codespaces timeout after 30 minutes by default. You can change this setting from the settings panel. But there’s nothing to worry about a timeout, since the data saved until then remains intact.
3. Rebuilding a Codespace
If you update your dev container configuration, you can rebuild the codespace. By default, GitHub uses cached images to rebuild the codespace. However, if you want to start from a clean environment, you can choose to do a full rebuild instead. Keep in mind that only files inside the /workspace folder are saved; everything else will be reset during the rebuild. You can also choose to do a full rebuild to start fresh.
4. Stopping a Codespace
You can stop a codespace at any time. When you stop it, all processes stop, but your saved work stays. Terminal history also stays. Just closing the browser tab doesn’t stop it. It still runs in the cloud, and you’ll be charged while it’s running. And to stop the codespace, you can follow the steps below:
- Go to Your Codespaces.
- Click on the three dots on the right end.
- Choose “Stop codespace”.

5. Deleting a Codespace
After pushing your changes, you can safely delete the codespace. Deleting a codespace is pretty simple once you’re done working; just make sure you pushed your changes on GitHub first so you don’t lose anything. If there are any uncommitted changes, GitHub will ask you to either push or export them before deleting. Also, stopped codespaces get deleted automatically after 30 days by default. But just keep in mind, even after deletion, a codespace might still count toward billing until the cycle ends.
6. Losing Connection While Using GitHub Codespaces
GitHub Codespaces needs an internet connection to run. So, if you lose access to the internet, you cannot use the codespace. But luckily, the unsaved changes would still be there. So, once you’re reconnected, you can resume from the same state. If you have an unsteady connection or plan to work offline often, I advise you to use a local container with the Dev Containers extension and your devcontainer.json.
Getting Started with GitHub Codespaces
Now let’s see how we can work with GitHub Codespaces. Instead of starting from scratch, let’s just create a codespace from a template repository. In this walkthrough, we’ll be using the browser-based version of VS Code, which is the default editor for Codespaces. If you want, you can switch later to another editor and change the default settings if needed.
Step 1: Create a Codespace
So in this step we will create a new codespace using ready-made GitHub template. This will help us quickly start or create a development environment without setting up anything on the local machine.
- Start by opening the github/haikus-for-codespaces template repository.
- Click on “Use this template.”
- After that, select “Open in a codespace” as shown in the image below.

This clones the template into your new codespace automatically.
Step 2: Run the Application
In this step, we’ll run the application to see how it works. This lets us test the changes live right from within the platform.
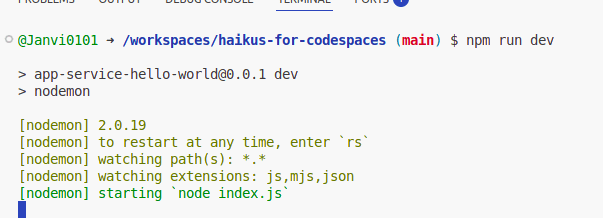
From the image below, you can see that the terminal is ready. Now let’s run the application.

- The next step is to enter the command npm run dev. This runs the Node.js app using the dev script from package.json.
- A pop-up will appear when the app is running. Click on “Open in Browser” to view it.

- When you open it in a browser, this is what you will see.

Step 3: Edit and Preview Changes
In this step, we will edit the content of the project and see the changes live. This will help us understand how real-time updates work inside a codespace.
- Go to Explorer and open the haikus.json file.


- Now change the text of the first or all the haiku and refresh your browser tab to view the update.

- If your tab was closed by mistake, go to the Ports tab in VS Code and click the browser icon, which is next to the forwarded port.

Step 4: Committing and Pushing the Changes
Now that we have made a few changes, we can push them onto GitHub. For this:
- From the activity bar, click on the “Source Control” view.

- Stage the changed file by clicking on the +, entering a commit message, and then clicking on “Commit”.

- Now, click on “Publish Branch”.

- Sign in to your GitHub account and give your new repository a name. Then, choose to publish it as public or private. You can also use “Open on GitHub” to view the changes in the new repository.

GitHub Codespaces Pricing
Now that we’ve learned how to use GitHub Codespaces, let’s find out how much it would cost us to use it. GitHub provides a flexible pricing model based on storage and compute time, as shown below:
| Plan | Included Usage |
Additional Cost |
|
Free for Individuals | 60 hours/month(for basic Linux compute) | $0.18 per additional hour |
| GitHub Team/Enterprise | Varies by plan |
Pay as you go or paid hours |
As mentioned in the table, GitHub Codespaces is free for individual users with 60 hours of standard compute time per month and up to 15 GB of storage, which makes it a great choice for hobby projects, learning, or testing workflows without any upfront cost. And even beyond the free tier, GitHub offers usage-based pricing, which ensures that you only pay for what you use.
When Should You Use GitHub Codespaces?
Github Codespaces is ideal for many tasks, such as:
- Contributing to open source: GitHub Codespaces lets you start coding instantly in a cloud-based IDE, removing the barrier of setting up local environments. This makes it easier for new contributors to get involved in open-source projects quickly and confidently.
- Learning and teaching: Instructors can share pre-configured environments with students or workshop participants, ensuring everyone starts on the same page. This promotes inclusive learning and lowers the technical barrier for those entering the open-source ecosystem.
- Corporate projects: Codespaces ensures secure, consistent development environments across teams, especially useful in regulated or distributed settings. Open-source tools within corporate workflows benefit from these standards, enhancing collaboration and reducing friction.
- Trying new projects: You can explore and experiment with open-source repositories without spending time configuring dependencies locally. This encourages curiosity and lowers the commitment needed to engage with new technologies or tools.
GitHub.dev vs. GitHub Codespaces
If you have used GitHub before, you might have seen GitHub.dev and thought about how it is different from GitHub Codespaces. Although they may seem similar, they serve very different purposes.
- GitHub.dev is a lightweight code editor that runs entirely on your browser and is quick and simple. It is best suited for small code edits, as you cannot run or test code on it.
- On the other hand, GitHub Codespaces gives you a full dev environment. You can code, run, and debug within the same platform, without the need to set up anything locally.
Work in GitHub.dev is not saved unless you commit; once you close it, your unsaved work is gone. But in Codespaces, your progress stays saved even after you close it. Also, Codespaces works with full IDEs like VS Code or JetBrains, and lets you sync settings between local and cloud. This is a much better option for big projects and teamwork.
Now let’s compare the two based on various features:
| Feature | GitHub.dev |
GitHub Codespaces |
| Use case | Quick edits | Full development |
| Setup | No setup needed | Ready-made container with tools |
| IDE Support | Basic editor | Supports VS Code, JetBrains, Jupyterlab |
| Custom Options | Very limited | Highly flexible |
| Resources | No resource use | You manage the compute and storage |
| Deployment | Not for deployment | Supports full deployment |
| Access | Works for all repos | Needs a paid plan and more resources |
Conclusion
GitHub Codespaces is a game-changer in the way developers approach coding. By eliminating setup difficulties and offering a powerful, cloud-based development environment, it streamlines workflows and boosts productivity. Whether you are working alone, collaborating in a team, or just getting started as a student, Codespaces ensures a fast, consistent, and flexible experience. With features like in-browser development, full IDE support, and seamless integration with GitHub repositories, it empowers developers to focus more on building and less on configuration. Simply put, this platform redefines modern development for the better.
Hi, I am Janvi, a passionate data science enthusiast currently working at Analytics Vidhya. My journey into the world of data began with a deep curiosity about how we can extract meaningful insights from complex datasets.


