Basics of Image Processing in Python
Writing today’s article was a fascinating experience for me and would also be for the readers of this blog. What’s so different? Two things: firstly the article is about something I always wanted to do since I was a 5-year old; secondly this topic / tools / algorithm are new to me as well. I am no way a master of image processing, but the utility of this field simply blew my mind.
Imagine, if you can create an application of auto-tagging a photograph as that of Facebook, or create your own face recognition password to your laptop. In this article, I will pick up a very simple but interesting application of Image processing. We will use Python to do the image processing. In next few articles, I will take over more complex examples of Image Processing. Here is the problem I will be working on in this article:
Problem Statement
Guess what is this image?
You are right, it’s a typical picture of an open sky. I took this picture last to last night in Bangalore from my terrace. At that point of time, I had no clue that this can be such an exciting and rewarding exercise. As a kid, I used to spend hours counting these stars but almost always failed to go beyond 50-60. I wanted to complete this exercise using some help from my machine. I had no clue that this was even possible till last Sunday, and today I have completed this long pending task using Python.
Let’s get started
Step 1: Import the required library
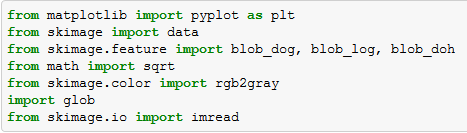
Skimage package enables us to do image processing using Python. The language is extremely simple to understand but does some of the most complicated tasks. Here are a few library you need to import to get started,
Step 2 : Import the image
Once we have all the libraries in place, we need to import our image file to python. Following is the code you can use to import the image file. Note that the image is imported in grey scale, which basically means that each pixel is a shade of grey. And each pixel essentially becomes one cell in a matrix. In this case the image is matrix of 480*581 cells (or image of 480*581 pixels).
Python Code:
Step 3 : Find the number of Stars
Now comes the critical part where our major labor is done by a few commands. These few command go out for searching continuous objects in the picture. Blobs_log gives three outputs for each object found. First two are the coordinates and the third one is the area of the object. The radius of each blob/object can be estimated using this column (area of the object).
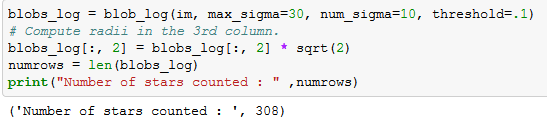
As we can see that the algorithm has estimated 308 visible stars. Let’s now look at how accurate are these readings.
Step 4 : Validated whether we captured all the stars
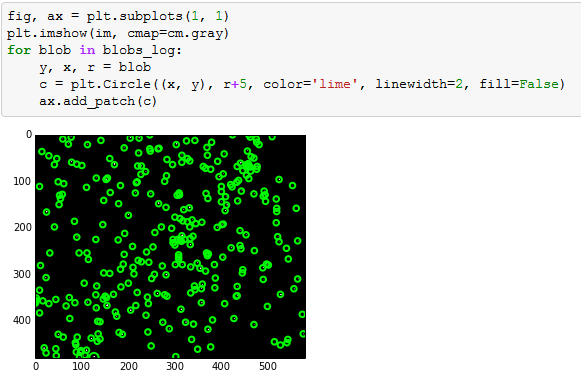
The number 308 is still coming out of a black box. Let’s look at whether we have spotted all the stars correctly. For this I am circling each estimated star position. And the look at the image if we are missing any star.
Here is the complete code :
[stextbox id=”grey”]from matplotlib import pyplot as plt from skimage import data from skimage.feature import blob_dog, blob_log, blob_doh from math import sqrt from skimage.color import rgb2gray import glob from skimage.io import imread
example_file = glob.glob(r"C:UsersTavishDesktopwint_sky.gif")[0]
im = imread(example_file, as_grey=True)
plt.imshow(im, cmap=cm.gray)
plt.show()
blobs_log = blob_log(im, max_sigma=30, num_sigma=10, threshold=.1)
# Compute radii in the 3rd column.
blobs_log[:, 2] = blobs_log[:, 2] * sqrt(2)
numrows = len(blobs_log)
print("Number of stars counted : " ,numrows)
fig, ax = plt.subplots(1, 1)
plt.imshow(im, cmap=cm.gray)
for blob in blobs_log:
    y, x, r = blob
    c = plt.Circle((x, y), r+5, color='lime', linewidth=2, fill=False)
    ax.add_patch(c)

[/stextbox]
End Notes
Image Processing is fascinating! I started my journey with Python Image Processing not more than 5 days. For the benefit of the community, I will encourage any suggestions or best practices to be shared on this forum. This exercise might not have any practical application but similar analysis can be done for purity estimations. For instance, in glass industry we need the number of silica particles in the glass at a microscopic level. By capturing the frames in a video, you can use this simple code to do a lot of things. For example, estimation of traffic through CCTV footage. This code can easily be tailored to achieve the same.
Did you find the article useful? If you have done similar pieces of work on Python Image processing, please share them with us. Do let us know your thoughts about this article in the box below.
If you like what you just read & want to continue your analytics learning, subscribe to our emails, follow us on twitter or like our facebook page.
Tavish Srivastava, co-founder and Chief Strategy Officer of Analytics Vidhya, is an IIT Madras graduate and a passionate data-science professional with 8+ years of diverse experience in markets including the US, India and Singapore, domains including Digital Acquisitions, Customer Servicing and Customer Management, and industry including Retail Banking, Credit Cards and Insurance. He is fascinated by the idea of artificial intelligence inspired by human intelligence and enjoys every discussion, theory or even movie related to this idea.


Hi Tavish, Very nice and creative article. THanks Rajesh
Thanks a lot for sharing. I am also a beginner in the image processing world, good article to start the journey !!
Nice article, Tavish. When you say that "this exercise might not have any practical application", it would depend upon your definition of practical. ;-) Even while reading the article, I thought up of a possible use: the estimation of night sky darkness from a specific place. With artificial lights encroaching into a lot of places, I strongly feel that it is important that we make sure that the treasures of the night sky are 'directly' available to us. While this method may not be perfect owing to the differences in the mechanics of human and camera vision, I think it at least could be a good complement to standard methods. And in more general terms, these days machine learning and large-scale computational statistical analyses are widely prevalent in astronomy (a good example of "Big Science"). For more information see, e.g. here and here.
Anon, Glad you liked the article. And thanks a lot for sharing these applications. Tavish
I am getting 'cm' is not defined at 'cmap=cm.gray'. Using Anaconda Python 2.7 Nice simple tutorial into CV! Thank you... Richard
Richard, Kyle has good approach to counter this issue. Have a look in trailing comments. If possible, please post the query on our forum as well so that the answer becomes public. Tavish
Great tutorial! I really like the straightforward example and clear code. The Python community could use a lot more blogs like this.
Nice article and simple to understand...You made it very easy:)..
Thanks for the info and tutorial! Really nice way to count stars! I noticed that cm.gray didn't work for me either (using py2.7, though not anaconda, on a mac). So I did the following: cm_gray = plt.get_cmap('gray') and then used that instead of cm.gray Minor thing - to see the green-circled blobs in the final image, need to add plt.show() after the "for blob..." loop is done.
you are right Kyle. Good observations.
Wonderful article! Thanks for sharing the step by step guide! Python Imaging Library (PIL) is one of the popular libraries used for image processing. PIL can be used to display image, create thumbnails, resize, rotation, convert between file formats, contrast enhancement, filter and apply other digital image processing techniques etc. PIL supports image formats like PNG, JPEG, GIF, TIFF, BMP etc. It also possesses powerful image processing and graphics capabilities. To start with image processing first we need to download PIL and install in PC. PIL supports python version 2.1 to 2.7.
Very nice! Thanks for sharing this post!
can you please let me know where can I find "skimage: pkg to install ....
Hi Tavish, It is a great article, I had one question, if we were to do something like a video analysis for a retail store to see customer response to a particular add/display, would it be possible to do the same in Python? The last time I had worked on Image processing was to detect patterns in a video stream using Matlab, Also would it be possible to use the same concepts for finding patterns by invoking Python from SAS? (Am too stubborn of a SAS user actually) Regards Abhinav Mathur
Dear Tavish, This is very good article to learners.Recently, my students also using it is very good for their basics. I had one query. I am applying this code on malaria microscopic images but i got very different results which are not validated correctly. So I need your suggestions Regards G.MADHU
Hi Tavish, I am just beginning with image processing starting from your article. Great one! One thing I couldn't understand is the formula we used for calculating the radius.
Is it possible in a different case to identify the dimensions of a particle? Say, a bubble, can we measure its diameter using python image processing? Please share any information if this is possible
hi i am trying to run your source code python idel 3.6.3 ,but it is showing list index out of range, can any one help for the above error.. Regards Venkatesh
hello, i recently started learning image processing but i am not able to understand things that clearly if any one can help in telling from where to study or from where i can arrange study material then please mail it to me my mailing id is [email protected]
Hi Tavish, Nice work. I have regarding my major project in X ray processing to predict pneumonia. If an X ray image is given as input, how can features be extracted from that? Is there any specialized thing to do that?
Thank you Sir for such interesting post, But I used openCV findContours() and drawContours(), so I got different answers for different minimum threshold values like min_thresh=10 or 9 output was 304, similarly for 8 count= 306,,7->>314,,6->>357,,5->>453,,4->>705,,3->>1160.
Great tutorial. Thank you for sharing it.