Introduction
In the realm of data analysis and manipulation, Excel remains a powerhouse tool. Among its many features, the TRANSPOSE function stands out for its ability to reorganize data quickly and efficiently. This function is particularly useful for data scientists and AI professionals who often need to restructure data to fit specific analytical needs. In this article, we’ll delve into Excel’s TRANSPOSE function, exploring its uses, how to implement it, and its practical applications in data science and AI.
Learn More: Microsoft Excel for Data Analysis

Table of Contents
Overview
- Understand what the TRANSPOSE function in Excel does.
- Learn how to use the TRANSPOSE function in Excel.
- Know what Paste Special Transpose in Excel is.
- Get familiar with the practical applications of this function in data science and AI.
What is the TRANSPOSE Function in Excel?
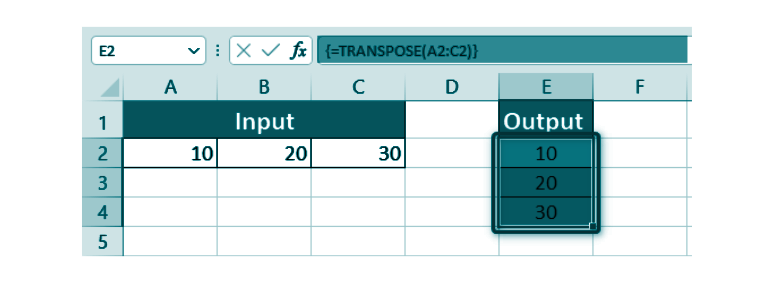
The TRANSPOSE function in Excel is a powerful tool that allows users to switch the orientation of a range of cells. In other words, it converts rows to columns and columns to rows. This becomes very useful when you need to reorganize your data and change the layout for better analysis or presentation.
The syntax for the TRANSPOSE function is: =TRANSPOSE(array)
Here, array is the range of cells you want to transpose.
How to Use the TRANSPOSE Function in Excel
Using the TRANSPOSE function is simple. Let’s go through a step-by-step example to understand its application:
- Basic Usage: Suppose you have a dataset in cells A1 to C5, and you want to transpose this data.
- Select an empty range of cells that matches the dimensions of the original data but flipped (e.g., if A1 ‘ is 5 rows by 3 columns, select a 5 columns by 3 rows range).
- Enter the formula
=TRANSPOSE(A1:C5)and press Ctrl+Shift+Enter to enter it as an array formula in older versions of Excel. In newer versions, just press Enter.
- Dynamic Transpose: If you want the transposed data to update automatically when the original data changes, using the TRANSPOSE function as an array formula is ideal.
Example
Original Data:
| Student | English | Math |
| Ayush | 95 | 98 |
| Badri | 98 | 91 | Charmi | 83 | 79 | Diya | 91 | 95 |
Transposed Data:
| Student | Ayush | Badri | Charmi | Diya |
| English | 95 | 98 | 83 | 91 |
| Math | 98 | 91 | 79 | 95 |
What is Paste Special Transpose?
The Paste Special Transpose feature provides a quick way to transpose data without using a formula. This method is particularly useful for static data that does not need to update dynamically.
Steps to Use Paste Special Transpose
- Select the range of cells you want to transpose.
- Copy the selected cells (Ctrl+C).
- Select the upper-left cell of the destination range.
- Right-click and choose Paste Special.
- In the Paste Special dialog box, check the Transpose box and click OK.
Example
Original Data:
| 1 | 2 | 3 |
| 4 | 5 | 6 |
| 7 | 8 | 9 |
After Paste Special Transpose:
| 1 | 4 | 7 |
| 2 | 5 | 8 |
| 3 | 6 | 9 |
Practical Applications
Excel’s TRANSPOSE function is particularly useful in data science and AI for:
- Data Reorganization: To quickly switch data from rows to columns or vice versa for better readability or to meet specific formatting requirements.
- Data Preparation: To prepare datasets for machine learning algorithms that may require data in a specific orientation.
- Dynamic Reporting: To create dynamic reports where the layout of data needs to be adjusted frequently.
- Data Analysis: To reorganize datasets for performing certain types of analysis or using specific Excel functions that require data in a particular layout.

Tips and Considerations
- Dynamic vs. Static: Use the TRANSPOSE function for dynamic transposition and Paste Special Transpose for static data changes.
- Array Formulas: Remember to use Ctrl+Shift+Enter for array formulas in versions of Excel, older than 2021.
- Data Size: Be mindful of the size of your dataset; transposing large datasets can be resource-intensive.
- Consistency: Ensure that your original data does not have merged cells, as this can cause issues with transposition.
- Formulas in Transposed Data: When transposing data that contains formulas, Excel adjusts the cell references. So, remember to use absolute references ($A$1) if you want them to remain unchanged.
- Empty Cells and Zeros: By default, the TRANSPOSE function converts blank cells into zeros. You can avoid this by using an additional IF function to check for empty cells and return an empty string instead. The formula for this would be:
=TRANSPOSE(IF(A1:C1=””, “”, A1:C1))
Conclusion
The TRANSPOSE function in Excel is a handy tool that makes it easier for data scientists and analysts to structure their data efficiently. Whether you need to reorganize your data for analysis or create dynamic reports, this function helps you do it in a single step. So, understanding how to use the TRANSPOSE function effectively can save you time and enhance your productivity.
Master Excel functions in 2 hours: Microsoft Excel Tutorial for Beginners
Frequently Asked Questions
Q1. What is the difference between the TRANSPOSE function and Paste Special Transpose?
A. The TRANSPOSE function dynamically links to the original data and updates automatically, while Paste Special Transpose creates a static copy of the data in the new orientation.
Q2. Can I transpose data in Excel without using formulas?
A. Yes, you can use the Paste Special Transpose feature to transpose data without using formulas.
Q3. How do I handle large datasets when using the TRANSPOSE function?
A. For large datasets, consider using Paste Special Transpose to avoid performance issues, as it creates a static copy and reduces the computational load.
Q4. Why do I get a #VALUE! error when using the TRANSPOSE function?
A. This error usually occurs when the selected output range does not match the dimensions of the transposed array. Ensure the output range is appropriately sized.
Q5. Can I transpose a table with merged cells?
A. Transposing a table with merged cells can cause issues. It is recommended to unmerge cells before transposing.
Sabreena is a GenAI enthusiast and tech editor who's passionate about documenting the latest advancements that shape the world. She's currently exploring the world of AI and Data Science as the Manager of Content & Growth at Analytics Vidhya.


