Spark is a cluster computing platform that allows us to distribute data and perform calculations on multiples nodes of a cluster. The distribution of data makes large dataset operations easier to
process. Here each node is referred to as a separate machine working on a subset of data. This node would also perform a part of the calculation for dataset operations. Spark is primarily written in Scala but supports Java, Python, R and SQL as well.

In this article, we will learn about PySpark DataFrames and the ways to create them. Spark DataFrames are built over Resilient Data Structure (RDDs), the core data structure of Spark. It’s not easy to work on an RDD, thus we will always work upon
Table of Contents
- Introduction
- PySpark DataFrame From an Existing RDD
- PySpark DataFrame From an External File
- Additional Useful Method
- Conclusions
Introduction to PySpark
PySpark was introduced to support Spark with Python Language. The PySpark API mostly contains the functionalities of Scikit-learn and Pandas Libraries of Python. In fact, the latest version of PySpark has computational power matching to Spark written in Scala. Dataframes in PySpark can be created primarily in two ways:
- From an existing Resilient Distributed Dataset (RDD), which is a fundamental data structure in Spark
- From external file sources, such as CSV, TXT, JSON
All the files and codes used below can be found here.
Here, we will use Google Colaboratory for practice purposes. To start importing our CSV Files in PySpark, we need to follow some prerequisites. First, we will install the pyspark library in Google Colaboratory using pip.
!pip install pyspark
Now, let’s see how to create the PySpark Dataframes using the two methods discussed above.
Create PySpark DataFrame From an Existing RDD
To create a PySpark DataFrame from an existing RDD, we will first create an RDD using the .parallelize() method and then convert it into a PySpark DataFrame using the .createDatFrame() method of SparkSession.
To start using PySpark, we first need to create a Spark Session. A spark session can be created by importing a library.
Importing the Libraries
from pyspark import SparkContext
from pyspark.sql import SparkSession
Creating a SparkContext
sc = SparkContext.getOrCreate()
We used the .getOrCreate() method of SparkContext to create a SparkContext for our exercise. The .getOrCreate() method will create and instantiate SparkContext into our variable sc or will fetch the old one if already created before.
Creating SparkSession
spark = SparkSession.builder.appName('PySpark DataFrame From RDD').getOrCreate()
Here, will have given the name to our Application by passing a string to .appName() as an argument. Next, we used .getOrCreate() which will create and instantiate SparkSession into our object spark. Using the .getOrCreate() method would use an existing SparkSession if one is already present else will create a new one.
Creating a Resilient Data Structure (RDD)
rdd = sc.parallelize([('C',85,76,87,91), ('B',85,76,87,91), ("A", 85,78,96,92), ("A", 92,76,89,96)], 4)
We used the .parallelize() method of SparkContext sc which took the tuples of marks of students. In the later steps, we will convert this RDD into a PySpark Dataframe. We passed numSlices value to 4 which is the number of partitions our data would parallelize into.
Checking the Datatype of RDD
print(type(rdd))

We can verify if our RDD creation is successful by checking the datatype of the variable rdd. On executing this, we will get pyspark.rdd.RDD
Converting the RDD into PySpark DataFrame
sub = ['Division','English','Mathematics','Physics','Chemistry']
marks_df = spark.createDataFrame(rdd, schema=sub)
Here, The .createDataFrame() method from SparkSession spark takes data as an RDD, a Python list or a Pandas DataFrame. Here we are passing the RDD as data. We also created a list of strings sub which will be passed into schema attribute of .createDataFrame() method.
The dataType of PySpark DataFrame
print(type(marks_df))

To verify if our operation is successful, we will check the datatype of marks_df. On executing this we will get pyspark.sql.dataframe.DataFrame as output.
Schema of PySpark DataFrame
marks_df.printSchema()
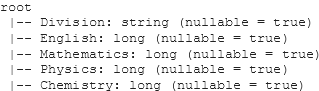
We can also check the schema of our file by using the .printSchema() method which is very useful when we have tens or hundreds of columns.
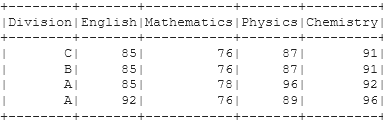
Contents of PySpark DataFrame
marks_df.show()
To view the contents of the file, we will use the .show() method on the PySpark Dataframe object. This will display the top 20 rows of our PySpark DataFrame.
Putting it all together
from pyspark import SparkContext
from pyspark.sql import SparkSession
sc = SparkContext.getOrCreate()
spark = SparkSession.builder.appName('PySpark DataFrame From RDD').getOrCreate()
rdd = sc.parallelize([('C',85,76,87,91), ('B',85,76,87,91), ("A", 85,78,96,92), ("A", 92,76,89,96)], 4)
#print(type(rdd))
sub = ['Division','English','Mathematics','Physics','Chemistry']
marks_df = spark.createDataFrame(rdd, schema=sub)
#print(type(marks_df))
#marks_df.printSchema()
marks_df.show()
On executing this, we get:
Create PySpark DataFrame From an External File
We will use the .read() methods of SparkSession to import our external Files. This will return a Spark Dataframe object. The external files format that can be imported includes JSON, TXT or CSV. The methods to import each of this file type is almost same and one can import them with no efforts. Unlike the previous method of creating PySpark Dataframe from RDD, this method is quite easier and requires only Spark Session.
Importing the libraries
from pyspark.sql import SparkSession
Creating Spark Session
spark = SparkSession.builder.appName('PySpark DataFrame From External Files').getOrCreate()
Here, will have given the name to our Application by passing a string to .appName() as an argument. Next, we used .getOrCreate() which will create and instantiate SparkSession into our object spark. Using the .getOrCreate() method would use an existing SparkSession if one is already present else will create a new one.
Reading External Files into PySpark DataFrame
1. Reading a CSV File
csv_file = spark.read.csv('Fish.csv', sep = ',', inferSchema = True, header = True)
In the spark.read.csv(), first, we passed our CSV file Fish.csv. Second, we passed the delimiter used in the CSV file. Here the delimiter is a comma ‘,‘. Next, we set the inferSchema attribute as True, this will go through the CSV file and automatically adapt its schema into PySpark Dataframe. Though, setting inferSchema to True may take time but is highly useful when we are working with a huge dataset.
2. Reading a TXT File
txt_file = spark.read.text("example.txt")
In the spark.read.text() method, we passed our txt file example.txt as an argument. Each line in this text file will act as a new row. This is useful when we want to read multiple lines at once.
3. Reading a JSON File
json_file = spark.read.json("sample.json", multiLine=True)
In the spark.read.json() method, we passed our JSON file sample.json as an argument. Also, we have set the multiLine Attribute to True to read the data from multiple lines. By default, JSON file inferSchema is set to True.
Checking DataTypes of PySpark DataFrames
print(type(csv_file))

print(type(txt_file))

print(type(json_file))

Checking Schema of PySpark DataFrames
csv_file.printSchema()

txt_file.printSchema()

json_file.printSchema()

Putting it all together
from pyspark.sql import SparkSession
spark = SparkSession.builder.appName('PySpark DataFrame From External Files').getOrCreate()
csv_file = spark.read.csv('Fish.csv', sep = ',', inferSchema = True, header = True)
txt_file = spark.read.text("example.txt")
json_file = spark.read.json("sample.json", multiLine=True)
print(type(csv_file))
#print(type(txt_file))
#print(type(json_file))
csv_file.printSchema()
#txt_file.printSchema()
#json_file.printSchema()
Additional Useful Methods
PySpark DataFrame to Pandas DataFrame
We can also convert the PySpark DataFrame into a Pandas DataFrame. This enables the functionality of Pandas methods on our DataFrame which can be very useful.
Let’s take the same DataFrame we created above.
df = csv_file.toPandas()
Here, we use the .toPandas() method to convert the PySpark Dataframe to Pandas DataFrame. This will return a Pandas DataFrame. Let’s check the DataType of the new DataFrame to confirm our operation.
type(df)
On executing this, we get:

Reading Multiple Files as Once
We can read multiple files at once in the .read() methods by passing a list of file paths as a string type. For example:
files = ['Fish.csv', 'Salary.csv']
df = spark.read.csv(files, sep = ',' ,  inferSchema=True, header=True)
This will create and assign a PySpark DataFrame into variable df. While reading multiple files at once, it is always advisable to consider files having the same schema as the joint DataFrame would not add any meaning.
Conclusions
In this article, we learnt about PySpark DataFrames and two methods to create them. The .parallelize() is a good except the fact that it require an additional effort in comparison to .read() methods. The .read() methods come really handy when we want to read a CSV file real quick. Once converted to PySpark DataFrame, one can do several operations on it. One of the widely used applications is using PySpark SQL for querying. We also looked at additional methods which are useful in performing PySpark tasks.
About the Author
Connect with me on LinkedIn.
For any suggestions or article requests, you can email me here.
Check out my other Articles Here and on Medium
You can provide your valuable feedback to me on LinkedIn.
Thanks for giving your time!
Image source
Image 1: https://www.pexels.com/photo/person-pointing-numeric-print-1342460/
The media shown in this article are not owned by Analytics Vidhya and are used at the Author’s discretion.
IT Engineering Graduate currently pursuing Post Graduate Diploma in Data Science.


