This article was published as a part of the Data Science Blogathon
Overview
Hadoop is widely used in the industry to examine large data volumes. The reason for this is that the Hadoop framework is based on a basic programming model (MapReduce), which allows for a scalable, flexible, fault-tolerant, and cost-effective computing solution.
Table of contents
- Overview
- Introduction
- Components of Apache Spark
- Apache Spark Core by Apache
- Apache Spark SQL
- Streaming Spark
- Download and set up path
- Downloading Apache Spark
- Apache Spark launch
- What exactly is Apache spark?
- How to import apache spark in the notebook?
- Apache Spark Dataframes
- Apache Spark Web UI–Spark Execution
- RDD Programming with Apache spark
- Apache Spark RDD Operations
- Apache Spark RDD Actions
- What is Pyspark RDD?
- How to read CSV or JSON files into DataFrame
- How to Write PySpark DataFrame to CSV file?
- Convert PySpark RDD to DataFrame
- Convert PySpark DataFrame to Pandas
- Most commonly used PySpark functions
- Frequently Asked Questions
- Scope for big data engineers
- Conclusion
Introduction
Apache Spark is an innovative cluster computing platform that is optimized for speed. It is based on Hadoop MapReduce and extends the MapReduce architecture to be used efficiently for a wider range of calculations, such as interactive queries and stream processing. Spark’s key feature is in-memory cluster computing, which boosts an application’s processing speed.
Components of Apache Spark
Spark Core Engine can be used with any of the other five components listed below. It is not expected to use all the Spark components at the same time.
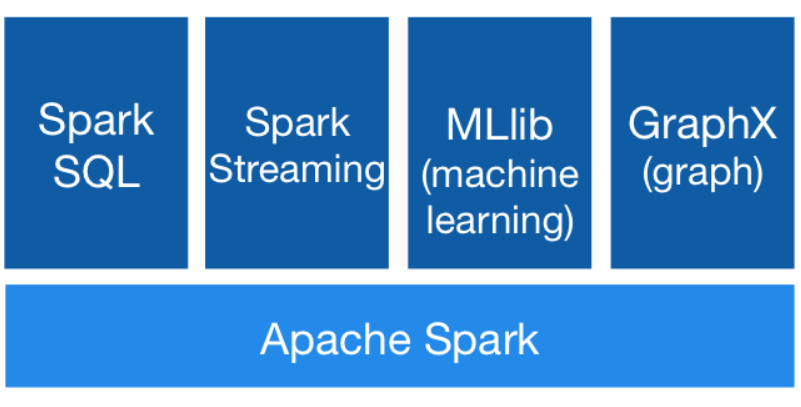
Apache Spark Core by Apache
Spark Core is the platform’s fundamental general execution engine, on which they build all other features. It offers in-memory processing and the ability to refer to datasets stored in external storage systems. The distributed execution engine is at its core, and the Java, Scala, and Python APIs provide a foundation for developing distributed ETL applications. Additional libraries built on top of the core enable a variety of streaming, SQL, and machine learning workloads. It is in charge of:
Fault recovery and memory management
On a cluster, jobs are scheduled, distributed, and monitored.
Interacting with storage systems is one of the most time-consuming aspects of the job.
Apache Spark SQL
Spark SQL is a component built on top of Spark Core that introduces SchemaRDD, a new data abstraction that supports structured and semi-structured data.
Listed below are the four libraries of Spark SQL.
- DataFrame API
- Interpreter & Optimizer
- SQL Service
- Data Source API
Streaming Spark
To execute streaming analytics, Spark Streaming makes use of Spark Core’s quick scheduling functionality. It ingests data in mini-batches and transforms it using RDD (Resilient Distributed Datasets) transformations. DStream is the most basic stream unit, which comprises a sequence of RDDs (Resilient Distributed Datasets) that process real-time data.
MLlib (Machine Learning Library):
MLlib is a collection of machine learning libraries. Because of the distributed memory-based Spark architecture, Spark MLlib is called for distributed machine learning framework. It is done by the MLlib developers against the Alternating Least Squares (ALS) implementations.
GraphX:
GraphX is a Spark-based distributed graph processing framework. It provides an API for defining graph computing that uses the Pregel abstraction API to model user-defined graphs. For this abstraction, it also provides an efficient runtime.
Installation of Apache spark:
We’ll need to go through a few steps to get started with Apache Spark and the PySpark library. If you’ve done nothing like this before, it can be a little perplexing, but don’t fear. We’ll make it happen.
Installation Prerequisites:
One of the prerequisites for installing Spark is the installation of Java. The initial steps in getting Apache Spark and PySpark fully operational are to make sure we have everything we need. Java 8, Python 3, and the ability to extract.tar files are all required.
Let’s look at what Java version you have installed on your desktop computer. If you’re using Windows, open the Command Prompt by going to Start, typing cmd, then pressing Enter. Type the following command there:
$java -version
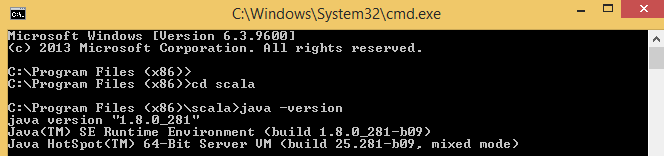
Followed by the command;
$javac -version

If you don’t already have Java and python installed on your computer, install them from the below link before moving on to the next step.
Download and set up path
1) Verifying Scala and spark installation:
Scala binaries can be found at https://www.scala-lang.org/download/. The Scala installer file will have a .msi extension when it is downloaded.
For Linus-Based System:
If we need to install Spark into a Linux-based system. The following steps show how to install Apache Spark.
We need to install a tar file from the Download Scala. Follow the command for extracting the Scala tar file.
$ tar xvf scala-2.11.6.tgz
Scala software files:
To move the Scala software files to the directory (/usr/local/scala), use the commands below.
$ su –
Password:
# cd /home/Hadoop/Downloads/
# mv scala-2.11.6 /usr/local/scala
# exit
Set PATH for Scala;
The command to set PATH for Scala:
$ export PATH = $PATH:/usr/local/scala/bin
Scala Installation Verification:
It’s a good idea to double-check everything after installation. To check if Scala is installed, run the following command.
$scala -version
Scala installation in windows:
Select Run after double-clicking or opening the scala-2.11.6.msi file. When the Setup Wizard displays, click Next to finish the installation. The Scala installer will also set the Path environment variable, allowing you to run it from any location. Locate the folder, then type cmd into the window’s location bar and press enter.
Open a command prompt and type cd to go to the bin directory of the installed Scala, as seen below.
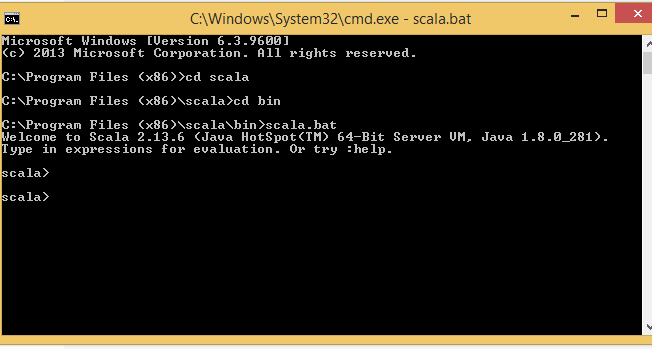
This is the scala shell, where we may type programs and view the results directly in the shell. The command below can check the Scala version.
Downloading Apache Spark
Visit the following link to get the most recent version of Spark( Download Spark). We’ll be using the spark-1.3.1-bin-hadoop2.6 version for this guide. We can find the Spark tar file in the download folder after you’ve downloaded it.
Extract the downloaded file into that folder. The winutils.exe file for the underlying Hadoop version that Spark will use is the next thing you need to add.
the command is for extracting the spark tar file is:
$ tar xvf spark-1.3.1-bin-hadoop2.6.tgz
Moving files from the Spark:
The instructions below will move the Spark software files to the directory (/usr/local/spark).
$ su –
Password:
# cd /home/Hadoop/Downloads/
# mv spark-1.3.1-bin-hadoop2.6 /usr/local/spark
# exit
Setting up the environment for Spark:
In the /.bashrc file, add the following line. It entails setting the PATH variable to the location of the spark program files.
$export PATH=$PATH:/usr/local/spark/bin
Command for sourcing the ~/.bashrc file :
$ source ~/.bashrc
Spark Installation verification:
Write the following command for opening the Spark shell.
$spark-shell
Apache Spark launch
Let us now launch our Spark to view it in all of its magnificence. To run Spark, open a new command prompt and type spark-shell. Spark will be up and running in a new window.

What exactly is Apache spark?
Apache Spark is a data processing framework that can handle enormous data sets quickly and distribute processing duties across many computers, either on its own or with other distributed computing tools.
PySpark-API:
PySpark is a combination of Apache Spark and Python. It is an excellent language for performing large-scale exploratory data analysis, machine learning pipelines, and data platform ETLs. PySpark is an excellent language to learn if you’re already familiar with Python and libraries like Pandas. It’ll help you construct more scalable analytics and pipelines. This post shows how to get started with PySpark and execute typical tasks.
Pyspark Environment:
There are a few different ways to get started with Spark:
Self-Hosted:
You can create your cluster using bare metal or virtual computers. For this option, Apache Ambari is a valuable project, but it’s not my preferred method for getting up and running quickly.
Most cloud providers have Spark clusters:
AWS offers EMR and Google Cloud Platform has DataProc. DataProc is a faster way to an interactive environment than self-hosting.
Spark solutions are available from companies such as Databricks and Cloudera, making it simple to get started with Spark.
It’s simple to get started with a Spark cluster and notebook environment in this Data Bricks Community Edition environment. With the Spark 2.4 runtime and Python 3, I built a cluster. For the Pandas UDFs feature, you’ll need at least Spark version 2.3 to run the code.
How to import apache spark in the notebook?
To use PySpark in your Jupyter notebook, simply run the following command to install the PySpark pip package:
pip install pyspark
The above command can also use Kaggle as we will, you can just type “pip install pyspark” and Apache Spark will be installed and ready to use.
Python will work with Apache Spark because it is on your system’s PATH. If you wish to use something like Google Colab, run the following block of code, which will automatically set up Apache Spark:
!apt-get install openjdk-8-jdk-headless -qq > /dev/null
!wget -q https://www-us.apache.org/dist/spark/spark-3.0.3/spark-3.0.3-bin-hadoop2.7.tgz
!tar xf spark-3.0.3-bin-hadoop2.7.tgz
!pip install -q findspark
import os
os.environ["JAVA_HOME"] = "/usr/lib/jvm/java-8-openjdk-amd64"
os.environ["SPARK_HOME"] = "/content/spark-3.0.3-bin-hadoop2.7"
import findspark
findspark.init()
Apache Spark Dataframes
The Spark data frame is the most important data type in PySpark. This object functions similarly to data frames in R and Pandas and can be thought of as a table dispersed throughout a cluster. If you wish to use PySpark for distributed computation, you’ll need to work with Spark data frames rather than conventional Python data types.
When working with Spark, you can use Pandas data frames by executing toPandas() on a Spark data frame, which yields a pandas object. However, especially when working with small data frames, this function should be avoided because it loads the entire object into memory on a single node.
Operations in PySpark are postponed until they require a result in the pipeline. You can define actions for importing a data set from S3 and performing a variety of transformations to the data frame, for example, but we will not do it right away from these operations. Instead, a graph of transformations is maintained, and when the data is needed, we do the transformations as a single pipeline operation when writing the results back to S3. This method avoids storing the entire data frame in memory and allows for more efficient processing across a cluster of devices. They fetched everything into memory with Pandas data frames, and we apply every operation to pandas.
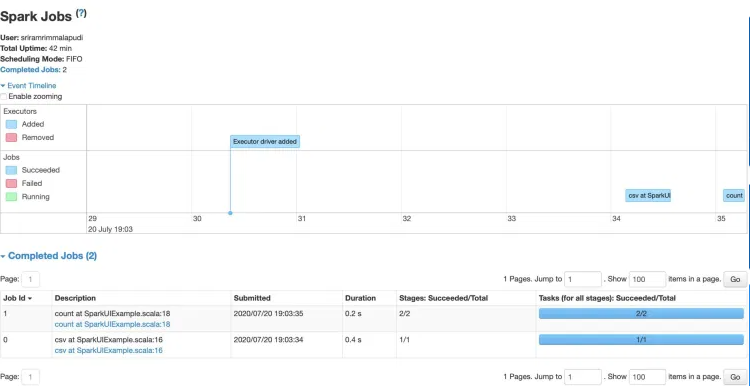
Apache Spark Web UI–Spark Execution
To monitor the progress of your Spark/PySpark application, resource consumption of Spark cluster, and Spark configurations, Apache Spark provides a set of Web UI/User Interfaces (Jobs, Stages, Tasks, Storage, Environment, Executors, and SQL).
These user interfaces are useful for better understanding how Spark runs the Spark/PySpark Jobs. Your application code is a set of instructions that tells the driver to perform a Spark Job and then lets the driver decide how to do so using executors.
Transformations are the instructions given to the driver, and action if causes the transformation to take place. Here, we’re reading a.csv file and checking the DataFrame’s count. Let’s have a look at how Spark UI renders an application.
By default, Spark includes an API for reading delimiter files, such as comma, pipe, and tab-separated files, as well as many options for handling with and without headers, double quotes, data types, and so on.
We separated spark UI into the below tabs.
- Spark Jobs
- Stages
- Tasks
- Storage
- Environment
- Executors
- SQL
If you’re running the Spark application locally, go to http://localhost:4040/ to access the Spark UI. The Spark UI runs on port 4040 by default, and the other UIs listed below can follow Spark applications.
- Spark JobTracker: http://localhost:8088/
- Spark Application UI: http://localhost:4040/
RDD Programming with Apache spark
Consider the example of a word count, which counts each word in a document. Consider the following text as input, which is saved in a home directory as an input.txt file.
input.txt − input file.
“Watch your thoughts; they become words. Watch your words; they become actions. Watch your actions; they become habits. Watch your habits; they become character. Watch your character; it becomes your destiny.”
Create RDD in Apache spark:
Let us create a simple RDD from the text file. Use the following command to create a simple RDD.
scala> val inputfile = sc.textFile(“input.txt”)
Word count Transformation:
The goal is to count the number of words in a file. Create a flat map (flatMap(line ⇒ line.split(“ ”)). to separate each line into words.
Then, using the map function (map(word ⇒ (word, 1))., read each word as a key with the value ‘1’ ( = word,1>). Finally, combine the values of related keys to reduce those keys (reduceByKey(_+_)).
scala> val counts = inputfile.flatMap(line => line.split(" ")).map(word => (word, 1)).reduceByKey(_+_);
We execute the word count logic using the following command. Because this is not an action, but a transformation (pointing to a new RDD or telling Spark what to do with the data), there will be no output once you run it.
Current RDD:
If you want to know what the current RDD is while working with the RDD, use the following command. For debugging, it will display a description of the current RDD and its dependencies.
scala> counts.toDebugString
Persistence of Transformations:
You can use the persist() or cache() methods on an RDD to mark it as persistent. It will be stored in memory on the nodes the first time it is computed in an action. To save the intermediate transformations in memory, run the command below.
scala> counts.cache()
Applying the Action:
Performing an action, such as storing all transformations, produces a text file. The absolute path of the output folder is passed as a string argument to the saveAsTextFile(” “) method. To save the output to a text file, use the command below. The ‘output’ folder is in the current location in the following example.
scala> counts.saveAsTextFile("output")
Examining the Results:
To get to your home directory, open another terminal (where a spark is executed in the other terminal). To check the output directory, use the instructions below.
[hadoop@localhost ~]$ cd output/
[hadoop@localhost output]$ ls -1
part-00000
part-00001
_SUCCESS
The following command is used to see output from Part-00000 files.
[hadoop@localhost output]$ cat part-00000
Output:
(watch,3)
(are,2)
(habits,1)
(as,8)
(beautiful,2)
(they, 7)
(look,1)
The following command is used to see output from Part-00001 files.
[hadoop@localhost output]$ cat part-00001
Output 1:
(walk, 1)
(or, 1)
(talk, 1)
(only, 1)
(love, 1)
(care, 1)
(share, 1)
(1) Create Data Frame:
scala> val data = Seq(('James','','Smith','1991-04-01','M',3000),
  ('Michael','Rose','','2000-05-19','M',4000)
)
val columns = Seq("firstname","middlename","lastname","dob","gender","salary")
df = spark.createDataFrame(data), schema = columns).toDF(columns:_*)
After all, the entry in a CSV would need to be divided by comma delimiter and stored in RDD as many columns. To do so, we’ll use the map() transformation on RDD to convert RDD[String] to RDD[Array[String] by dividing each record with a comma delimiter. Instead of modifying an existing RDD, the map() method creates a new one.
 scala> val rdd = rddFromFile.map(f=>{
    f.split(",")
  })
Apache Spark RDD Operations
Transformations based on RDDs–Transformations are lazy operations that yield another RDD instead of updating an RDD.
RDD actions are operations that cause RDD values to be computed and returned.
Spark transformations RDD yields another RDD, and transformations are lazy, which means they don’t run until action on RDD is called FlatMap, map, reduceByKey, filter, sortByKey, and return new RDD instead of updating the current RDD are some RDD transformations.
How to load data in Apache Spark?
SparkContext’s textFile method can create text file RDDs. This method reads a file’s URI (either a machine’s local path or a hdfs://, s3a://, etc URI) as a collection of lines.
scala> val distFile = sc.textFile("data.txt")
1 -> First, create an RDD file path :
scala> val rdd:RDD[String] = spark.sparkContext.textFile("src/main/scala/test.txt")
Map() —
The map() transformation is used to do complex operations, such as adding a column, changing a column, and so on. The output of map transformations always has the same amount of records as the input.
In our word count example, we add a new column with the value 1 for each word; the RDD returns PairRDDFunctions, which contain key-value pairs, with a word of type String as the key and 1 of type Int as the value. I’ve defined the rdd3 variable with type.
scala> val rdd3:RDD[(String,Int)]= rdd2.map(m=>(m,1))
flatMap() —
After applying the function, the flatMap() transformation flattens the RDD and returns a new RDD. In the example below, it splits each record in an RDD by space first, then flattens it. Each record in the resulting RDD has a single word.
scala> val rdd2 = rdd.flatMap(f=>f.split(" "))
filter():
Filtering records in an RDD are done with the filter() transformation. We are filtering all words that begin with the letter “a”.
scala> val rdd4 = rdd3.filter(a=> a._1.startsWith("a"))
sortByKey():
sortByKey() is a function that allows you to sort your data by key.
It sorts RDD elements by key using the sortByKey() transformation. we use the map transformation to change RDD[(String,Int)] to RDD[(Int, String]) and then use sortByKey to sort on an integer value. Finally, foreach with println statements returns every words in RDD as a key-value pair, as well as their count.
scala> val rdd6 = rdd5.map(a=>(a._2,a._1)).sortByKey()
//Print rdd6 result to console
rdd6.foreach(println)
reduceByKey() :
reduceByKey() combines the values of each key with the function supplied. It decreases the word string in our case by using the sum function on value. Our RDD yielded a list of unique terms and their counts.
scala> val rdd5 = rdd4.reduceByKey(_ + _)
Apache Spark RDD Actions
We’ll stick with our word count example for now; foreach() action is used to manage accumulators, write to a database table, or access external data sources, but foreachPartiton() is more efficient since it allows you to conduct heavy initializations per partition. On our word count example, let’s look at some more action procedures.
max–This function is used to return the max record.
 scala> val datMax = rdd6.max()
    println("Max Record : "+datMax._1 + ","+ datMax._2)
fold–This function aggregates the elements of each partition, and then the results for all of the partitions.
scala> println("fold :  "+listRdd.fold(0){ (acc,v) =>
    val sum = acc+v
    sum
$ Output: fold: 20reduce–This function is used to decrease the records to single, we can use this to count or sum.
 scala> val totalWordCount = rdd.reduce((a,b) => (a._1+b._1,a._2))
    println("dataReduce Record : "+totalWordCount._1)
Collect–Returns an array of all data from RDD. When working with large RDDs with millions or billions of records, be cautious about using this method because the driver may run out of memory.
 scala>val data = rdd.collect()
       data.foreach(f=>{
       println("Key:"+ f._1 +", Value:"+f._2)
    })
saveAsTextFile–we can use saveAsTestFile action to write the RDD to a text file.
scala> rdd6.saveAsTextFile("/tmp/wordCount")
What is Pyspark RDD?
The PySpark RDD (Resilient Distributed Dataset) is a core data structure in PySpark that is a fault-tolerant, immutable distributed collection of items, which means you can’t change it after you’ve created it. RDD divides each dataset into logical partitions that can be computed on separate cluster nodes.
PySpark is the Python API for Apache Spark, an open-source distributed computing framework used for big data processing and analytics. It allows developers to write Spark applications using Python, leveraging the power and scalability of Spark’s distributed computing capabilities. PySpark provides a high-level interface for working with distributed datasets, enabling tasks like data manipulation, querying, and machine learning. It seamlessly integrates with other Python libraries and offers a familiar programming experience for Python developers. PySpark supports parallel processing, fault tolerance, and in-memory caching, making it well-suited for handling large-scale data processing tasks in a distributed computing environment.
How to read CSV or JSON files into DataFrame
Using csv(“path”) or format(“csv”).load(“path”) we can read a CSV file into a PySpark DataFrame of DataFrameReader. These methods take a file path to read from as an input. You can specify data sources by their fully qualified names when using the format(“CSV”) method. However, for built-in sources, you can simply use their short names (CSV, JSON, parquet, JDBC, text e.t.c).
df = spark.read.format("org.apache.spark.sql.csv")
                  .load("/tmp/resources/zipcodes.csv")
df.printSchema()
Loading a CSV file in PySpark is a little more difficult. Because there is no local storage in a distributed environment, a distributed file system such as HDFS, Databricks file store (DBFS), or S3 must give the file’s path.
When I use PySpark, I usually work with data stored in S3. Many databases provide an unload to S3 feature, and you can also move files from your local workstation to S3 via the AWS dashboard. I’ll be using the Databricks file system (DBFS) for this article, which gives paths in the manner of /FileStore. The first step is to upload the CSV file that you want to work with.
file_location = "/FileStore/tables/game_skater_stats.csv"df = spark.read.format("csv").option("inferSchema",
           True).option("header", True).load(file_location)display(df)
The next snippet shows how to save the data frame from a previous snippet as a parquet file on DBFS, then reload the data frame from the parquet file.
df.write.save('/FileStore/parquet/game_skater_stats',
               format='parquet')df = spark.read.load("/FileStore/parquet/game_skater_stats")
display(df)
How to Write PySpark DataFrame to CSV file?
To save a PySpark DataFrame to a CSV file, use the write() function of the PySpark DataFrameWriter object.
df.write.option("header",True)
 .csv("/tmp/spark_output/zipcodes")
Writing Data:
It’s not a good idea to write data to local storage while using PySpark, just like it’s not a good idea to read data with Spark. You should instead use a distributed file system like S3 or HDFS. If you’re going to use Spark to process the findings, parquet is a decent format to save data frames in.
df.write.save('/FileStore/parquet/game_stats',format='parquet')
Create a data frame:
To generate a DataFrame from a list, we’ll need the data, so let’s get started by creating the data and columns we’ll need.
columns = ["language","count"]
data = [("Java", "20000"), ("Python", "100000"), ("c#", "3000")]
The toDF() method of PySpark RDD is used to construct a DataFrame from an existing RDD. Because RDD lacks columns, the DataFrame is generated with the default column names “_1” and “_2” to represent the two columns we have.
columns = ["language","users_count"]
dfFromRDD1 = rdd.toDF(columns)
dfFromRDD1.printSchema()
Convert PySpark RDD to DataFrame
The RDD’s toDF() function is used in PySpark to convert RDD to DataFrame. We’d have to change RDD to DataFrame because DataFrame has more benefits than RDD. For example, DataFrame is a distributed collection of data arranged into named columns that give optimization and efficiency gains, comparable to database tables.
from pyspark.sql import SparkSession
spark = SparkSession.builder.appName('PySpark create using parallelize()').getOrCreate()
dept = [("Finance",10),("Marketing",20),("Sales",30),("IT",40)]
rdd = spark.sparkContext.parallelize(dept)
To begin, pass a Python list object to the sparkContext.parallelize() function to generate an RDD.
When you construct an RDD in PySpark, this collection will be parallelized if you have data in a list, which means you have a collection of data in the PySpark driver’s memory.
deptColumns = ["dept_name","dept_id"]
df2 = rdd.toDF(deptColumns)
df2.printSchema()
df2.show(truncate=False)
Convert PySpark DataFrame to Pandas
A function toPandas() can convert a PySpark DataFrame to a Python Pandas DataFrame (). A function toPandas() can convert a PySpark DataFrame to a Python Pandas DataFrame (). PySpark works on several machines, whereas pandas run on a single node. If you’re working on a Machine Learning application with massive datasets, PySpark is much faster than pandas at processing operations.
First, we have to create data frames in PySpark.
import pyspark
from pyspark.sql import SparkSession
spark = SparkSession.builder.appName('Pyspark data frames to pandas').getOrCreate()
data = [("James","","Smith","36636","M",60000),
        ("Michael","Rose","","40288","M",70000),
columns = ["first_name","middle_name","last_name","dob","gender","salary"]
pysparkDF = spark.createDataFrame(data = data, schema = columns)
pysparkDF.printSchema()
pysparkDF.show(truncate=False)
toPandas() collects all records in the PySpark DataFrame and sends them to the driver software; it should only be used on a tiny fraction of the data. When using a larger dataset, the application crashes because of a memory problem.
pandasDF = pysparkDF.toPandas()
print(pandasDF)
Most commonly used PySpark functions
PySpark show() :
PySpark DataFrame show() displays the contents of a DataFrame in a Table Row and Column Format. The column values are truncated at 20 characters by default, and only 20 rows are displayed.
from pyspark.sql import SparkSession
spark = SparkSession.builder.appName('pyspark show()').getOrCreate()
columns = ["Seqno","Quote"]
data = [("1", "Be the change that you wish to see in the world"),
    ("2", "Everyone thinks of changing the world, but no one thinks of changing himself."),
df = spark.createDataFrame(data,columns)
df.show()
Let’s look at how to display the complete contents of the Quote column, which are truncated at 20 characters.
df.show(truncate=False)
Pyspark Filter():
If you’re coming from a SQL background, you can use the where() clause instead of the filter() method to filter the rows from an RDD/DataFrame depending on the specified condition or SQL expression.
from pyspark.sql.types import StructType,StructField
from pyspark.sql.types import StringType, IntegerType, ArrayType
data = [
    (("James","","Smith"),["Java","Scala","C++"],"OH","M"),
    (("Anna","Rose",""),["Spark","Java","C++"],"NY","F"),
    (("Julia","","Williams"),["CSharp","VB"],"OH","F"),
 ]
schema = StructType([
     StructField('name', StructType([
        StructField('firstname', StringType(), True),
        StructField('middlename', StringType(), True),
         StructField('lastname', StringType(), True)
     ])),
     StructField('languages', ArrayType(StringType()), True),
     StructField('state', StringType(), True),
     StructField('gender', StringType(), True)
 ])
df = spark.createDataFrame(data = data, schema = schema)
df.printSchema()
df.show(truncate=False)
To filter the rows from a DataFrame, use Column with the condition. You can express complex conditions by referring to column names with dfObject.colname.
df.filter(df.state == "OH").show(truncate=False)
PySpark map():
PySpark map (map()) is an RDD transformation that applies the transformation function (lambda) to each RDD/DataFrame element and returns a new RDD.
from pyspark.sql import SparkSession
spark = SparkSession.builder.master("local[1]")
    .appName("pyspark map()").getOrCreate()
data = ["Project","Gutenberg’s","Alice’s","Adventures",
"in","Wonderland","Project","Gutenberg’s","Adventures",
"in","Wonderland","Project","Gutenberg’s"]
rdd=spark.sparkContext.parallelize(data)
RDD map() transformations are used to do sophisticated operations, such as adding a column, changing a column, converting data, and so on. The output of map transformations always has the same amount of records as the input.
rdd2=rdd.map(lambda x: (x,1))
for element in rdd2.collect():
    print(element)
PySpark Select():
PySpark select() is a transformation function that returns a new DataFrame with the selected columns. It may pick single, multiple, column by index, all columns from a list, and nested columns from a DataFrame.
import pyspark
from pyspark.sql import SparkSession
spark = SparkSession.builder.appName('Pyspark Select()').getOrCreate()
data = [("James","Smith","USA","CA"),
    ("Michael","Rose","USA","NY")
  ]
columns = ["firstname","lastname","country","state"]
df = spark.createDataFrame(data = data, schema = columns)
df.show(truncate=False)
By giving the column names to the select() function, you can choose a single or several columns from the DataFrame. This produces a new DataFrame with the selected columns because DataFrame is immutable. The Dataframe contents are displayed using the show() function.
df2.select("name").show(truncate=False)
PySpark Join():
PySpark Join is used to join two DataFrames together, and by chaining them together, you can join several DataFrames. It supports all fundamental SQL join types, including INNER, LEFT OUTER, RIGHT OUTER, LEFT ANTI, LEFT SEMI, CROSS, and SELF JOIN.
emp = [(1,"Smith",-1,"2018","10","M",3000),
    (2,"Rose",1,"2010","20","M",4000),
    (3,"Williams",1,"2010","10","M",1000),
    (4,"Jones",2,"2005","10","F",2000),
  ]
empColumns = ["emp_id","name","superior_emp_id","year_joined",
       "emp_dept_id","gender","salary"]
empDF1 = spark.createDataFrame(data=emp, schema = empColumns)
empDF1.printSchema()
empDF1.show(truncate=False)
dept = [("Finance",10),
    ("Marketing",20),
    ("Sales",30),
    ("IT",40)
  ]
deptColumns = ["dept_name","dept_id"]
deptDF1 = spark.createDataFrame(data=dept, schema = deptColumns)
deptDF1.printSchema()
deptDF1.show(truncate=False)
Inner join is PySpark’s default and most commonly used join. This connects two datasets based on key columns, with rows from both datasets being deleted if the keys don’t match (emp & dept).
empDF.join(deptDF,empDF.emp_dept_id ==  deptDF.dept_id,"inner")
     .show(truncate=False)
Frequently Asked Questions
Q1. What is RDD in PySpark?
A. RDD stands for Resilient Distributed Dataset. In PySpark, RDD is the fundamental data structure representing an immutable distributed collection of objects. RDDs are fault-tolerant, allowing for distributed processing and parallel execution across a cluster. They support various transformations (map, filter, etc.) and actions (count, collect, etc.) to perform distributed data processing operations in PySpark.
Q2. What is RDD vs DF in PySpark?
A. In PySpark, RDD (Resilient Distributed Dataset) and DataFrame (DF) are two fundamental data structures used for distributed data processing. RDDs are the core data structure in PySpark, providing a low-level API and representing a distributed collection of objects. They offer more flexibility but less optimization compared to DataFrames.
DataFrames, on the other hand, provide a higher-level, tabular-like structure with a schema. They are built on top of RDDs and offer optimizations such as query optimization and Catalyst optimizer. DataFrames provide a simpler API for data manipulation, integration with Spark SQL, and compatibility with various data formats.
Overall, RDDs are more flexible but less optimized, while DataFrames provide better performance and ease of use, particularly for structured and semi-structured data.
Scope for big data engineers
Big Data engineers are to identify patterns in large data sets and design algorithms to make raw data more relevant to businesses. This IT position causes a diverse range of technical abilities, including a thorough understanding of SQL database design and several programming languages.
Skillsets and responsibilities for big data engineers:
Analytical abilities
Data visualization abilities
Knowledge of business domains and big data tools.
Programming abilities
Problem-solving abilities.
Data mining Techniques
About Myself:
This is Lavanya from Chennai. I am a passionate writer and enthusiastic content maker. The most intractable problems always thrill me. I am currently pursuing my B.E., in Computer Engineering and have a strong interest in the fields of data engineering, machine learning, data science, and artificial intelligence, and I am constantly looking for ways to integrate these fields with other disciplines such as science and chemistry to further my analysis goals.
Linkedin URL: https://www.linkedin.com/in/lavanya-srinivas-949b5a16a/
Conclusion
I hope you found this blog post interesting! You should now be familiar with the Apache spark and Pyspark RDD operations and functions, as well as scopes of big data. In this article, we glanced at how to install and use the spark framework using python and how it may help you know about some of the RDD functions in the spark environment.
END NOTES
When you apply a transformation to an RDD, you get a new RDD. As a result, RDDs are inherently immutable. We computed the outcome when an action on an RDD is introduced. As a result, lazy evaluation reduces computation overhead and improves system efficiency.
If you have questions about Spark RDD Operations, please contact us. I will gladly assist you in resolving them.
The media shown in this article is not owned by Analytics Vidhya and are used at the Author’s discretion.
Hello, my name is Lavanya, and I’m from Chennai. I am a passionate writer and enthusiastic content maker. The most intractable problems always thrill me. I am currently pursuing my B. Tech in Computer Engineering and have a strong interest in the fields of data engineering, machine learning, data science, and artificial intelligence, and I am constantly looking for ways to integrate these fields with other disciplines such as science and computer to take further my research goals.