This article was published as a part of the Data Science Blogathon.
Introduction
As we all know, Computer Vision has gained huge popularity in Machine Learning and Artificial Intelligence. The image recognition skill allows computers to process more information than the human eye, often faster and more accurately, or simply when people are not involved in looking. So, you might be wondering how machines can learn and interpret the visual world.
In this article, I will cover how to start working with images and videos using the OpenCV library of Python. We will be covering the following topics :
- A brief introduction to Computer Vision
- A brief introduction to the OpenCV library and its applications
- How to work with images and videos using the OpenCV library
Computer Vision
It is a field of Artificial Intelligence and Computer Science that trains computers to understand the visual world. It is one of the main components of machine learning. It deals with the images of the natural world (high dimensional data). It carries out various tasks such as acquiring, analyzing, and processing to understand images and convert them into numerical or symbolic information.
Today’s computer vision algorithms are based on pattern recognition and typically rely on convolutional neural networks(CNN). Computer vision is booming due to various advancements in this field, and its popularity has grown exponentially in the last few years. Its applications range from defect detection to intruder detection, mask detection to tumor detection, crop monitoring to plant monitoring, vehicle classification to traffic flow analysis, etc. This technology is mainly used in retail and manufacturing, transportation, media, agriculture, healthcare, sports, banking, augmented reality, home security, etc.
OpenCV
Python includes a library called OpenCV To work in the field of computer vision. It is an open-source library that was launched in the year 1999. We can perform tasks such as image processing, image analysis, video analysis, etc. This library is primarily written in C++ and has C++, Python, Java, and MATLAB interfaces to work with.
Applications:
2D and 3D feature toolkits
Video/image search retrieval
Facial-recognition system
Gesture recognition
Mobile robotics
Object identification
Medical image analysis
Motion tracking
Augmented reality
Installation
OpenCV can be easily installed using the pip command as follows
pip install opencv-python
Working with Images using OpenCV
OpenCV has many operations that can be performed on images when working with images. Among those, I will be discussing:
- Reading an image
- Resize an image
- Rotate an image
- flip an image
- Rewrite an image
- Crop an image
- Drawing various shapes on an image
1. Read an image from the file
1. The image is read using the function imread() (this supports the BMP, jpeg, tiff, png, portable image formats, etc.)
2. To show the image we read in the previous step, we use the function “imshow().” The first argument of this function is the title, and the second is the image we have read.
3. The waitkey() function lets us display a window for several milliseconds. The number of milliseconds is passed as a parameter to the function. If 0 is passed as an argument, it waits forever until any key is pressed.
4. Finally, the destroyAllWindows() deletes the image window from memory after displaying it.
Example:
Python Code:
import cv2

img=cv2.imread('img.jpeg')
cv2.imshow('Image',img)
cv2.waitKey()
cv2.destroyAllWindows()
2. Resize an image:
In image processing, there is often a need to resize the images. OpenCV provides us with several methods to easily rescale the images. Let us understand through an example.
Example:
img2=cv2.resize(img,(400,400))

#resize by a fraction of original size

img3=cv2.resize(img,(0,0),fx=0.5,fy=0.6)

#using INTER_AREA to shrink the image

img4=cv2.resize(img,(600,700),interpolation=cv2.INTER_AREA)
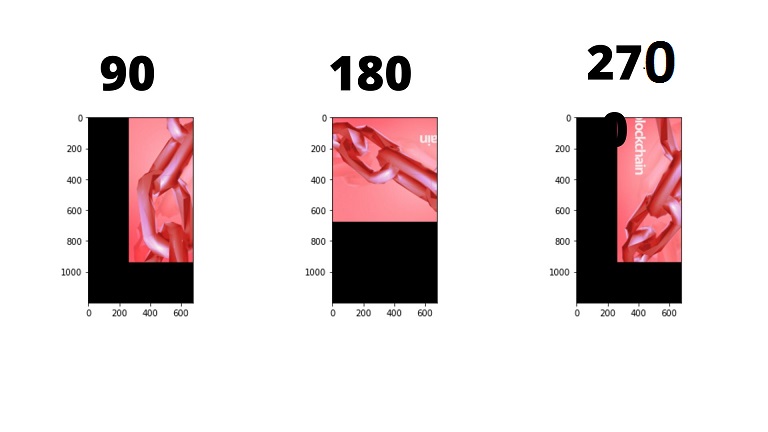
3. Rotate an image
The syntax for rotating an image using OpenCV is
M=cv2.getRotationMatrix2D(center, angle,scale)
and then we use the method
cv2.wrapAffine(src,M, (h,w))
Let us understand in depth by using an example:
Example:
#calculate height and width to get center

(h,w)=img.shape[:2]

center=(w/2,h/2)

#rotate by 90 degrees

M = cv2.getRotationMatrix2D(center, 90, 1.0)

img90 = cv2.warpAffine(img, M, (h, w))

#rotate by 180 degrees

M = cv2.getRotationMatrix2D(center, 180, 1.0)

img180 = cv2.warpAffine(img, M, (h, w))

#rotate by 270 degrees

M = cv2.getRotationMatrix2D(center, 270, 1.0)

img270 = cv2.warpAffine(img, M, (h, w))
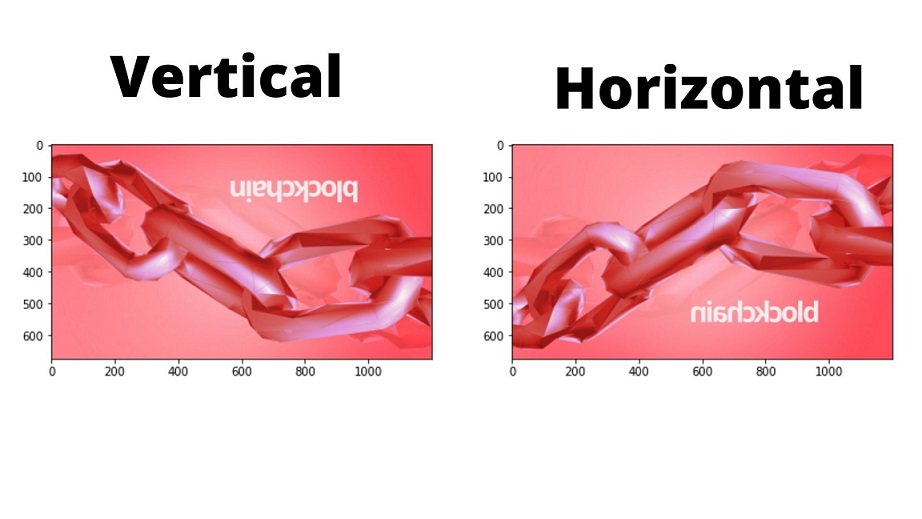
4. Flip an image:
To flip an image, we use the function cv2.flip() and pass the parameters, i.e., the image and the flip code (either horizontal or vertical)
Example:
#flip- vertical axes
img=cv2.flip(img,0)
#flip- horizontal axes
img=cv2.flip(img,1)
5. Rewrite an image
To rewrite an image to a new file, we use the function imwrite() as follows:
cv2.imwrite('new_img.jpg',img)
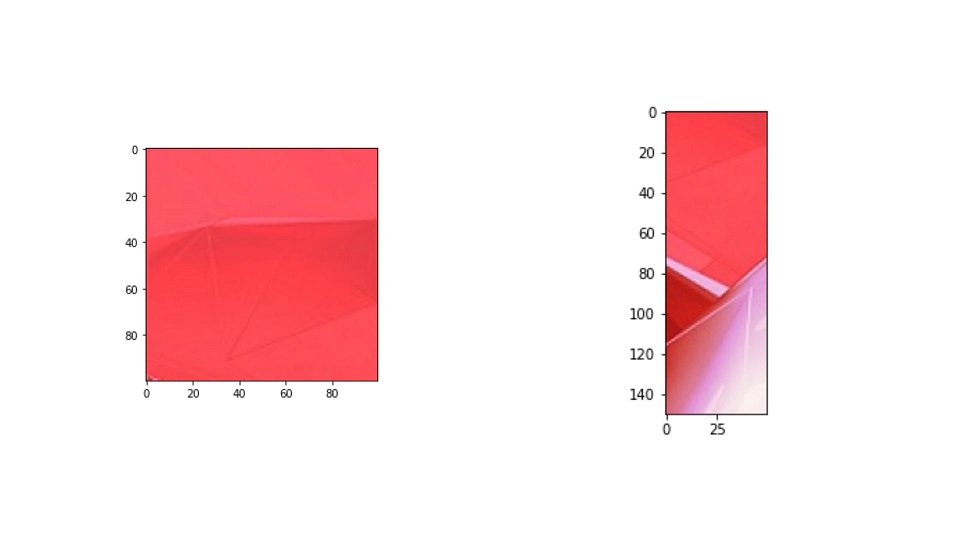
6. Crop an image
#crop from top
img=img[0:100,0:100]
#crop by specifying height and width
img=img[50:200,50:100]
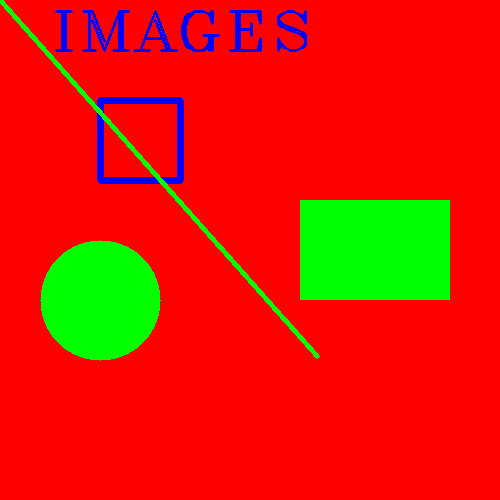
7. Drawing Shapes
Using OpenCV, we can quickly draw various shapes such as a circle, a rectangle, a polygon, etc. on an image using different functions. Let us understand using an example:
Example:
#creating a blank image
import cv2 as cv2
import numpy as np
img=np.zeros((500,500,3),dtype=float)
#changing the color of the image to green
img[:]=0,255,0
#Red
img[:]=0,0,255
#changing the color of a particular portion
img[200:300,300:450]=0,255,0
#drawing a rectangle
cv2.rectangle(img,(100,100),(180,180),color=(255,0,0),thickness=5)
#draw a circle with filling the color
cv2.circle(img,center=(100,300),radius=60,color=(0,255,0),thickness=-1)
#drawing a line
cv2.line(img,(0,0),(317,356),thickness=3,color=(0,255,0))
#adding text
cv2.putText(img,org=(50,50),fontScale=3,color=(255,0,0)
,thickness=2,lineType=cv2.LINE_AA,text="IMAGES", fontFace=cv2.FONT_HERSHEY_COMPLEX_SMALL)
cv2_imshow(img)
cv2.waitKey(0)
Working with Videos using OpenCV
A video is a sequence of frames or a sequence of images. An image is usually in the form of BGR (Blue, Green, Red). Each pixel will have a value between 0-255. To start working with videos using OpenCV, we use the following functions:
Cv2.VideoCapture() : It establishes a connection to a Video.It takes a parameter that indicates whether to use the built-in camera or an add-on camera. The value ‘0’ denotes the built-in camera.
Cap.read(): This method allows us to get a frame.
Cv2.cvtColor(): allows you to change the color model that the image is using. This includes converting from BGR to RGB and Grayscale.
When it comes to working with videos, in this article, we will be learning
- How to capture different properties of a video frame
- Reading a Video file
- Writing a Video
1. Capturing Properties of a video frame:
Let us look at a few examples of capturing properties of a Video.
- To capture the frame shape:
frame.shape
(2160, 3840, 3)
plt.imshow(frame)
plt.show()
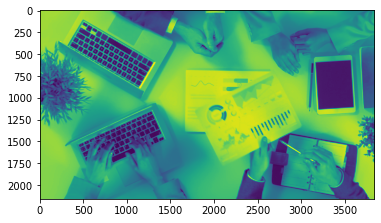
- To change the color of the frame, we use the function cv2.cvtColor() as shown below:
#changing the color of the frame
plt.show()
plt.imshow(cv2.cvtColor(frame,cv2.COLOR_BGR2GRAY))
- To capture the video, we use the function cv2.VideoCapture()
cap=cv2.VideoCapture('/content/video.mp4')
cap.read()
- To get the height of the frame, we use the cap.get() function as follows:
#height
cap.get(cv2.CAP_PROP_FRAME_HEIGHT)
- To get the width of the frame, we use,
#width
cap.get(cv2.CAP_PROP_FRAME_WIDTH)
- To get the frame count, we use the function cap.get() as follows:
#number of frames
cap.get(cv2.CAP_PROP_FRAME_COUNT)
- To get the number of frames per second, we use
#number of frames per sec
cap.get(cv2.CAP_PROP_FPS)
2. Reading a Video file
- Import cv2
- We then use the function cv2.VideoCapture() to capture the video.
- Next, we loop through each frame and read the frames using the function cap.read().
- To show each frame, we use the method cv2.imshow().
- Finally, we break the loop using the waitKey() function that breaks the loop when the user presses any key.
- The destroyAllWindows() function will close the window.
Example:
#importing dependencies
import cv2
from matplotlib import pyplot as plt
#establish capture
cap=cv2.VideoCapture('/content/video.mp4')
#loop through each frame
while(cap.isOpened()):
  ret,frame=cap.read()
  frame=cv2.resize(frame,(1200,700))
  cv2.imshow(‘Video’,frame)
  if cv2.waitKey(10) & 0xFF == ord('q'):
    break
#close down everything
cap.release()
cv2.destroyALLWindows()
3. Writing a video file
- Import cv2
- Capture the video using the function cv2.VideoCapture()
- We then use the function cv2.VideoWriter to write a video. This function takes the parameters as
- cv2.VideoWriter(filename, fourcc, fps, framesize)
- The filename-The input video file that is captured
- fourcc- A code that is used to specify the video codec
- fps- frames per second
- framesize- height and width of the videframe
- Next, we loop through each frame and use the object video_writer to write the frame.
- Finally, we use the waitKey() function to break the loop
- Close the window using the function destroyAllWindows()
import cv2
from google.colab.patches import cv2_imshow
cap=cv2.VideoCapture('/content/video.mp4')
height=int(cap.get(cv2.CAP_PROP_FRAME_HEIGHT))
width=int(cap.get(cv2.CAP_PROP_FRAME_WIDTH))
fps=int(cap.get(cv2.CAP_PROP_FPS))
frame_size = (width,height)
video_writer= cv2.VideoWriter('/content/output.avi',cv2.VideoWriter_fourcc('M','J','P','G'), fps, frame_size)
for frame_idx in range(int(cap.get(cv2.CAP_PROP_FRAME_COUNT))):
  ret,frame=cap.read()
  gray=cv2.cvtColor(frame,cv2.COLOR_BGR2GRAY)
  video_writer.write(gray)
  if cv2.waitKey(10) & 0xFF== ord('q'):
    break
cap.release()
cv2.destroyALLWindows()
Conclusion
That was an interesting article that helped you create great applications related to Computer Vision. I hope you now have a good understanding of :
- What is Computer Vision
- Applications of OpenCV library
- Working with images using the OpenCV library
- Working with Videos using the OpenCV library
To learn more about this library, please refer to the documentation here
The media shown in this article is not owned by Analytics Vidhya and is used at the Author’s discretion.
I am a Software Developer who has a great passion to teach and educate others. Always keen on learning new technologies and constantly seeking out innovative solutions to everyday problems.
If I talk about my hobbies, writing comes as number one. I almost write every day about whatever interests me and any new concept that I learn each day. I am also a keen gardener.


