Introduction
Analysis of blood cells is a important step in the diagnosis of a wide range of medical disorders like infections and anaemia to more serious diseases like leukaemia. Conventionally, this was done the old way – where a lab technician would go through microscope blood smear slides, spending a couple of hours. This process is not only being mind-numbingly tedious, but it’s also is prone to human error, especially when dealing with large sample volumes or tricky cases.
Now this seems no wonder why medical professionals have been eager to automate this important analysis. With the power of computer vision and deep learning algorithms, we can handle blood cell examination with much greater accuracy and efficiency. One technique that has been game-changing for this application is image segmentation – essentially picking out and separating the individual cells from the surrounding areas of the image.
Table of contents
Image Segmentation and Mask R-CNN
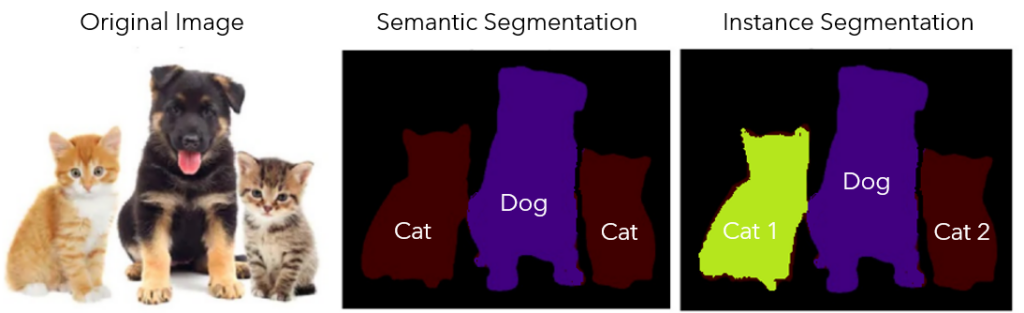
A computer vision approach called image segmentation which involves breaking an image up into several segments or regions, each of which represents a separate object or portion of an object in the image. This procedure is essential for deriving valuable data and comprehending the image’s content. Semantic and instance segmentation are the two basic categories into which segmentation falls.
- Semantic Segmentation: Semantic segmentation assigns a class label to every pixel in the image, without distinguishing between distinct instances of the same class.
- Instance Segmentation: Instance segmentation assigns class labels to pixels, which helps differentiate between many instances of the same class.
Applications of image segmentation are diverse, which ranges from medical imaging (such as tumor detection and organ delineation) to autonomous driving (identifying and tracking objects like pedestrians and vehicles) to satellite imagery (land cover classification) and augmented reality.
Introduction to Mask R-CNN and Its Role in Instance Segmentation
Modern deep learning models like Mask R-CNN (Mask Region-Based Convolutional Neural Network) are made to handle instance segmentation. This adds a branch for segmentation mask prediction on each Region of Interest (RoI), extending the Faster R-CNN model used for object detection. With this new enhancement, Mask R-CNN can now accomplish instance segmentation by detecting objects in an image and producing a pixel-level mask for each one.
Mask R-CNN is a highly successful method for applications requiring precise object borders, such as medical imaging for segmenting distinct types of cells in blood samples. It excels at properly recognizing and outlining specific objects inside an image.
Overview of the Mask R-CNN Architecture and Key Components
The Mask R-CNN architecture builds upon the Faster R-CNN framework and incorporates several key components:
- Backbone Network: Typically a deep convolutional neural network (e.g., ResNet or ResNeXt) that acts as a feature extractor. This network processes the input image and produces a feature map.
- Region Proposal Network (RPN): This component generates region proposals, which are potential regions in the feature map that might contain objects. The RPN is a lightweight neural network that outputs bounding boxes and objectness scores for these regions.
- RoI Align: An improvement over RoI Pooling, RoI Align accurately extracts features from the proposed regions of interest by avoiding quantization issues, ensuring precise alignment of features.
- Bounding Box Head: A fully connected network that takes the RoI features and performs object classification and bounding box regression to refine the initial region proposals.
- Mask Head: A small convolutional network that takes the RoI features and predicts a binary mask for each object, segmenting the object at the pixel level.
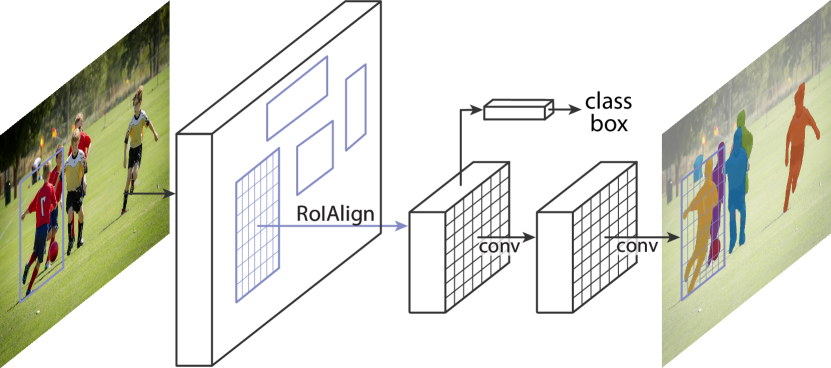
The integration of these components allows Mask R-CNN to effectively detect objects and produce high-quality segmentation masks, making it a powerful tool for detailed and accurate instance segmentation tasks. Medical applications, such as blood cell segmentation, particularly benefit from this architecture, where precise object boundaries are essential for accurate analysis and diagnosis.
Implementation of Blood Cell Segmentation Using Mask R-CNN
Now let’s implement Mask RCNN for blood cell segmentation.
Step1. Import Dependencies
import os
import torch
import numpy as np
import matplotlib.pyplot as plt
from PIL import Image
from torch.utils.data import Dataset, DataLoader
from torchvision.transforms import Compose, ToTensor, Resize
from torchvision.models.detection import maskrcnn_resnet50_fpn
from torchvision.models.detection.faster_rcnn import FastRCNNPredictor
from torchvision.models.detection.mask_rcnn import MaskRCNNPredictor
Step2. Setting Seed
Setting a seed will make sure we get the same random generation every time the code is run.
seed = 42
np.random.seed(seed)
torch.manual_seed(seed)
Step3. Define File Paths
Initializing paths to images and target(mask) for retrieving images.
images_dir = '/content/images_BloodCellSegmentation'
targets_dir = '/content/targets_BloodCellSegmentation'
Step4. Define Custom Dataset Class
BloodCellSegDataset: Creating a custom dataset class for loading and preprocessing blood cell images and their masks.
__init__: This constructor initializes the dataset by listing all image file names and constructing full paths for images and masks.
__getitem__: This function loads
- An image and its mask, preprocesses the mask to create a binary mask
- Calculates bounding boxes
- Resizes images and masks
- Applies transformations.
__len__: This function returns the total number of images in our dataset.
class BloodCellSegDataset(Dataset):
    def __init__(self, images_dir, masks_dir):
        self.image_names = os.listdir(images_dir)
        self.images_paths = [os.path.join(images_dir, image_name) for image_name in self.image_names]
        self.masks_paths = [os.path.join(masks_dir, image_name.split('.')[0] + '.png') for image_name in self.image_names]
    def __getitem__(self, idx):
        image = Image.open(self.images_paths[idx])
        mask = Image.open(self.masks_paths[idx])
        mask = np.array(mask)
        mask = ((mask == 128) | (mask == 255))
        get_x = (mask.sum(axis=0) > 0).astype(int)
        get_y = (mask.sum(axis=1) > 0).astype(int)
        x1, x2 = get_x.argmax(), get_x.shape[0] - get_x[::-1].argmax()
        y1, y2 = get_y.argmax(), get_y.shape[0] - get_y[::-1].argmax()
        boxes = torch.as_tensor([[x1, y1, x2, y2]], dtype=torch.float32)
        area = (boxes[:, 3] - boxes[:, 1]) * (boxes[:, 2] - boxes[:, 0])
        mask = Image.fromarray(mask)
        label = torch.ones((1,), dtype=torch.int64)
        image_id = torch.tensor([idx])
        iscrowd = torch.zeros((1,), dtype=torch.int64)
        transform = Compose([Resize(224), ToTensor()])
        boxes *= (224 / image.size[0])
        image = transform(image)
        mask = transform(mask)

        target = {'masks': mask, 'labels': label, 'boxes': boxes, "image_id": image_id, "area": area, "iscrowd": iscrowd}
        return image, target
    def __len__(self):
        return len(self.image_names)
Step5. Create DataLoader
collate_fn: This function is to handle batches of data, ensures proper format.
DataLoader: This is used to create pytorch data loader to
- Handle batching
- Shuffling
- Parallel loading of data.
def collate_fn(batch):
    return tuple(zip(*batch))
dataset = BloodCellSegDataset(images_dir, targets_dir)
data_loader = DataLoader(dataset, batch_size=8, num_workers=2, shuffle=True, collate_fn=collate_fn)
Step6. Define and Modify the Model
maskrcnn_resnet50_fpn: This loads a pre-trained Mask R-CNN model with a ResNet-50 backbone and Feature Pyramid Network (FPN).
num_classes: This sets the number of classes in our dataset.
FastRCNNPredictor: This replaces the classification head which fits the custom number of classes.
MaskRCNNPredictor: This replaces the mask prediction head which fits the custom number of classes.
model = maskrcnn_resnet50_fpn(pretrained=True)
num_classes = 2
in_features = model.roi_heads.box_predictor.cls_score.in_features
model.roi_heads.box_predictor = FastRCNNPredictor(in_features, num_classes)
in_features_mask = model.roi_heads.mask_predictor.conv5_mask.in_channels
num_filters = 256
model.roi_heads.mask_predictor = MaskRCNNPredictor(in_features_mask, num_filters, num_classes)
Step7. Train the Model
model.to(“cuda”): This transfers our model to GPU to accelerate training.
torch.optim.Adam: This defines our optimizer for updating model parameters to our model.
model.train(): This sets the model on training mode and enables it to change weights.
Training Loop:
- We iterates over multiple epochs.
- Batches of images and targets are transferred to the GPU.
- The model clears gradients for the next epoch and passes images through to calculate loss.
- The loss is backpropagated, and model parameters are updated.
- Average loss per epoch is calculated and printed.
model = model.to("cuda")
optimizer = torch.optim.Adam(model.parameters(), lr=0.001)
model.train()
for epoch in range(10):
    epoch_loss = cnt = 0
    for batch_x, batch_y in tqdm(data_loader):
        batch_x = list(image.to("cuda") for image in batch_x)
        batch_y = [{k: v.to("cuda") for k, v in t.items()} for t in batch_y]
        optimizer.zero_grad()
        loss_dict = model(batch_x, batch_y)
        losses = sum(loss for loss in loss_dict.values())
        losses.backward()
        optimizer.step()
        epoch_loss += loss_dict['loss_mask'].item()
        cnt += 1
    epoch_loss /= cnt
    print("Training loss for epoch {} is {} ".format(epoch + 1, epoch_loss))
Step8. Evaluate the Model
In Evaluation:
- We load a sample image and its original mask.
- We apply transformations to the image and mask.
- We set the model in evaluation mode so that the model does not calculate gradients.
- We pass the image through the model to get predicted masks.
- At the end we visualize the original and predicted masks using Matplotlib.
image = Image.open('/content/images_BloodCellSegmentation/002.bmp')
gt_mask = Image.open('/content/targets_BloodCellSegmentation/002.png')
gt_mask = np.array(gt_mask)
gt_mask = ((gt_mask == 128) | (gt_mask == 255))
gt_mask = Image.fromarray(gt_mask)
transform = Compose([Resize(224), ToTensor()])
image = transform(image)
gt_mask = transform(gt_mask)
model.eval()
output = model(image.unsqueeze(dim=0).to('cuda'))
output = output[0]['masks'][0].cpu().detach().numpy()
plt.imshow(gt_mask.squeeze(), cmap='gray')
plt.imshow((output.squeeze() > 0.5).astype(int), cmap='gray')
Step9. Calculate Intersection over Union (IoU)
IoU Calculation:
- Here we flatten the predicted and original masks.
- Then we calculate the intersection and union of the predicted and original masks.
- Now we compute the IoU score, a metric for evaluating segmentation performance.
mask = (output.squeeze() > 0.5).astype(int)
pred = mask.ravel().copy()
gt_mask = gt_mask.numpy()
target = gt_mask.ravel().copy().astype(int)
pred_inds = pred == 1
target_inds = target == 1
intersection = pred_inds[target_inds].sum()
union = pred_inds.sum() + target_inds.sum() - intersection
iou = (float(intersection) / float(max(union, 1)))
iou
Comparison with Other Techniques
While Mask R-CNN is the new kid on the block taking segmentation by storm, we can’t discount some of the older, more traditional methods that kicked things off. Techniques like thresholding and edge detection have been workhorses for blood cell segmentation for ages.
The problem, however, is that these simpler approaches often can’t handle the endless variations that come with real-world medical images. Thresholding separates objects/background based on pixel intensities, but it struggles with noise, uneven staining, etc. Edge detection looks for boundaries based on intensity gradients but cell clusters and overlaps throw it off.
Then we have more recent deep learning models like U-Net and SegNet, which specifically designed for dense pixel-wise segmentation tasks. They’ve definitely leveled up the segmentation game, but their sweet spot is identifying all pixels of a particular class, like “cell” vs “background.”
Mask R-CNN takes a different instance-based approach where it separates and outlines each individual object instance. While semantic segmentation tells you all pixels that belong to “car,” instance seg tells you the precise boundaries around each distinct car object. For blood cell analysis, being able to delineate every single cell is crucial.
So while those other deep learning models are great at their respective semantic tasks, Mask R-CNN’s specialization in instance segmentation gives it an edge (no pun intended) for intricate cell outlining. Its ability to both locate and segment individual instances, along with separating clustered cells, is unmatched.
Conclusion
The promise of deep learning techniques in medical diagnostics is demonstrated by the application of Mask R-CNN to blood cell segmentation. With enough research and investment we can automate mundane task and increase the productivity of medical professionals. Mask R-CNN can greatly impact the effectiveness and precision of blood cell analysis by automating the segmentation process, which will enhance patient care and diagnostic results. By utilization of Mask R-CNN’s advanced capabilities, this technology easily overcomes the drawbacks of manual segmentation techniques and creates future opportunities to more advanced medical imaging solutions.
Frequently Asked Questions
Q1. What is Image Segmentation?
A. Image segmentation is the process of dividing an image into several sections or segments in order to simplify its display or to increase its significance and facilitate analysis.
Q2. Give an explanation of Mask RCNN?
A. Using a Region Proposal Network (RPN), Mask R-CNN first generates region proposals. Following this enhancement, these suggestions are separated into object classes. Mask R-CNN not only classifies and localizes objects but also predicts a binary mask that represents the pixel-by-pixel segmentation of each object inside its bounding box, for every object that is detected.
Q3. How does Mask R-CNN compare with conventional segmentation techniques?
A. Mask R-CNN can recognise objects and segment instances in an image at the same time, giving each instance of an object pixel-level accuracy. Conventional segmentation techniques struggle to identify between distinct object instances and object borders.
Q4. What is the distinction between Mask R-CNN and R-CNN?
A. The main distinction between Region-based Convolutional Neural Network, or R-CNN, initially proposes regions of interest before classifying those regions to detect objects. Mask R-CNN is an extension of R-CNN that can also do instance segmentation and object detection by including a branch for predicting segmentation masks for each region of interest.
Data science Trainee at Analytics Vidhya, specializing in ML, DL and Gen AI. Dedicated to sharing insights through articles on these subjects. Eager to learn and contribute to the field's advancements. Passionate about leveraging data to solve complex problems and drive innovation.


