This article was published as a part of the Data Science Blogathon.
Introduction
Web apps are the apps through which you can showcase your solution or approach to the public at a mass level. Creating the model is not enough until it’s in use by people. When it comes to delivering the solution then, everyone comes with creating a website. But we can follow simple steps and use cloud-native services that not only take our application to a global level but provide it a secure and easy access functionality. In this article, we will learn how we can build and deploy an AI application with Azure cognitive services, where we will build a simple app for language translation.
System Setup
The first step before developing the project is to get rid of all the pre-requisite for project development and its runtime. So we will follow the simple three-step process to make the system ready for code with the necessary libraries and software to help build a translation app with Azure cognitive services.
Step 1) Create Azure Account
You can build an account on azure for 12 months free of charge, where most of the azure cognitive services will be free to use. You will not get charged unless you exceed the compute resource before the limit. Refer to the official Azure documentation steps and follow the process.
Step 2) Download Python 3.6 or above
You must have Python installed on your system to create a Flask language translation application. If you already have a python, then you can jump to step 3; else, you can download python through the official python download page through this link.
Step 3) Install Code Editor
I suggest using VS Code editor, where you can code in different languages. Apart from VS code, you can select other Python IDEs.
Set Up a Development Environment
The download and installation part of project pre-requites is completed, but we have to install certain libraries on the software before writing code. First, create a new directory where you want to develop a project and open the folder in the code editor.
Create a Python Virtual Environment
It is always good to develop a new project in a new virtual environment that helps to install only libraries on which the project operates. Creating a virtual environment makes our application modular and avoids versioning issues in the application. You can create a virtual environment by using the below command based on your operating system.
# Windows
# Create the environment
python -m venv venv
# Activate the environment
.venvscriptsactivate
# macOS or Linux
# Create the environment
python -m venv venv
# Activate the environment
source ./venv/bin/activate
Install Flask and required Libraries
Create a new text file in your working directory and name it requirements.txt. Add the following libraries in the file displayed in the below snippet and save.
flask
python-dotenv
requests
To install all the libraries, run the below command.
pip install -r requirements.txt
Create a Flask App
Flask is a python package used for creating static, responsive websites and data apps with Python. Flask provides options for easy routing and browsing of different URLs. I hope you are familiar with Flask and if you want an overview, please refer to this article.
To start, we will create a landing page for our application which will display the form that will accept the details from the user. We are creating a language translation application where in the form user will enter the text, which is the source text, and a target language in which results will be displayed. Azure cognitive services can automatically detect the source language. First, we will create a simple flask app to route the application to the Home template containing the form to enter the details.
Step 1) Create the core application.
In your working directory, create a new project folder and opens the folder in a code editor. Create a new python file and name it app.py, where we will create a flask app. Below is the code snippet to create a default route for the application.
from flask import Flask, request, session, render_template, url_for, redirect

app = Flask(__name__)

#Add the route

@app.route('/', methods=['GET'])

def index():

return render_template('index.html')
Explanation ~ The import statement includes the references to the flask, the functions, and the modules to build a template like render_template will be used to render the user to the HTML template on the defined URL.
Step 2) Create HTML Template
Jinja is the templating engine for a flask that focuses on HTML. we will use a little bit of Bootstrap to make a page look a little prettier. By using Bootstrap we will use its different classes. If you are unfamiliar with Bootstrap, do not worry and focus on the HTML part. Templates for flask need to be created in a folder named templates.
- create a new folder named templates where your app.py is kept (in the project folder itself).
- Select the templates folder and create a new HTML file named index.html and then you can follow the below code snippet.
    <link rel="stylesheet" href="https://cdn.jsdelivr.net/npm/[email protected]/dist/css/bootstrap.min.css"
        integrity="sha384-TX8t27EcRE3e/ihU7zmQxVncDAy5uIKz4rEkgIXeMed4M0jlfIDPvg6uqKI2xXr2" crossorigin="anonymous">
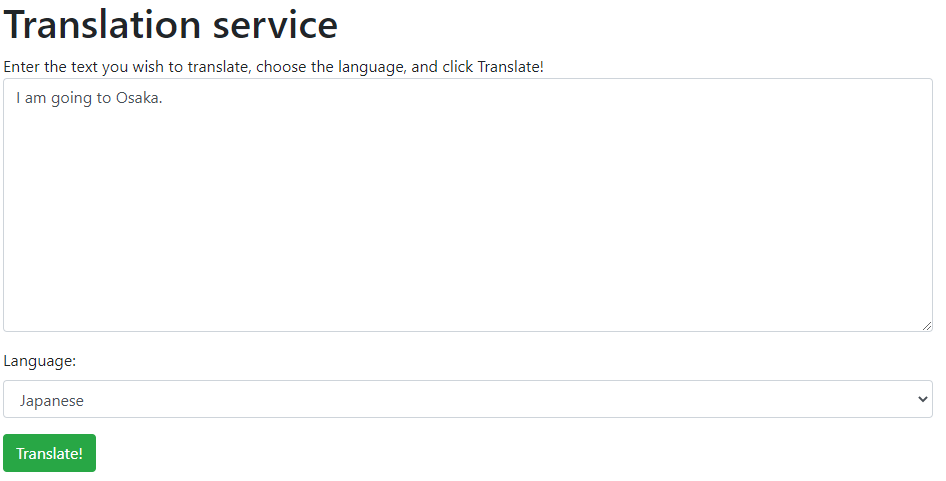
Translation service
Enter the text you wish to translate, choose the language, and click Translate!
English
Italian
Japanese
Russian
German
Italian
Japanese
Russian
German
The form is an important part of understanding that contains text-area in which the user will enter the text, a dropdown list to select the target language, and a submit button which, on click, submits the detail back to the translator service to get a resultant translated text.
Step 3) Test the application.
The site home page is initialized, and it’s time to test it. So follow the below two commands to start the server.
- Run the below command to set the Flask runtime to development which means the server will automatically reload whenever we make changes to the flask app. Run the below command according to your operating system.
# Windows
set FLASK_ENV=development
# Linux/macOS
export FLASK_ENV=development
- Run the application.
flask run
- Open the application in the browser and navigate to the URL you received on running a command or visit the default flask route http://localhost:5000.
Create Translator Service
Azure provides a set of offerings called cognitive services, and translator service is one of the parts of cognitive services. You will call the translator service like we create routes for other endpoints. To call the translator service, you will need a key, which will be used each time we call the service to translate the text. To protect the key, the great solution is to use dotenv, which contains key-value pairs, and we don’t want it to be a part of the source code.
- Browse to the Azure Portal and select create a new resource.
- In the resource search box, enter translator.
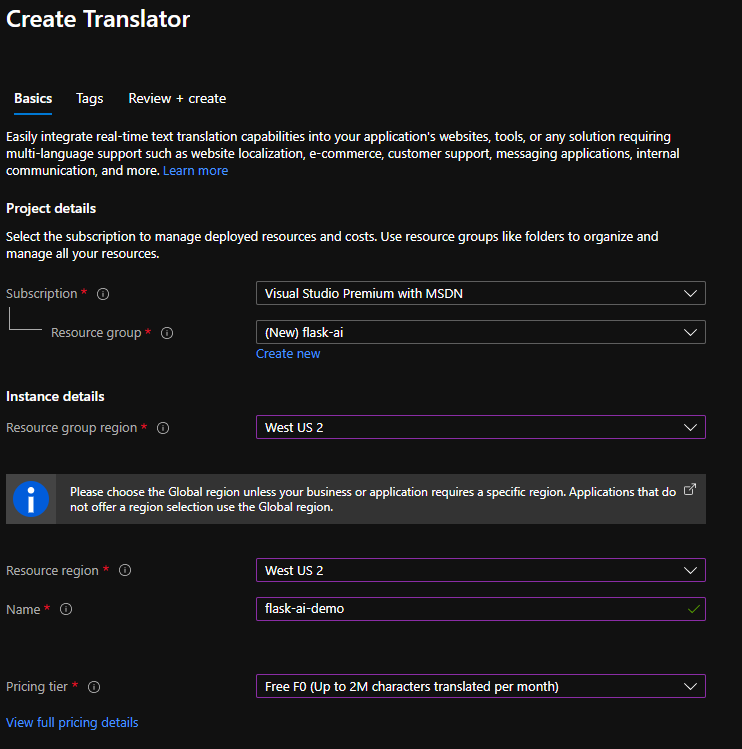
- Select Translator and click create. Complete the create translator form with the following values
- Subscription – Your subscription.
- In the resource, the group says to create a new one and name it Flask-ai
- Resource group region – select the name that is near your place.
- Resource region – Enter the same value entered above.
- Name – any unique name as per your choice.
- Pricing tier – Free F0
- Select Review and Create. Click create, and the resource will be created after a few moments.
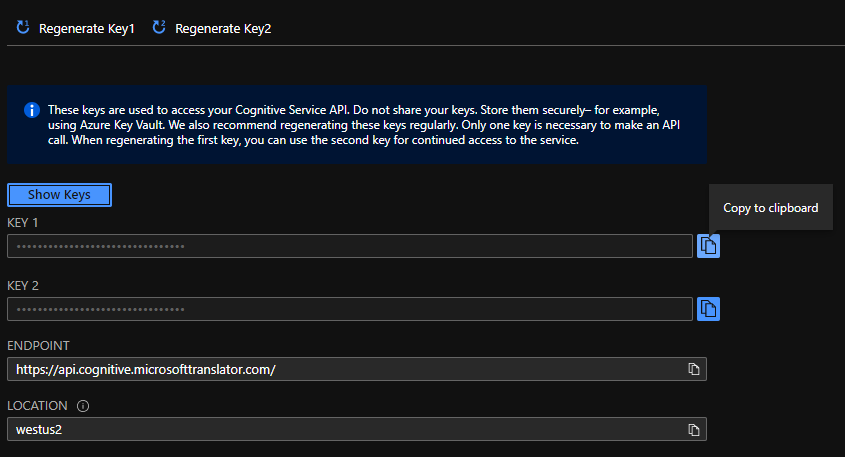
- Go to Resource
- Select Keys and endpoints on the left side under Resource Management.
- Next to Key 1, select copy to clipboard.
- Make a note of text translation and location values.
Create .env File
Return to the code editor, create a new file in the project root directory, and name it .env. The file will contain your key, endpoint and location values. After creating the file, paste the following text into it.
KEY=your_key
ENDPOINT=your_endpoint
LOCATION=your_location
In place of your key, paste the key that you have copied above. The endpoint and location should be entered from Azure.
Call the Translator Service
We have created the translator service at the back-end side means on the Azure portal. Now we will add the necessary logic to add a template and routing to add a translator with our application.
Add the Code to call the service.
App.py is the main file containing the application code. We have to create the default route with so that when a user submits the form we can access the information and call the translator service. So, first, we need to import the necessary modules and load the key-pair file.
import json, os,  uuid, requests
from dotenv import load_dotenv
load_dotenv()
Now we will create a route to accept information, call the translator service, accept the response from the translator and display the translated text back to the user.
In the above code snippet, read the comments to understand a part of what it means and in short below are the steps that our code does.
- It reads the text that the user has entered and the target language.
- Loads the environment variable stored in the .env file.
- Creates the path to call the translator service that includes the target language (source language is automatically identified)
- Creates header information which includes location and arbitrary ID for transmission.
- Creates a Body of text that need to be translated.
- Apply Post request to call the translator service.
- Retrieve JSON response from the server that includes translated text into the target language.
- Using slicing from JSON object retrieves only the resultant translated text.
- Render at the results page to display the translated text to a user.
Create a Template to display the results
In the last step, we stated that to render the user at the results page to display the translated text. So we will create an HTML page in the templates folder where the translated text will get displayed using Jinja templating.
    <link rel="stylesheet" href="https://cdn.jsdelivr.net/npm/[email protected]/dist/css/bootstrap.min.css"
        integrity="sha384-TX8t27EcRE3e/ihU7zmQxVncDAy5uIKz4rEkgIXeMed4M0jlfIDPvg6uqKI2xXr2" crossorigin="anonymous">
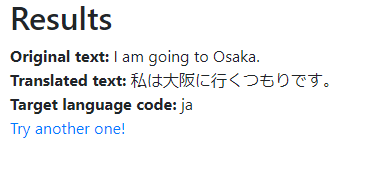
Results
Original text: {{ original_text }}
Translated text: {{ translated_text }}
Target language code: {{ target_language }}
Test the Page
Follow the same steps to start the flask server from the integrated template and run the command. Navigate to the localhost:5000 and fill up the form and submit.
If everything is fine, then you will get the translated text.
Conclusion
Congratulations! You have successfully created an application that translates the text from one language to another language using Azure cognitive service. In reality, the language relies on the context, and the computer cannot interpret the results it in the same way compared with humans so if you notice the results, then it will not be perfect each time you run the application. Let us look at some of the key takeaways from this article.
- The route is a path to action similar to tapping a button in a mobile app. In our app, we click to submit it undergoes certain actions.
- Templates allow us to write core HTML, and we use placeholders to pass information from the server where Jinja is the templating engine for the flask. Hence, we use {{ }} as a placeholder to display the information.
- Azure cognitive service provides multiple services for computer vision, speech-to-text, text-to-speech, text translation, etc.
- Whenever you upload your code on the public or open-source platform, ensure that you mark the .env file with git ignores so the file credentials are safe with you.
Thank You Note
- I hope it was easy to cope with each step discussed in the article. You can post queries in the comment section below or can connect with me.
- Connect with me on Linkedin.
- Check out my other articles on Analytics Vidhya and crazy-techie
The media shown in this article is not owned by Analytics Vidhya and is used at the Author’s discretion.
I am a software Engineer with a keen passion towards data science. I love to learn and explore different data-related techniques and technologies. Writing articles provide me with the skill of research and the ability to make others understand what I learned. I aspire to grow as a prominent data architect through my profession and technical content writing as a passion.