This article was published as a part of the Data Science Blogathon
Deployment of Machine Learning Models
Deployment of a machine learning model means making your model predictions available to the users through API or through a web application. In this post let us see how we could leverage CherryPy and Docker to deploy a Machine Learning model.
Lifecycle of a Machine Learning Project
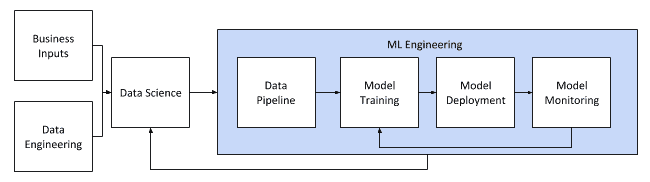
The lifecycle of a Machine Learning Project involves,
- Acquiring data
- Data Preprocessing
- Data cleaning
- Missing value imputation
- Outlier removal
- Data transformation
- Normalization
- Standardization
- Data reduction
- Feature Selection
- Feature Extraction
- Data cleaning
- Model selection
- Training with the best model
- Model deployment
- Model monitoring
In this post, we are going to look at Model Deployment using CherryPy and Docker.
What is CherryPy?
CherryPy is a python, object-oriented web framework. A web framework is a software framework that assists us in developing web applications. In this post, we are going to utilize CherryPy to build a web API for training iris data and obtaining predictions for it.
Install cherrypy using the following command,
pip install cherrypy
CherryPy starter example,
import cherrypy

class CherryPyExample:
    @cherrypy.expose
    def welcome_page(self):
        return "Welcome!"

if __name__ == '__main__':
    cherrypy.quickstart(CherryPyExample())
The method name ‘welcome_page’ is exposed using the decorator @cherrypy.expose which when called returns the string ‘Welcome!’.
The line cherrypy.quickstart(CherryPyExample()), starts the cherrypy engine and the following output can be viewed.
[15/Jun/2021:17:19:47] ENGINE Listening for SIGTERM.
[15/Jun/2021:17:19:47] ENGINE Listening for SIGHUP.
[15/Jun/2021:17:19:47] ENGINE Listening for SIGUSR1.
[15/Jun/2021:17:19:47] ENGINE Bus STARTING
CherryPy Checker:
The Application mounted at '' has an empty config.

[15/Jun/2021:17:19:47] ENGINE Started monitor thread 'Autoreloader'.
[15/Jun/2021:17:19:47] ENGINE Serving on http://127.0.0.1:8080
[15/Jun/2021:17:19:47] ENGINE Bus STARTED
Now accessing http://127.0.0.1:8080/welcome_page you can view the following output.
To know further about CherryPy, read their documentation.
What is Docker?
Docker is an open-source containerization platform. What does that mean? Docker containerizes your application and isolates your dependencies for each application, but Docker can do much more than we just saw. Docker makes your application platform-independent, which means you can run docker anywhere. Docker is seen as an alternative to Virtual Machines.
Why docker containers?
Docker provides you all the features of an OS but also gives you extra layers of advantages,
- Docker is lightweight, unlike VMs, docker only has the code and its dependencies whereas the VMs contains an entire OS instance along with it.
- Docker is faster and easier to deploy, VM instances take a long time to get started whereas docker containers can be started in seconds.
- Docker is portable, you can push your image to the docker hub and download it from anywhere which makes it ubiquitous.
Docker terminologies
- Docker file
- Docker image
- Docker containers
Docker file
Docker file is a simple text file that contains the instructions to build a container image. The docker file is read sequentially by the docker engine, each line represents a layer in the image. Docker file is used to automate the Docker image creation.
Docker image
Docker image contains the source code of your application, its dependencies, and libraries. Docker image is built from the instructions of Docker file. You can either create an image from scratch or you can use the existing images from the Docker hub. The final layer of the image is called the read/write layer which exists only when the container is started and its changes reside until the container is stopped.
Docker container
A running instance of an image is called a container. Many containers can be created from a single docker image. All the data produced by the docker container resides in the container until the container is stopped, once it is stopped all the data is erased.
For installing Docker, refer to their documentation
Deploying a Machine Learning Model using CherryPy and Docker
Before moving on, make sure your project structure looks like this.
Project Structure
deploy_model (root directory)
|--- model_deployment.py
|--- Dockerfile
|--- requirements.txt
Requirements.txt file
pandas==1.2.4
CherryPy==18.6.0
scikit_learn==0.24.2
Dockerfile
FROM ubuntu
ADD . /DeployModel
WORKDIR /DeployModel

# Export Time-Zone
ENV TZ=Asia/Kolkata
RUN ln -snf /usr/share/zoneinfo/$TZ /etc/localtime && echo $TZ > /etc/timezone

# dependencies
RUN apt-get update
RUN apt-get install python3.6 -y
RUN apt-get install python3-pip -y
RUN pip3 install -r requirements.txt

CMD ["/bin/bash"]
Instructions in Dockerfile
- FROM ubuntu, is the base image that contains the Ubuntu OS from which we build our customized image.
- ADD . /DeployModel, this command adds all the files and directories in the current directory to the image directory named DeployModel
- WORKDIR /DeployModel, this command changes the current working directory to DeployModel
- The timezone commands set the system timezone to Asia/Kolkata
- RUN apt-get update, runs the command inside the image, RUN apt-get install python3.6 -y installs the python library, RUN apt-get install python3-pip -y install the pip which is the python package manager, RUN pip3 install -r requirements.txt installs all the python dependencies inside the requirements.txt file.
- CMD [“/bin/bash”] is executed during the initialization of a container that opens a terminal.
deploy_model.py file
import cherrypy
import traceback
import pandas as pd
from sklearn.datasets import load_iris
from sklearn.utils import all_estimators
from sklearn.model_selection import train_test_split
from sklearn.metrics import accuracy_score, f1_score


class TrainIris:

    @cherrypy.expose()
    @cherrypy.tools.allow(methods=['GET', 'POST'])
    @cherrypy.tools.json_out()
    def train_iris_data(self, model='RandomForestClassifier'):

        try:
            # accepts only classifiers in
            # sklearn
            classifiers = TrainIris.get_all_estimators('classifier')
            if model not in classifiers:
                return {
                    'training_status': 'failure',
                    'reason': (f'Invalid model provided `{model}`. '
                               'Provide sklearn models only.')
                }

            self.estimator = classifiers[model]()
            # get the training and testing data
            x_train, x_test, y_train, y_test = self.get_train_and_test_data()

            # fit the model
            self.estimator.fit(x_train, y_train)
            y_pred = self.estimator.predict(x_test)

            # calculate accuracy and f1_score
            acc_score = accuracy_score(y_test, y_pred)
            f1 = f1_score(y_test, y_pred, average='macro')

            return {
                'training_status': 'success',
                'model': f'{model}',
                'accuracy_score': acc_score,
                'f1_score': f1
            }

        except Exception as e:
            return {
                'training_status': 'failure',
                'reason': f"{e}"
            }

    @cherrypy.expose()
    @cherrypy.tools.allow(methods=['POST'])
    @cherrypy.tools.json_in()
    @cherrypy.tools.json_out()
    def predict(self):

        if not hasattr(self, 'estimator'):
            return {
                'prediction_status': 'failure',
                'reason': 'Model has not been trained yet. Train the model first'
            }
        try:
            request_json = cherrypy.request.json
            if len(request_json.keys()) < 4:
                return {
                    'prediction_status': 'failure',
                    'reason': ('Some column is missing in the provided data. '
                               'Recheck the data.')
                }

            for k in request_json.keys():
                if k not in self.feature_names:
                    return {
                        'prediction_status': 'failure',
                        'reason': f'The column `{k}` is not in data.'
                    }

            req_json = [request_json]
            # convert the data to data frame and predict
            data_to_predict = pd.DataFrame(req_json)
            prediction = self.estimator.predict(data_to_predict)
            prediction_prob = self.estimator.predict_proba(data_to_predict)
            prediction_str = self.target_names[prediction[0]]
            probability = prediction_prob[0][prediction[0]]

            return {
                'prediction_status': 'success',
                'model': f"{self.estimator.__class__.__name__}",
                'prediction': f"{prediction_str}",
                'prediction_probability': f"{probability}"
            }

        except Exception as e:
            return {
                'prediction_status': 'failure',
                'reason': f'{e, traceback.print_exc()}'
            }

    def get_train_and_test_data(self):
        iris_data = load_iris()
        # separate the data into features and target
        features = pd.DataFrame(
            iris_data.data, columns=iris_data.feature_names
        )
        target = pd.Series(iris_data.target)

        # split the data into train and test
        x_train, x_test, y_train, y_test = train_test_split(
            features, target, test_size=0.2, stratify=target
        )
        self.target_names = iris_data.target_names
        self.feature_names = iris_data.feature_names

        return x_train, x_test, y_train, y_test

    @staticmethod
    def get_all_estimators(type_filter):
        estimators = all_estimators(type_filter=type_filter)
        estimators = dict(estimators)
        return estimators


if __name__ == '__main__':
    cherrypy.server.socket_host = '0.0.0.0'
    cherrypy.quickstart(TrainIris())
How does the above code work?
- The train_iris_data method is exposed by the cherrypy which allows only the get method and returns a JSON.
- The train_iris_data method accepts classifiers of the sklearn module only.
- It takes the iris data and fits the model provided, if no model is provided then it uses Random Forest Classifier by default.
- Once the training is finished it returns the accuracy score and f1_score of the model
- If there is an exception while training it throws an error message in response.
- This is the first method to be called before prediction.
- The predict method is exposed by the cherrypy which allows only the get and post methods and takes in and returns a JSON.
- The features for prediction must be sent in the body of the request in JSON format, where the keys should be the column name and the values are the values to be predicted.
- The predict method should not be called before the train method else it throws you an error.
- If the predict method is finished successfully it returns the prediction and prediction probability of the provided instance.
Building Docker image and running a container
# build a docker image
docker build -t model_deployment .

# run the image as container
docker run -it -p 8080:8080 model_deployment python3 deploy_model.py
docker build command creates a docker image from the instructions in Dockerfile,
- The -t flag in the command denotes the tag name, in our case it is model_deployment
- The ‘.’ at the end of the command denotes that the Dockerfile is in the current directory
docker run command runs the created image,
- The -it flag in the command denotes that the container is going to be executed in the foreground interactively.
- The -p flag denotes port forwarding, which means the machine’s port is mapped to the container’s port.
- model_deployment in the command is the image that we’ve created
- Finally, python3 deploy_model.py is the command that is executed to start the cherrypy engine. This command overrides the CMD layer in the Dockerfile.
Once the container is up and running do the following instructions to train and obtain predictions of the model.
The training model and obtaining predictions
import requests

# train the model
train_response = requests.get(
    'http://0.0.0.0:8080/train_iris_data?model=LogisticRegression'
)
print(train_response.text)
# Output
# '{"training_status": "success", "model": "LogisticRegression",
# "accuracy_score": 0.9, "f1_score": 0.899749373433584}'

# obtain predictions
prediction_response = requests.post(
    'http://0.0.0.0:8080/predict',
    json={
        'sepal length (cm)': 6.5,
        'sepal width (cm)': 3.2,
        'petal length (cm)': 5.1,
        'petal width (cm)': 2.0
    }
)
print(prediction_response.text)
# Output
# {"prediction_status": "success", "model": "LogisticRegression", "prediction": "virginica",
# "prediction_probability": "0.8011622485588459"}
Train the model
Train the model using the API http://0.0.0.0:8080/train_iris_data?model=LogisticRegression, you can change the model in the model parameter. The API accepts only the classifiers of sklearn and don’t forget to make an API call using the GET method. If the training is successful it returns the following output.
‘{“training_status”: “success”, “model”: “LogisticRegression”, “accuracy_score”: 0.9, “f1_score”: 0.899749373433584}’
Obtain Predictions
Obtain predictions of the trained model using the API http://0.0.0.0:8080/predict, in the body of this call you must provide the features that you want to predict in JSON format. This API must be called only after training the data or else it will raise an error message, the API must be called using the POST method. If the prediction is successful it returns the following output.
{“prediction_status”: “success”, “model”: “LogisticRegression”, “prediction”: “virginica”, “prediction_probability”: “0.8011622485588459”}
In this way, you can deploy a model using CherryPy and Docker.
References
[1] CherryPy
[2] Docker
Thank you!
The media shown in this article on Deploying Machine Learning Models leveraging CherryPy and Docker are not owned by Analytics Vidhya and are used at the Author’s discretion.
Machine Learning Engineer @ Zoho Corporation


