This article was published as a part of the Data Science Blogathon.
Introduction
In this article, we are going to discuss machine learning with Spark in Python. Our goal is to build a regression Pipeline that works in Spark and gives a real-time prediction. We will discuss the Spark MLlib package in detail for building a machine learning pipeline.
Our end goal is to build a Car price Predictor using Spark machine learning APIs and perform all required steps.
We will see how spark works and spark’s different classes and ML-lib package in detail. We will also discuss the working of the pipeline and the feature engineering associated with it.
Why Spark?
Spark is an in-memory distributed data processing and computation tool that is performed on big volumes of data. Spark works 100X times faster than Hadoop Map-reduce since map-reduce performs computational and data processing in the disk and that makes it run slower. Various Machine learning pipeline built on Spark runs in real-time on Spark data streaming pipelines.
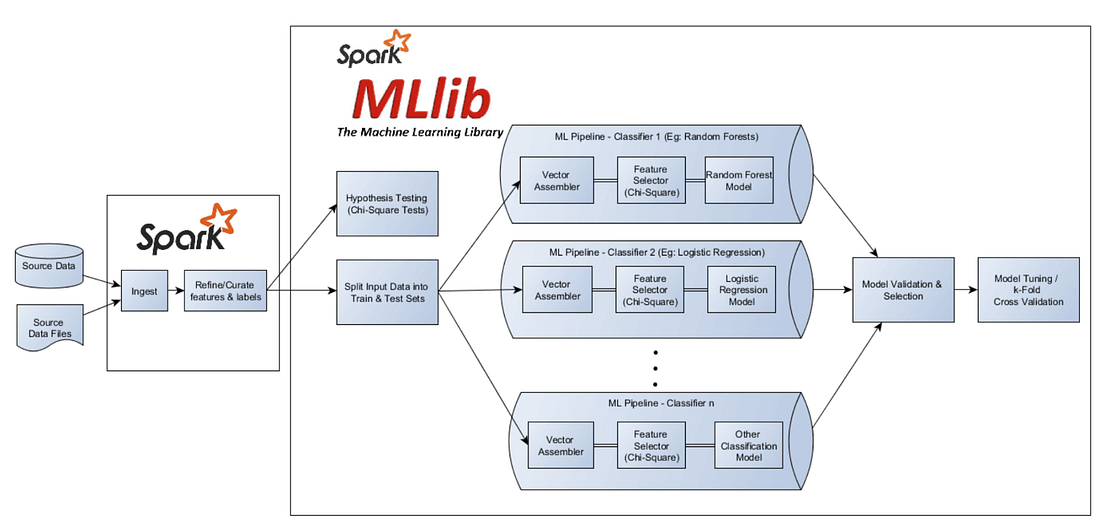
Spark MLlib
Spark Provides a separate package for performing all the machine learning-related tasks. various 3rd party dependencies are also available that work perfectly with spark. Apache Mahout for machine learning has been used in Hadoop Ecosystem, Since Spark is a newer and well-defined tool for big data processing we use spark dependencies for our tasks.
Features of ML-lib package:
Spark’s MLlib is a feature-rich package for performing Machine learning Operations.
- ML-lib contains all the intermediate processing and feature engineering classes required.
- ML-lib supports all types of Supervised learning and clustering algorithms.
- ML-lib can be applied for natural language processing and computer vision.
- ML-lib APIs are similar to
sklearn’sAPIs, hence working with ML-lib are more adaptive for new learners. - Compatible with real-time streaming data.
Goal
In this article, we will be building a car price predictor Pipeline ( a regression task) using Apache Spark in Python
Checkpoints:
- Setting up Spark Environment
- Data loading
- Data Cleaning
- Feature Engineering
- Model Training and Testing
- Performance Evaluation
Setting up Spark Environment
Installation of Spark in a Python environment can be done using pip package manager although I urge you to set up Pyspark in any cloud notebook ie Google Colab, Kaggle, Databricks, etc.
!pip install pyspark
!pip install findspark
import findspark
findspark.init()
Importing Libraries
import pandas as pd
import matplotlib.pyplot as plt
from pyspark.sql import SparkSession
from pyspark import SparkContext, SparkConf
Spark Context and Session
Spark context is the entry point of any Spark Application. To work on Spark, loading the data, we need to create spark context. It is more like creating an object of a class.
from pyspark import SparkContext, SparkConf
# Creating a spark context class
sc = SparkSession.builder.master("local[*]").getOrCreate()
local[*]→ Create a session using all CPU cores available.getOrCreate→ A new session is created if a context is not already been created.
Data Loading
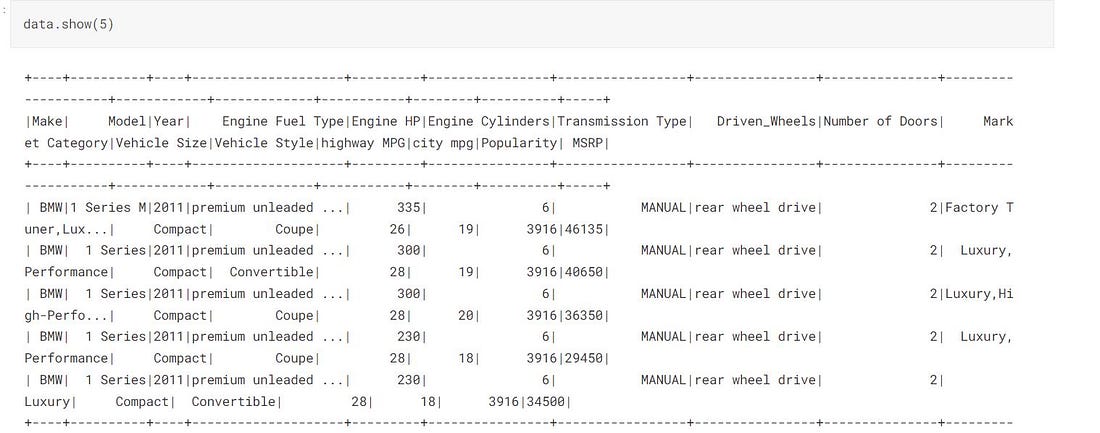
We are importing the car price prediction dataset publically available on kaggle. you can either download the dataset or you can create a cloud notebook and import the dataset without downloading it.
data = sc.read.csv('cars-data/data.csv', inferSchema = True, header = True)
data.show(5)
data.printSchema()
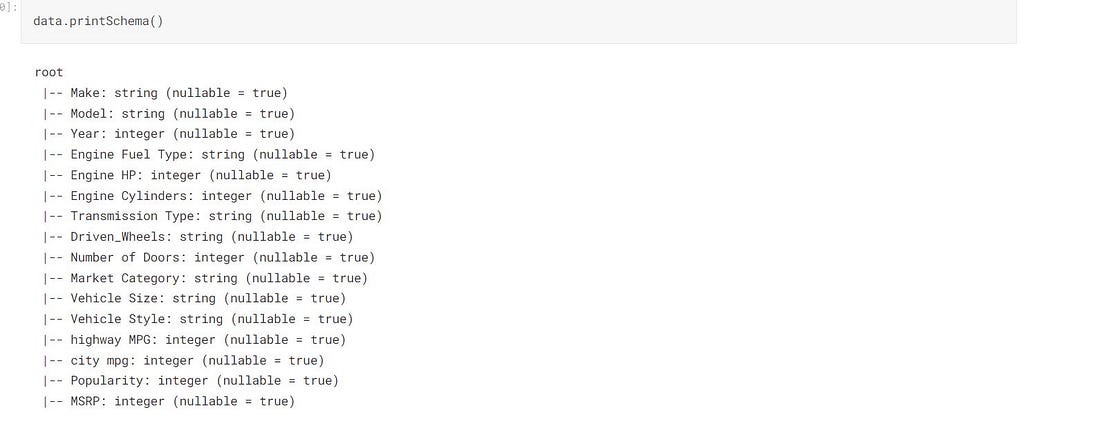
printSchema()Prints the structure of the dataset.inferSchema()It loads the schema of the dataset.
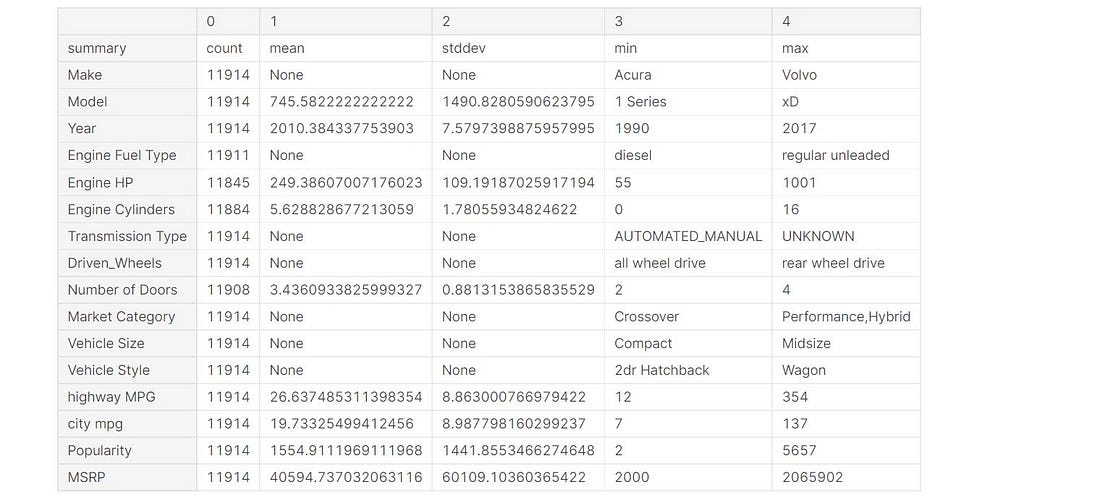
Statistical Analysis
Spark provides built-in classes for statistical analysis as well.
data.describe().toPandas().transpose()
Data Cleaning
Our dataset is containing some “N/A” string values and we want to replace them with the actual NA values.
def replace(column, value):
    return when(column!=value,column).otherwise(lit(None))
The function replace takes a column and values and replaces the matching values with None.
data = data.withColumn("Market Category", replace(col("Market Category"),"N/A"))
NULL values
from pyspark.sql.functions import when,lit,count,isnan,col
data.select([count(when(isnan(c)|col(c).isNull(),c)).alias(c) for c in data.columns]).show()
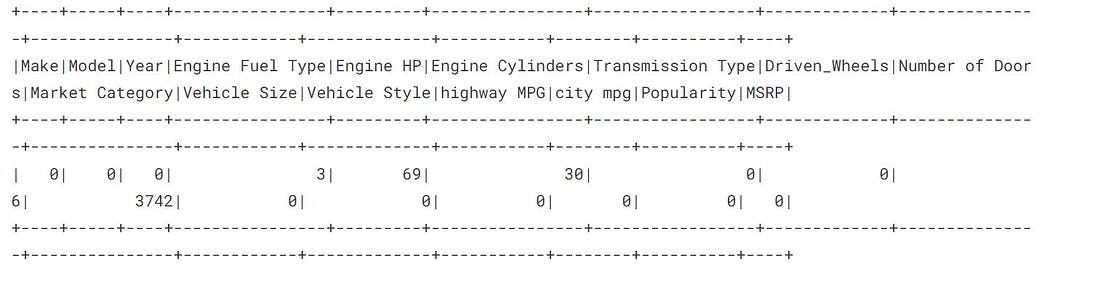
The Market Category has a maximum number of null or nan values which means the Market Category is not significant in our dataset hence we are free to drop this column.
Dropping the NaN values
In Spark, we use the drop method is used to Delete a particular column
#deleting the column Market Category
data = data.drop("Market Category")
# deleting the all null values
data = data.na.drop()
At this stage, we have cleaned our data, and now we start the feature engineering process.
print((data.count(), len(data.columns)))

Feature Vectors in Spark ML-lib
Spark ML-lib accepts our data in the form of Feature Vectors. We convert our regular columns into the Spark feature vectors.
This is done by Using VectorAssembler from the Spark ML-lib class.
We want to pass “Year”,”highway MPG”,”Engine Cylinders”,these columns as input features in our model.
“Number of Doors”,”city mpg”,”Engine HP”,”Popularity”
We want to train our model on the above features, to do that we need to convert our selected features into a Vector.
from pyspark.ml.feature import VectorAssembler
assembler = VectorAssembler(inputCols = ["Year","Engine HP","Engine Cylinders","Number of Doors","Popularity",
                                        "highway MPG","city mpg"],
                           outputCol = "Input Attributes")
outputCol: This is the name of our Feature generated by the training columns in this case.
We are not converting our data into Vectors at this step since we want to create a pipeline hence the pipeline will convert the data into features.
Model and Pipeline.
Spark MLlib provides many inbuilt machine learning models and preprocessing units. we simply need to call them and work on them.
We will use RandomForest Regressor, an ensemble technique for regression.
from pyspark.ml.regression import RandomForestRegressor
regressor = RandomForestRegressor(labelCol = "MSRP",featuresCol = 'Input Attributes')
featuresCol: This is the input feature column namelabelCol: This is the Labelled Column for the training.
Pipeline
A pipeline is a combination of multiple steps performed sequentially. Data goes from one side and comes from the other side.
We can also load our pipeline from the disk and saved it on the disk.
from pyspark.ml import Pipeline
pipeline  = Pipeline(stages = [assembler,regressor])
#--Saving the Pipeline
pipeline.write().overwrite().save("pipeline_saved_model")
Loading the Pipeline
pipelineModel = Pipeline.load('./pipeline_saved_model')
Splitting the data
Splitting the dataset into training and the testing part. We will be training our pipeline on 80% of the data and the remaining will be used for testing purposes.
data_train , data_test = data.randomSplit([0.8,0.2], seed = 123)
Training the Pipeline
This process takes some time depending on the system performance.
Model = PipelineModel.fit(train_data)
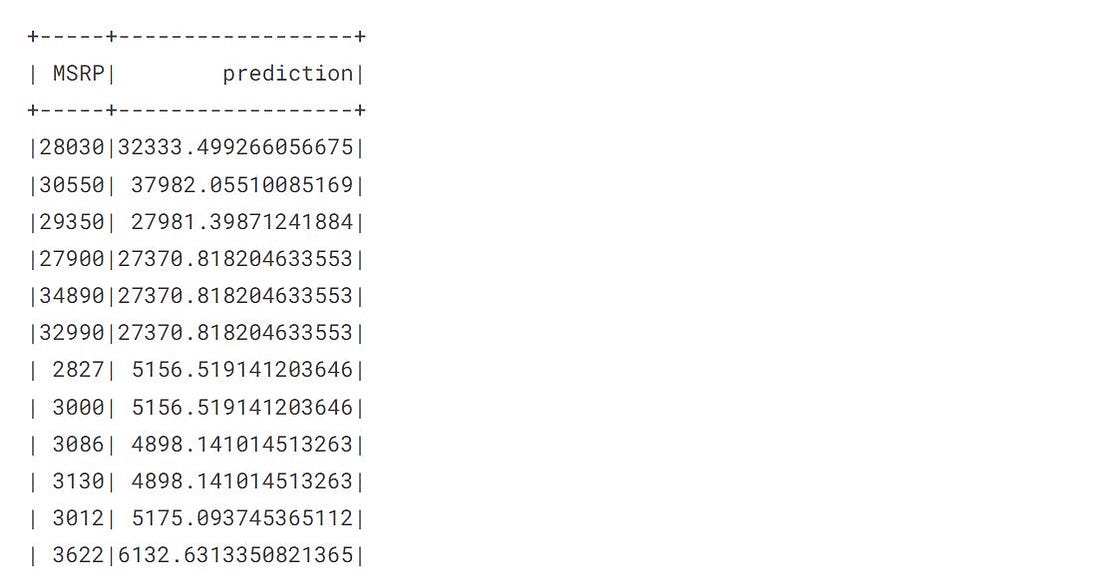
Prediction
In the prediction phase, we test our model on some unseen data.
pred = Model.transform(data_test)
transform method automatically creates a new column named prediction.
Model Evaluation
Spark Provides evaluation metrics for regression and classification tasks.
from pyspark.ml.evaluation import RegressionEvaluator
eval = RegressionEvaluator(labelCol = 'MSRP')
rmse = eval.evaluate(pred, {eval.metricName:'rmse'})
r2 =eval.evaluate(pred,{eval.metricName:'r2'})
Printing the Result
print("RMSE: %.2f" %rmse)
print("MAE: %.2f" %mae)
print("R2: %.2f" %r2)

R2: It indicates the percentage of variance that our model explains. The higher the r2 score better the model.
Conclusion
In this article, we have seen the working of ML-lib and discussed the steps involved in building an ML pipeline in Pyspark. Working with spark ML-lib becomes far easier if the new learners have some basic knowledge of Machine learning models.
- Spark ML-lib provides built-in performance evaluator metrics for classification and regression tasks.
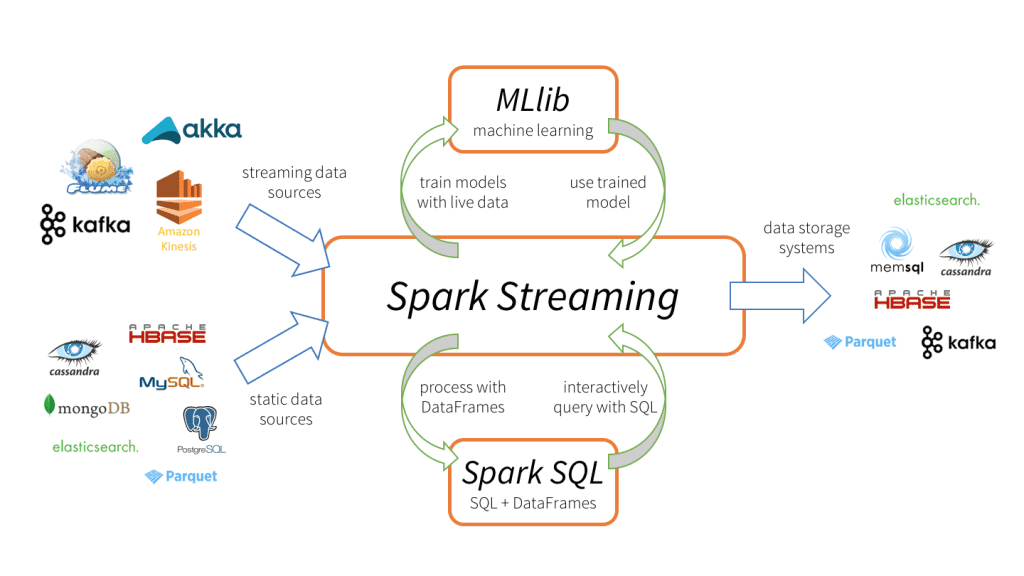
- Spark machine learning pipelines can be fitted with streaming data in order to give real-time predictions.
- Spark ML-lib only works with the feature vectors.
- In our article, we worked with the static dataset and built our model on the static dataset.
- Spark provides an MLlib package that works the same as our Keras and other machine learning packages works.
Machine learning pipelines can be stacked with ETL pipelines to give real-time predictions of our data.
The media shown in this article is not owned by Analytics Vidhya and is used at the Author’s discretion.
A data enthusiast exploring the leading technologies related to the data


